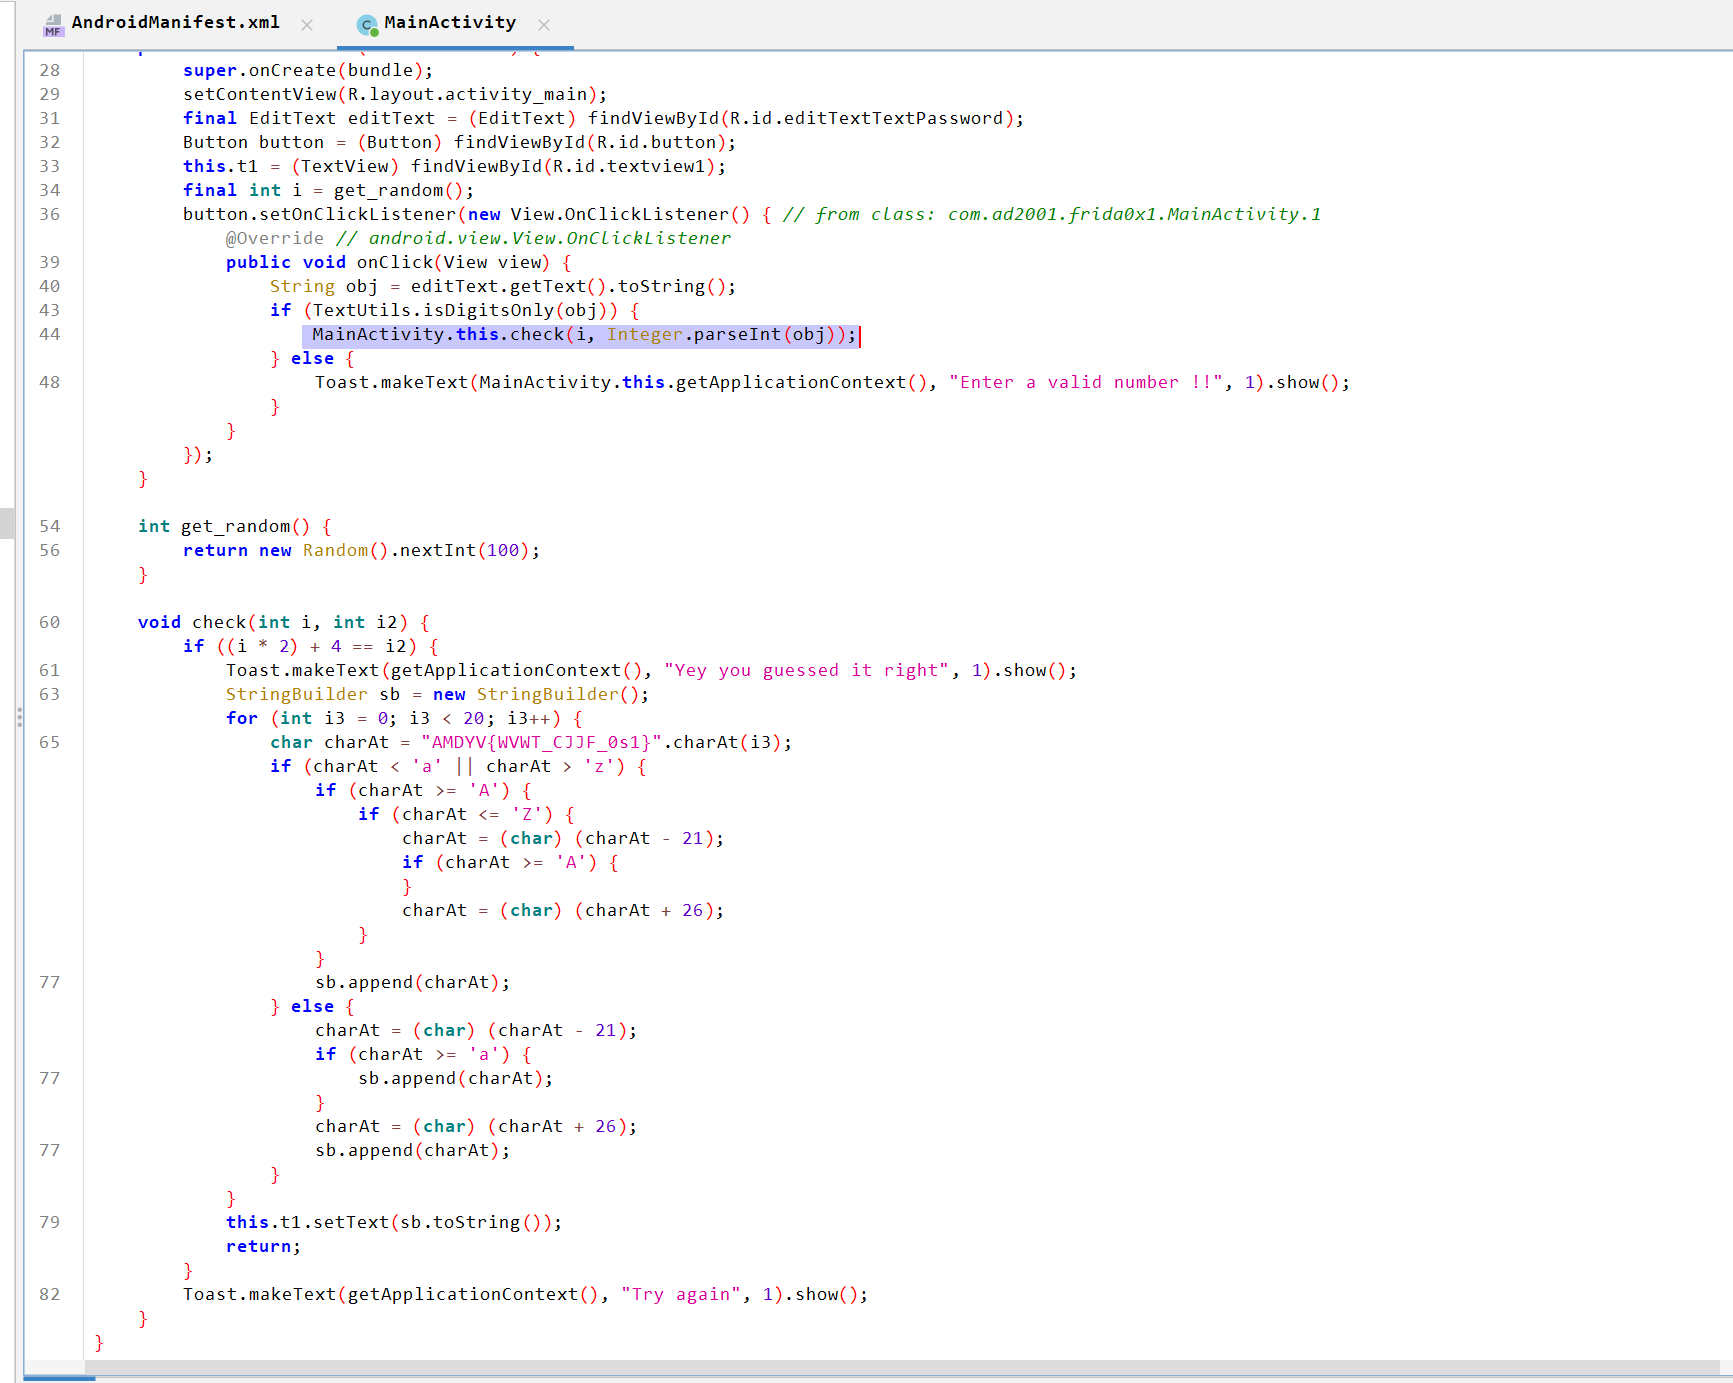
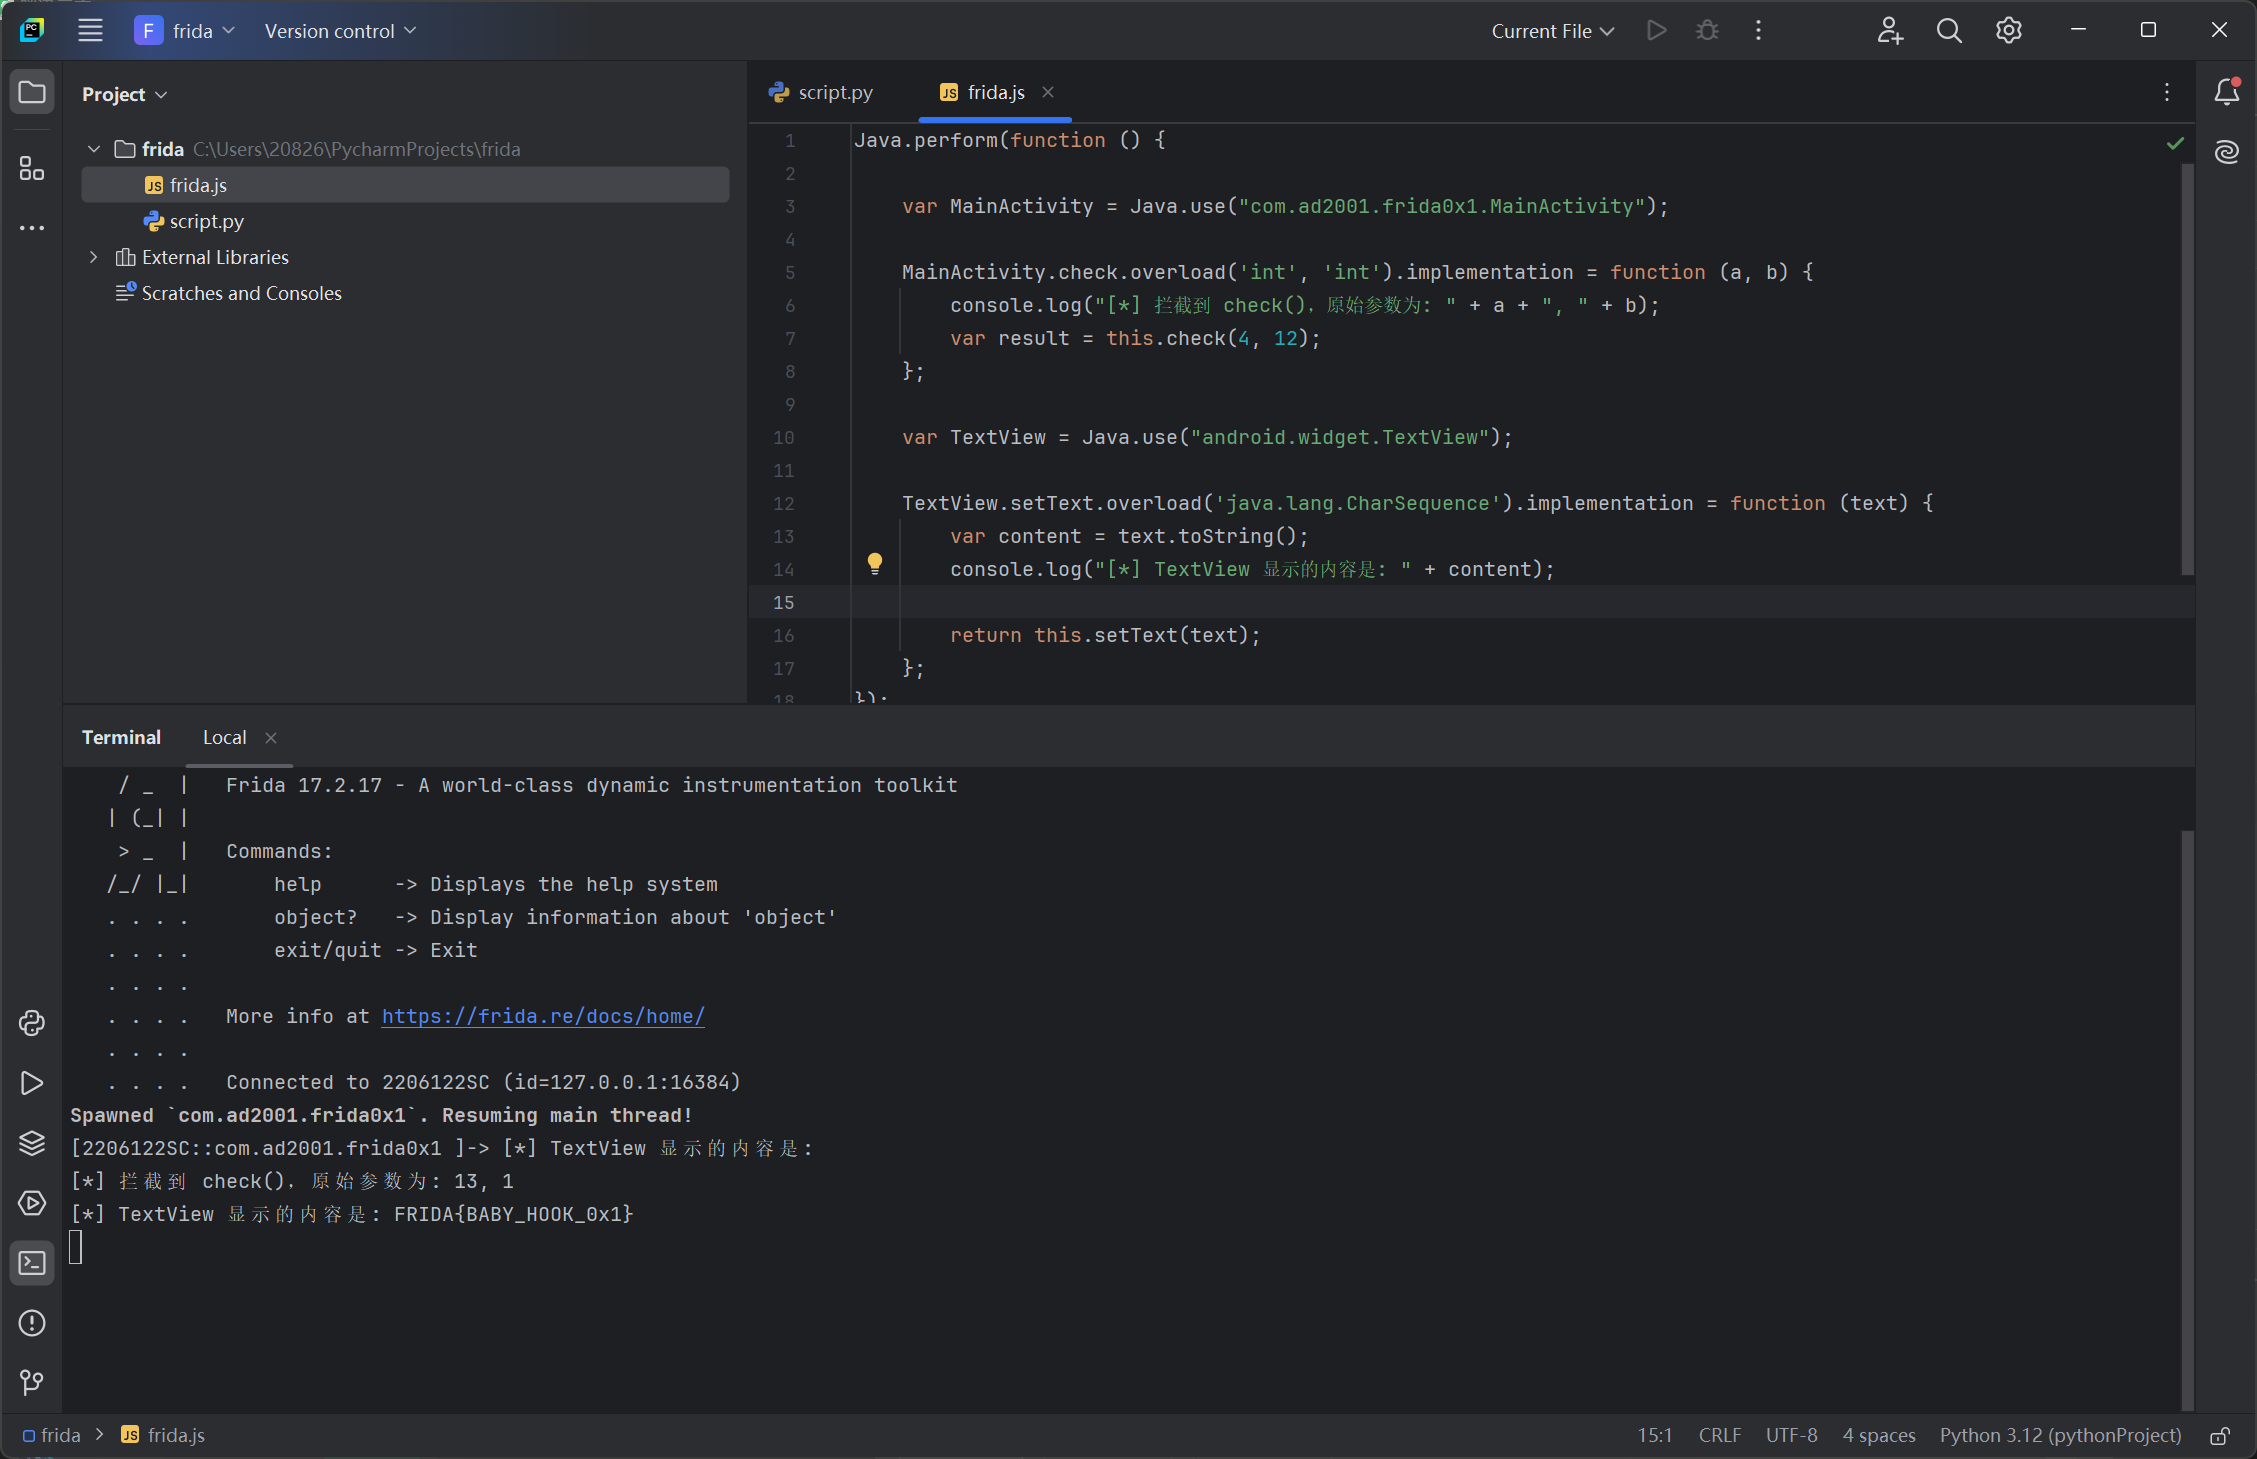
MainActivity.check.overload('int', 'int').implementation = function (a, b) { console.log("[*] 拦截到 check(),原始参数为: " + a + ", " + b); var result = this.check(4, 12); };
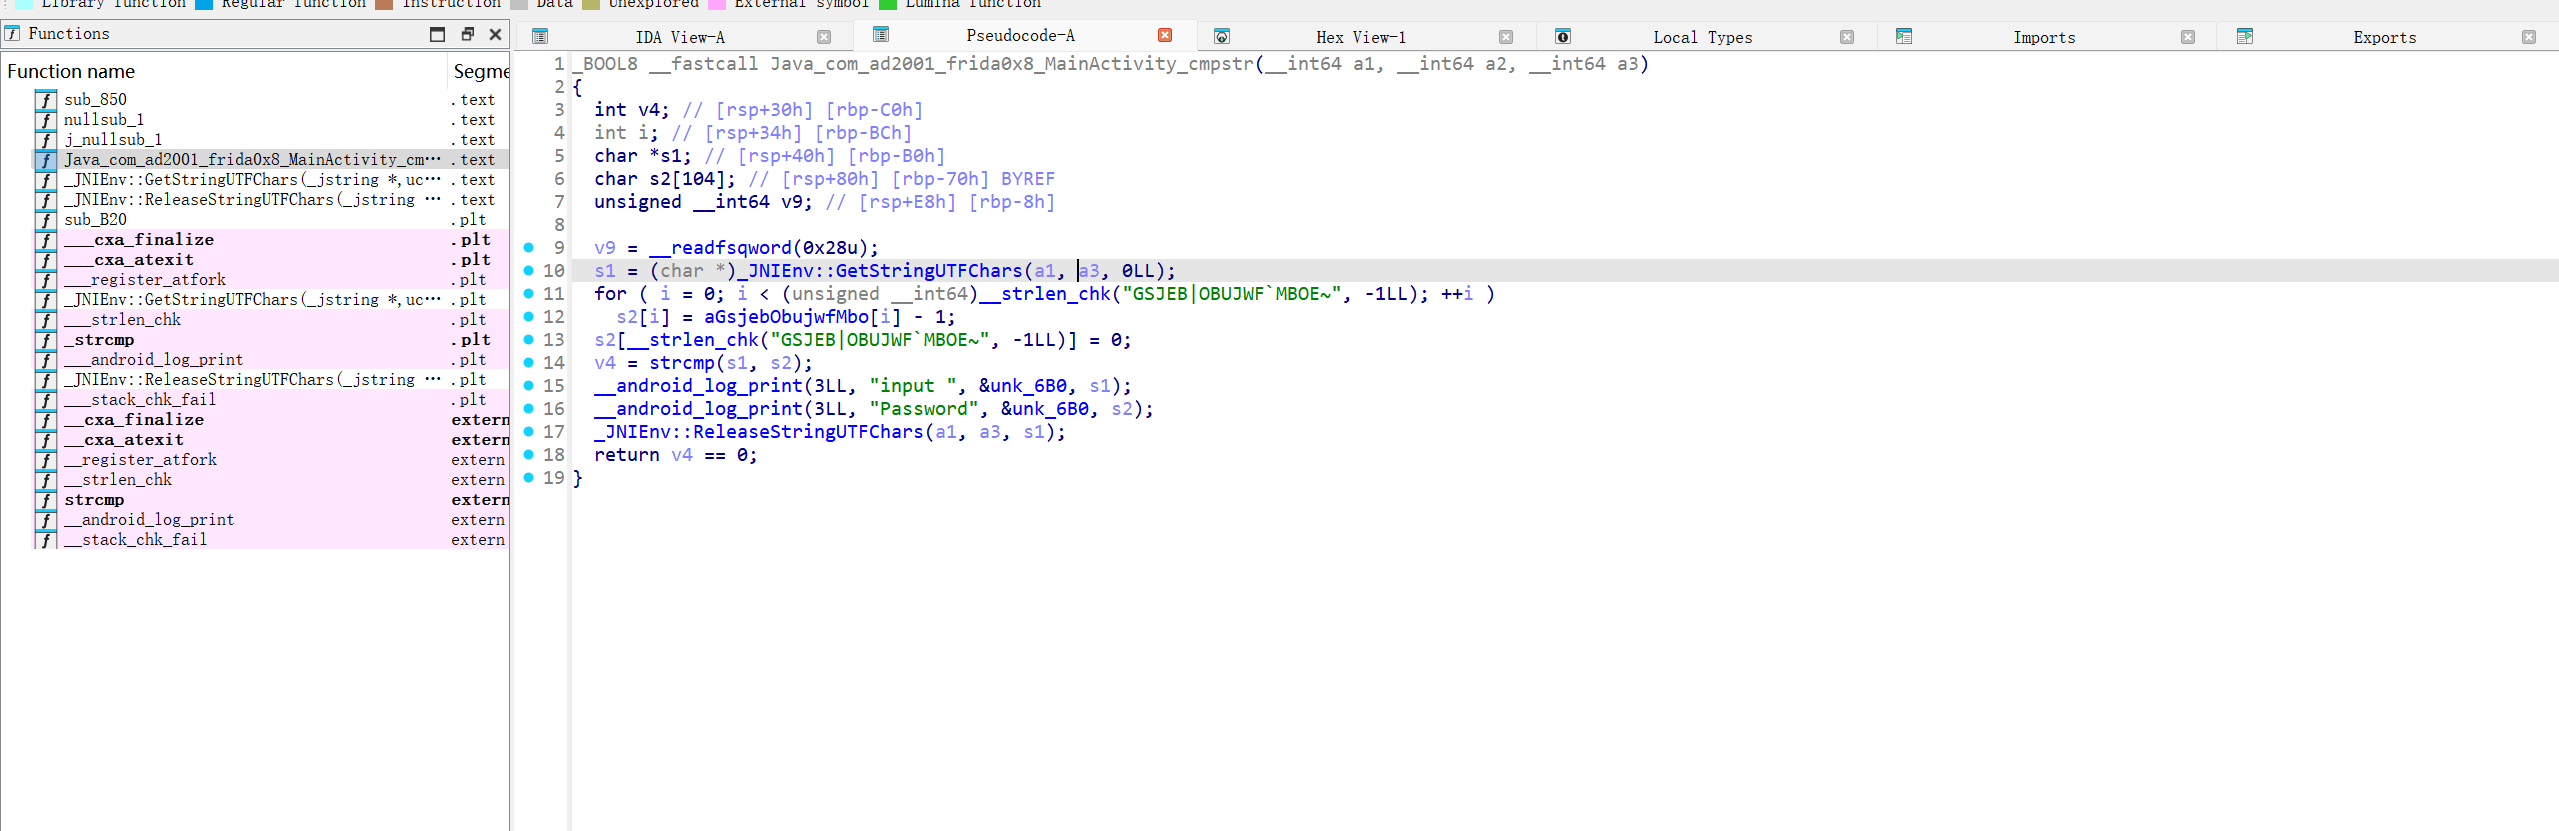
for ( i = 0; i < (unsigned __int64)__strlen_chk("GSJEB|OBUJWF`MBOE~", -1LL); ++i ) s2[i] = aGsjebObujwfMbo[i] - 1;
aGsjebObujwfMbo 数组的内容也是 GSJEB|OBUJWF MBOE~`
对每一个字符串的 ascii 值减一即可得到 flag
1 2 3 4 5
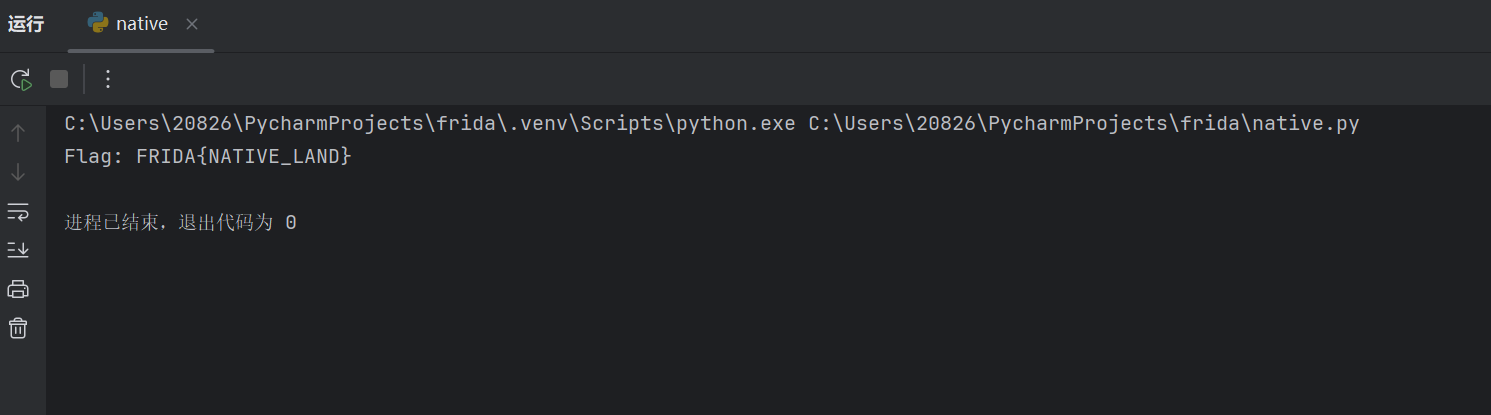
enc = "GSJEB|OBUJWF`MBOE~"
decrypted_str = ''.join([chr(ord(c) - 1) for c in enc])
print("Flag:", decrypted_str)
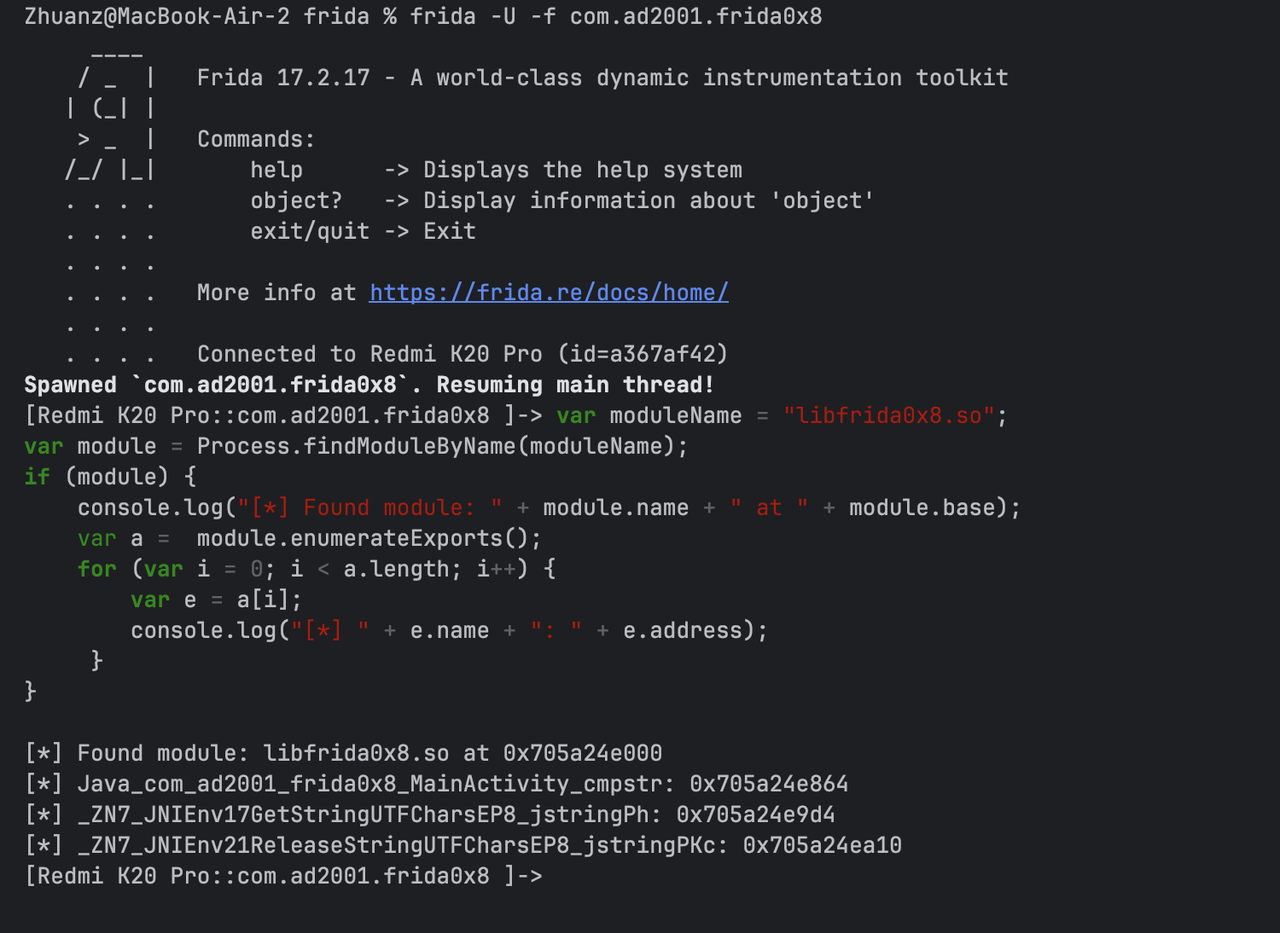
frida 也支持 native 层的 hook
先通过 frida 获取所有导出函数,获取完整的函数签名
1 2 3 4 5 6 7 8 9 10
var moduleName = "libfrida0x8.so"; varmodule = Process.findModuleByName(moduleName); if (module) { console.log("[*] Found module: " + module.name + " at " + module.base); var a = module.enumerateExports(); for (var i = 0; i < a.length; i++) { var e = a[i]; console.log("[*] " + e.name + ": " + e.address); } }
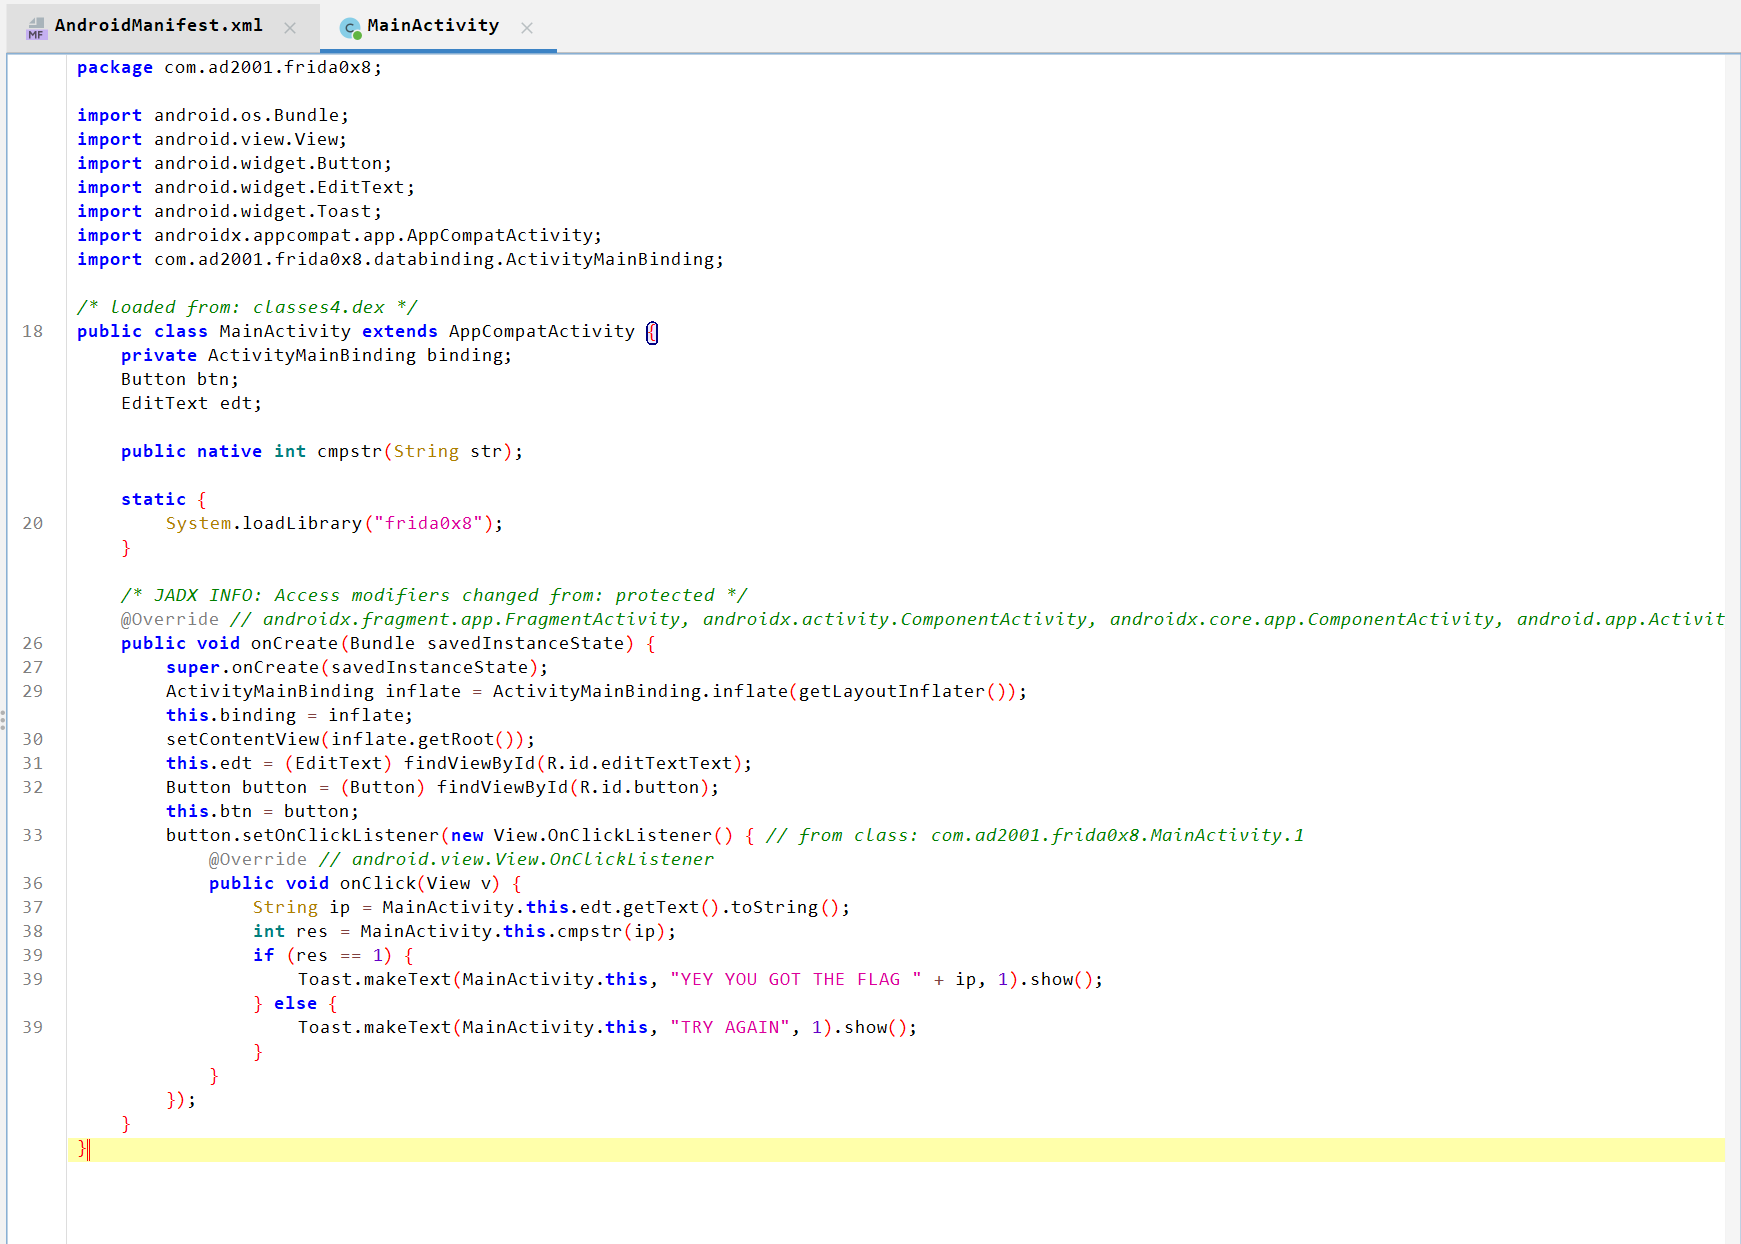
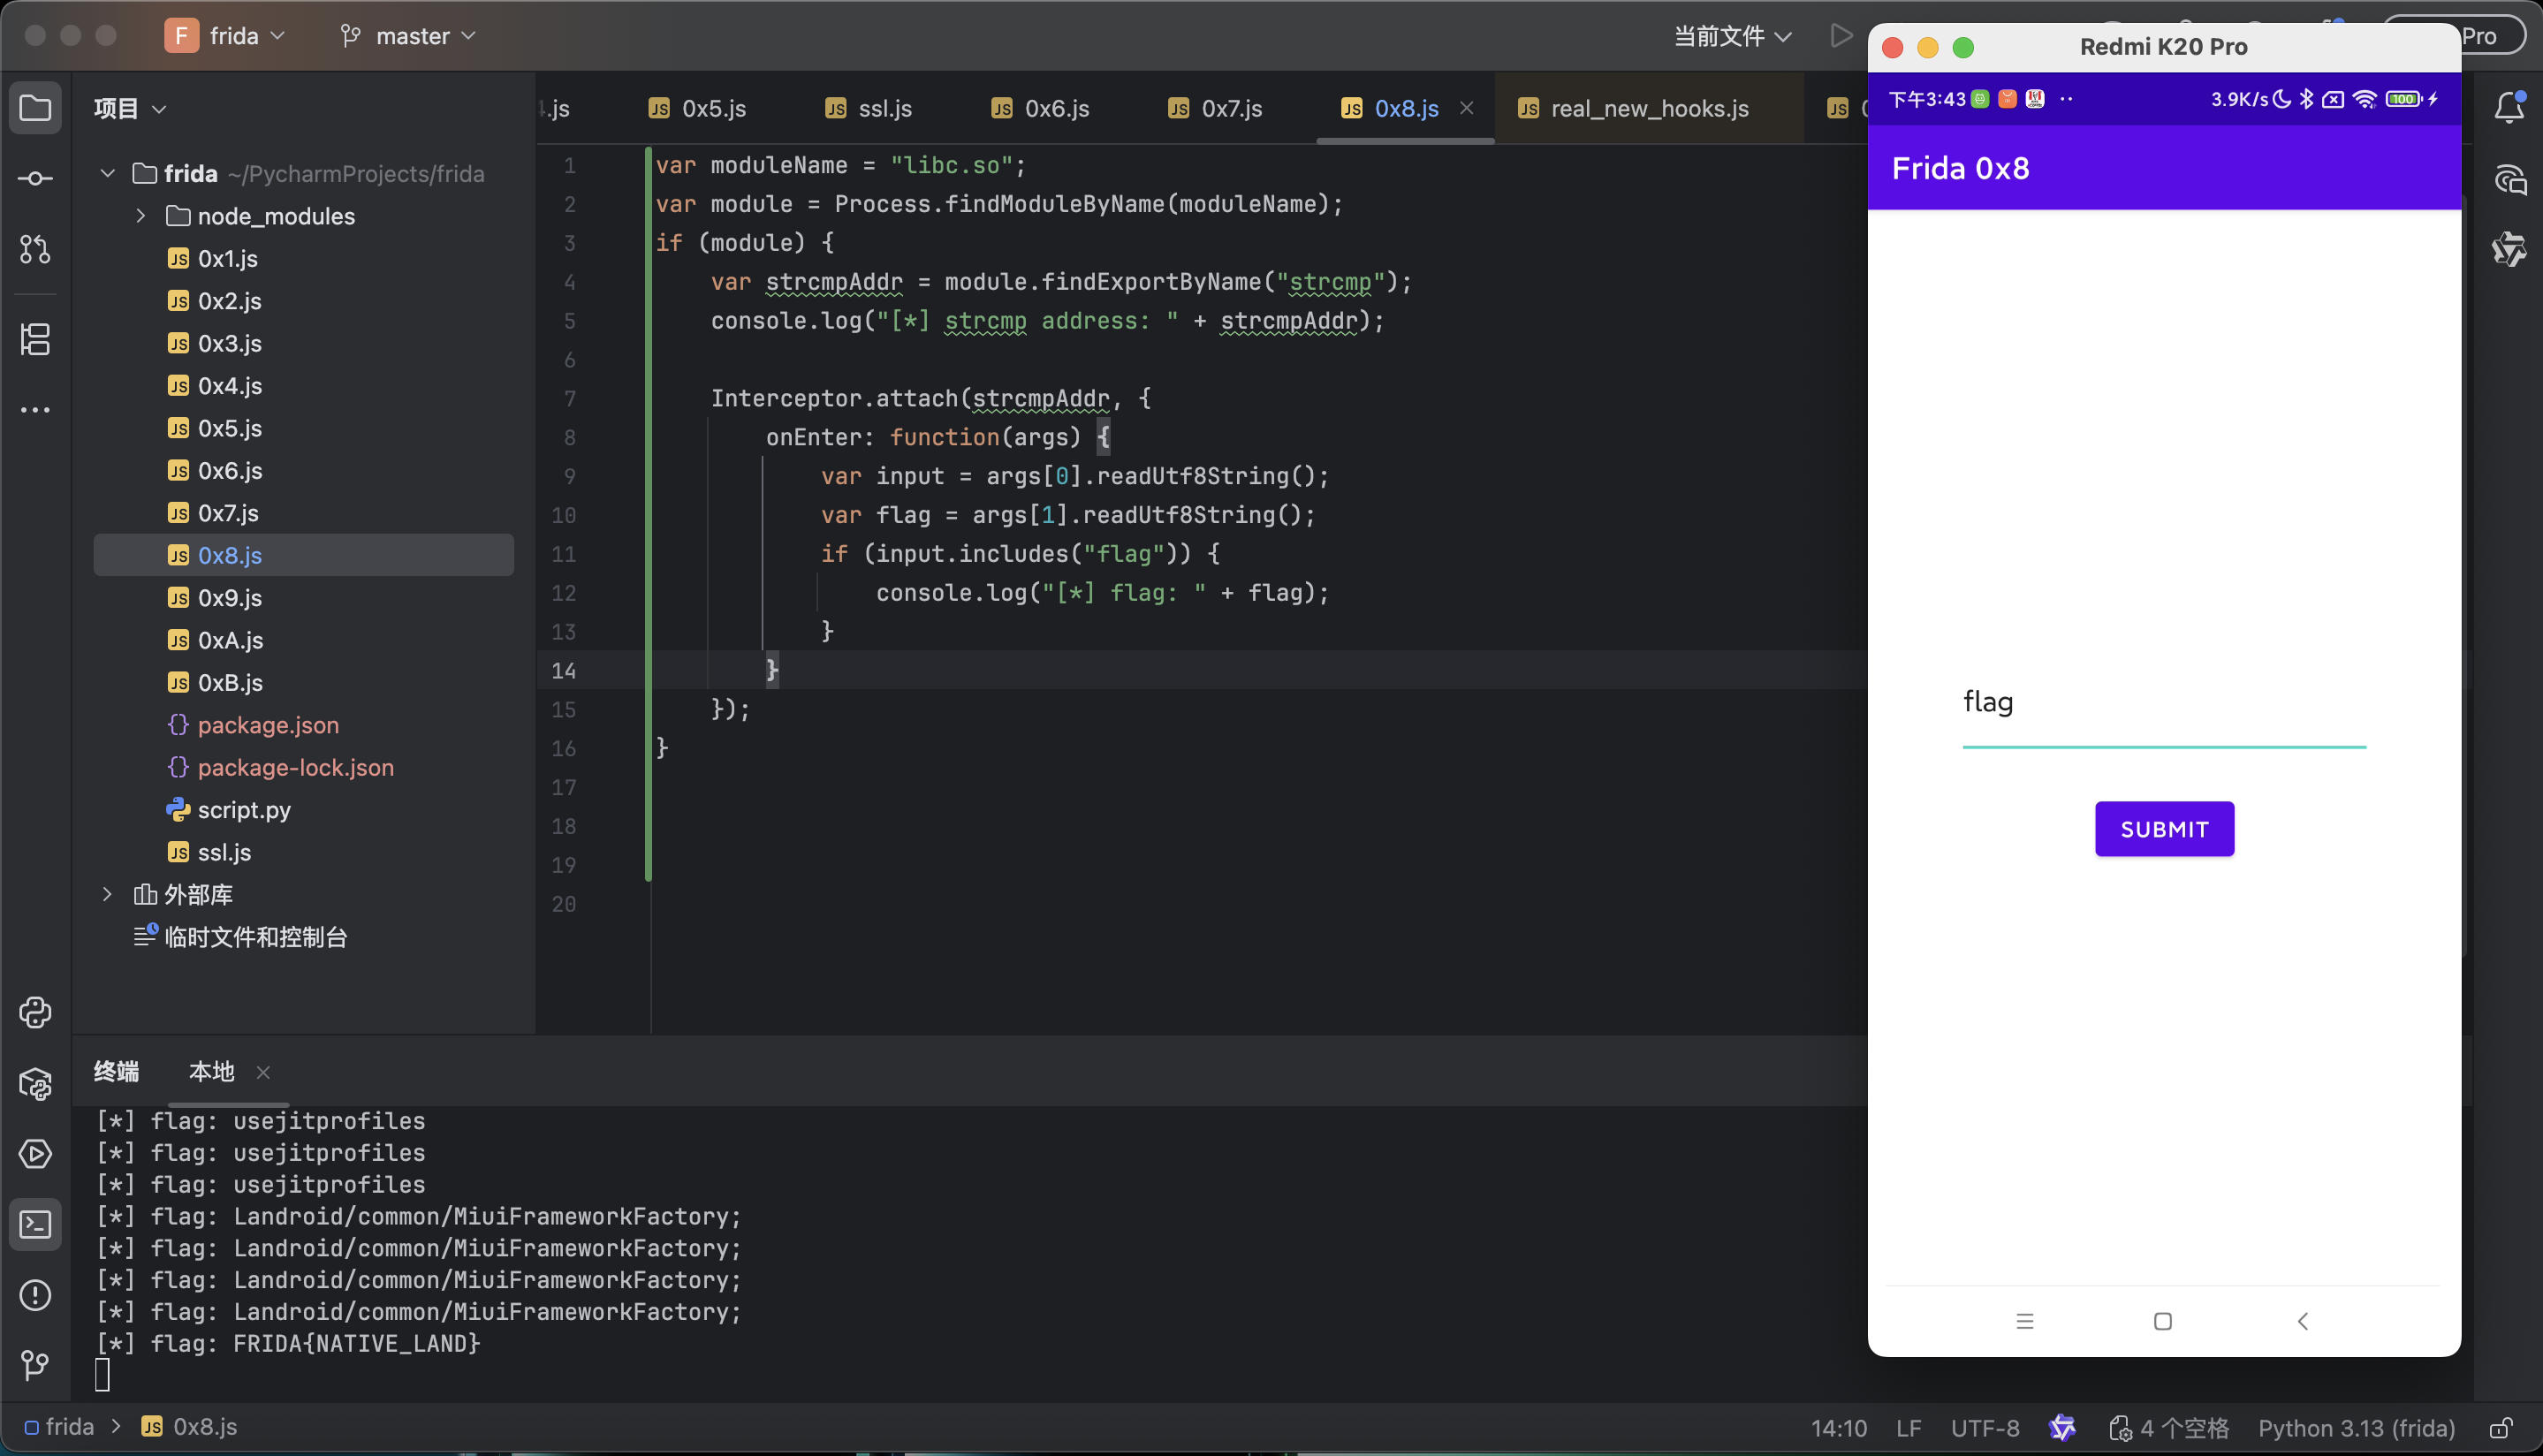
native 层中的主要逻辑是调用 strcmp 将输入的字符串和 flag 比较,所以直接 hook libc.so 中的 strcmp 函数就能直接获取到 flag
1 2 3 4 5 6 7 8 9 10 11 12 13 14 15 16
var moduleName = "libc.so"; varmodule = Process.findModuleByName(moduleName); if (module) { var strcmpAddr = module.findExportByName("strcmp"); console.log("[*] strcmp address: " + strcmpAddr);
Interceptor.attach(strcmpAddr, { onEnter: function(args) { var input = args[0].readUtf8String(); //转换成utf8字符串以免报错 var flag = args[1].readUtf8String(); if (input.includes("flag")) { //只有特定输入值才会打印 以免冗余打印 console.log("[*] flag: " + flag); } } }); }
var moduleName = "liba0x9.so"; varmodule = Process.findModuleByName(moduleName); if (module) { console.log("[*] Found module: " + module.name + " at " + module.base); var a = module.enumerateExports(); for (var i = 0; i < a.length; i++) { var e = a[i]; console.log("[*] " + e.name + ": " + e.address); } }
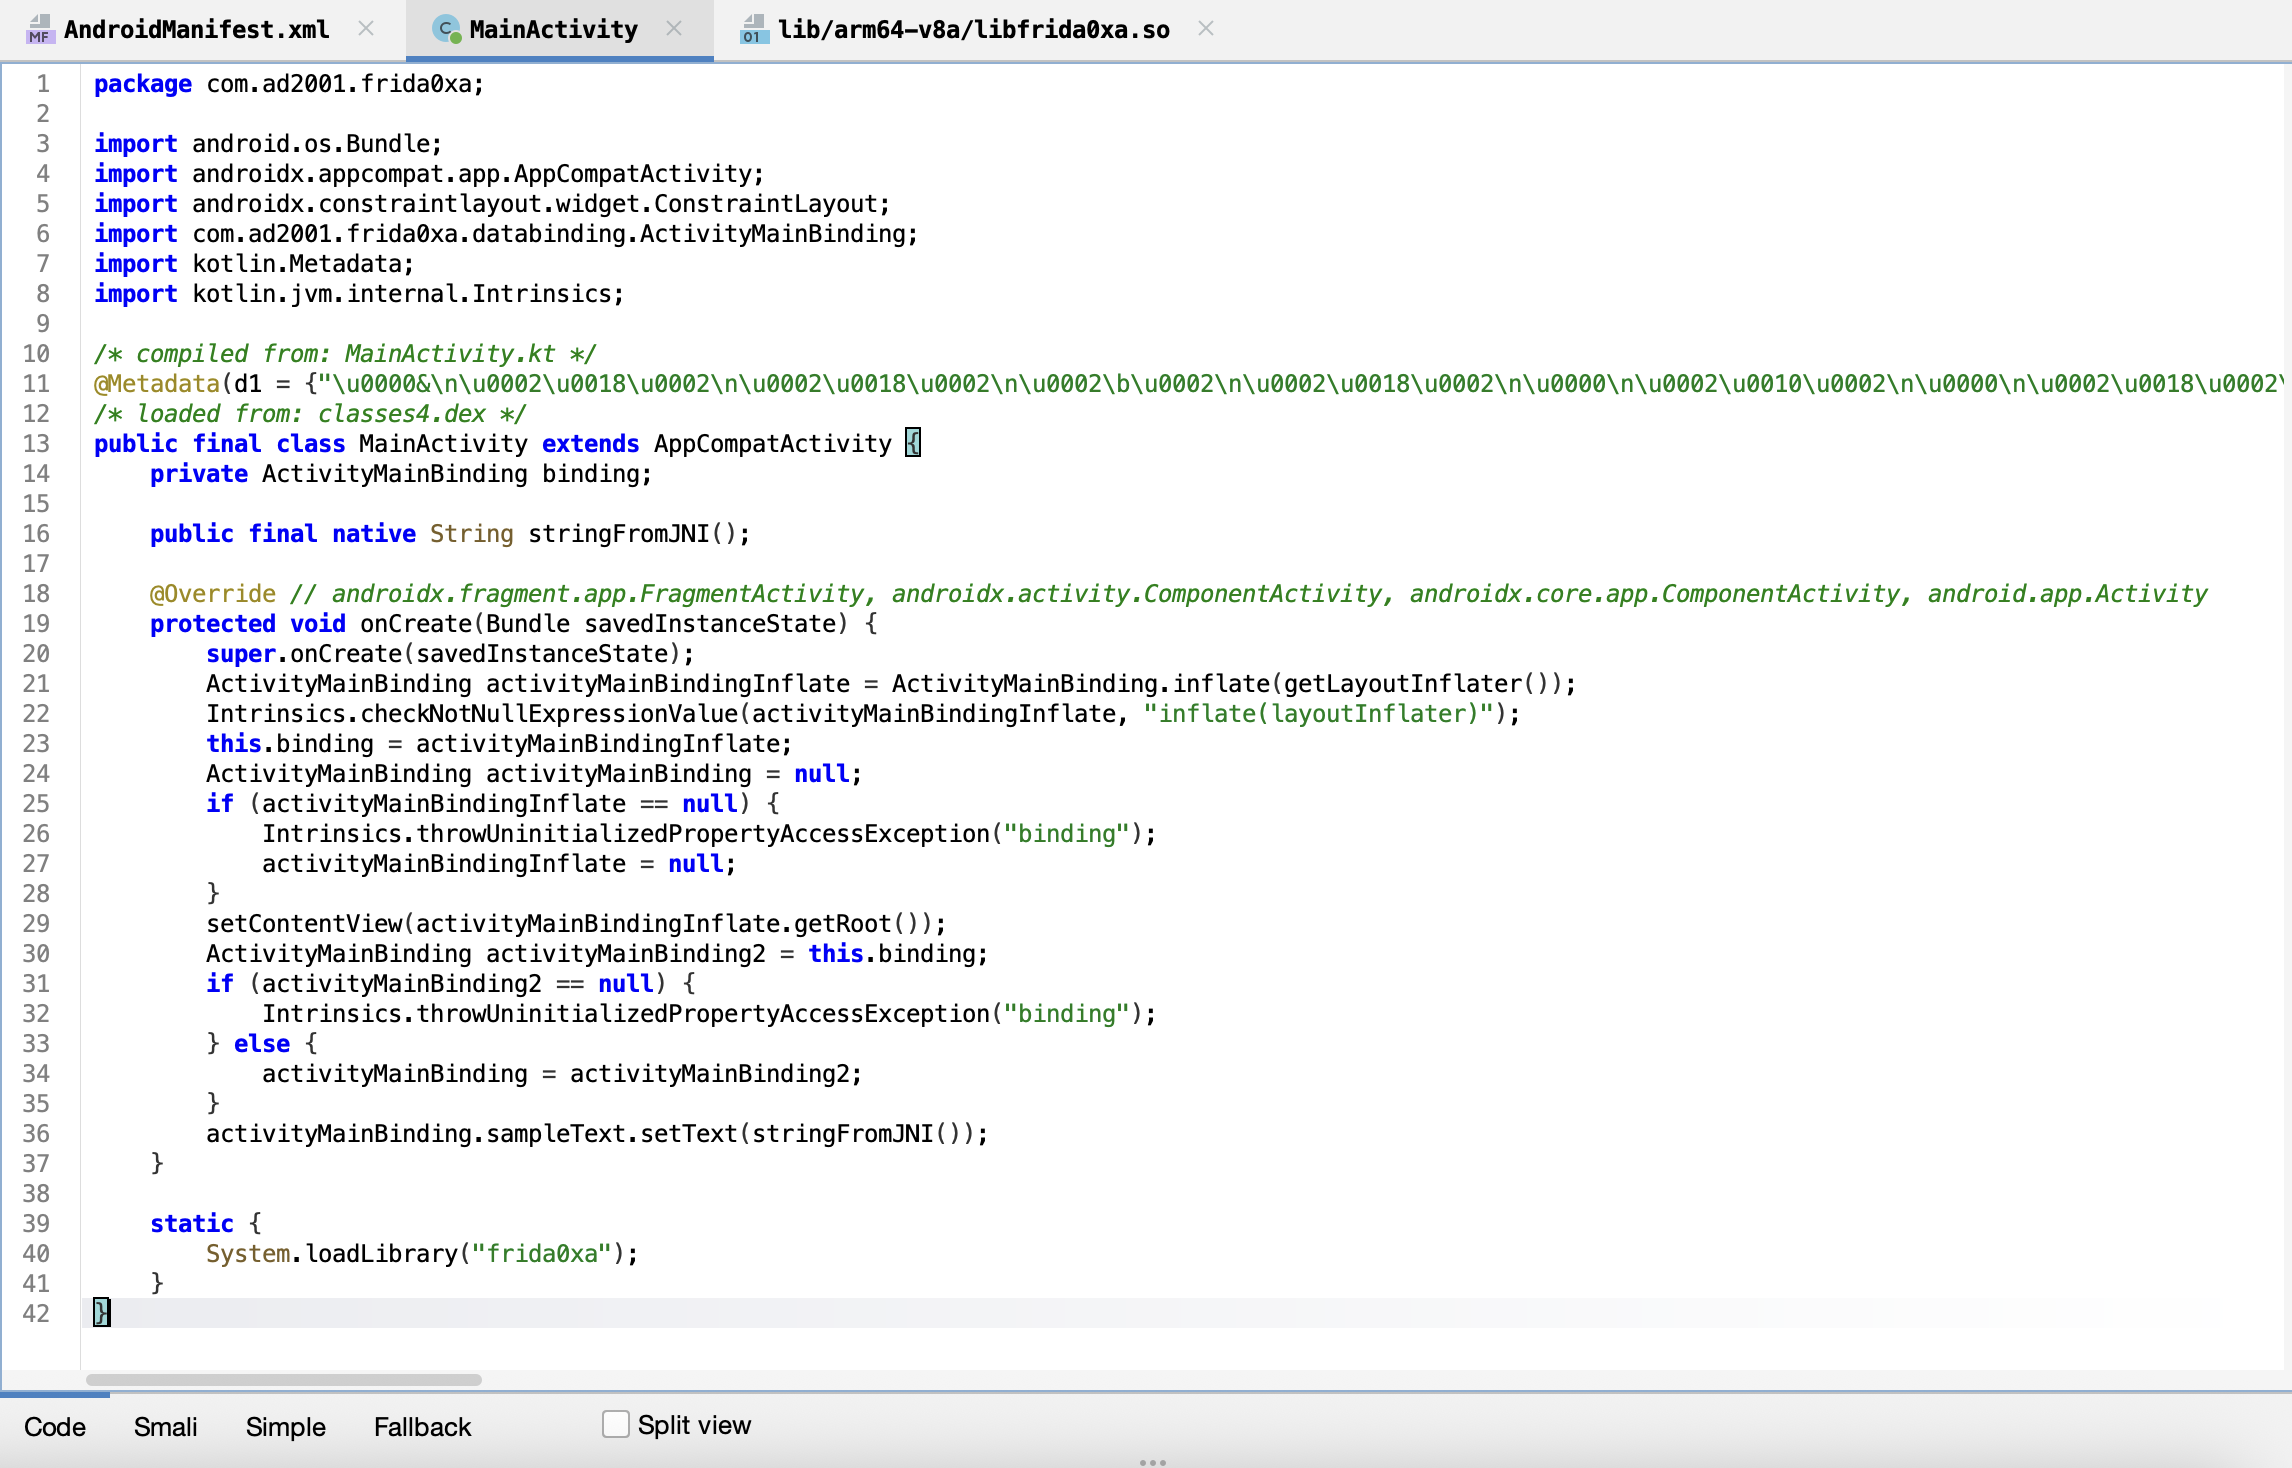
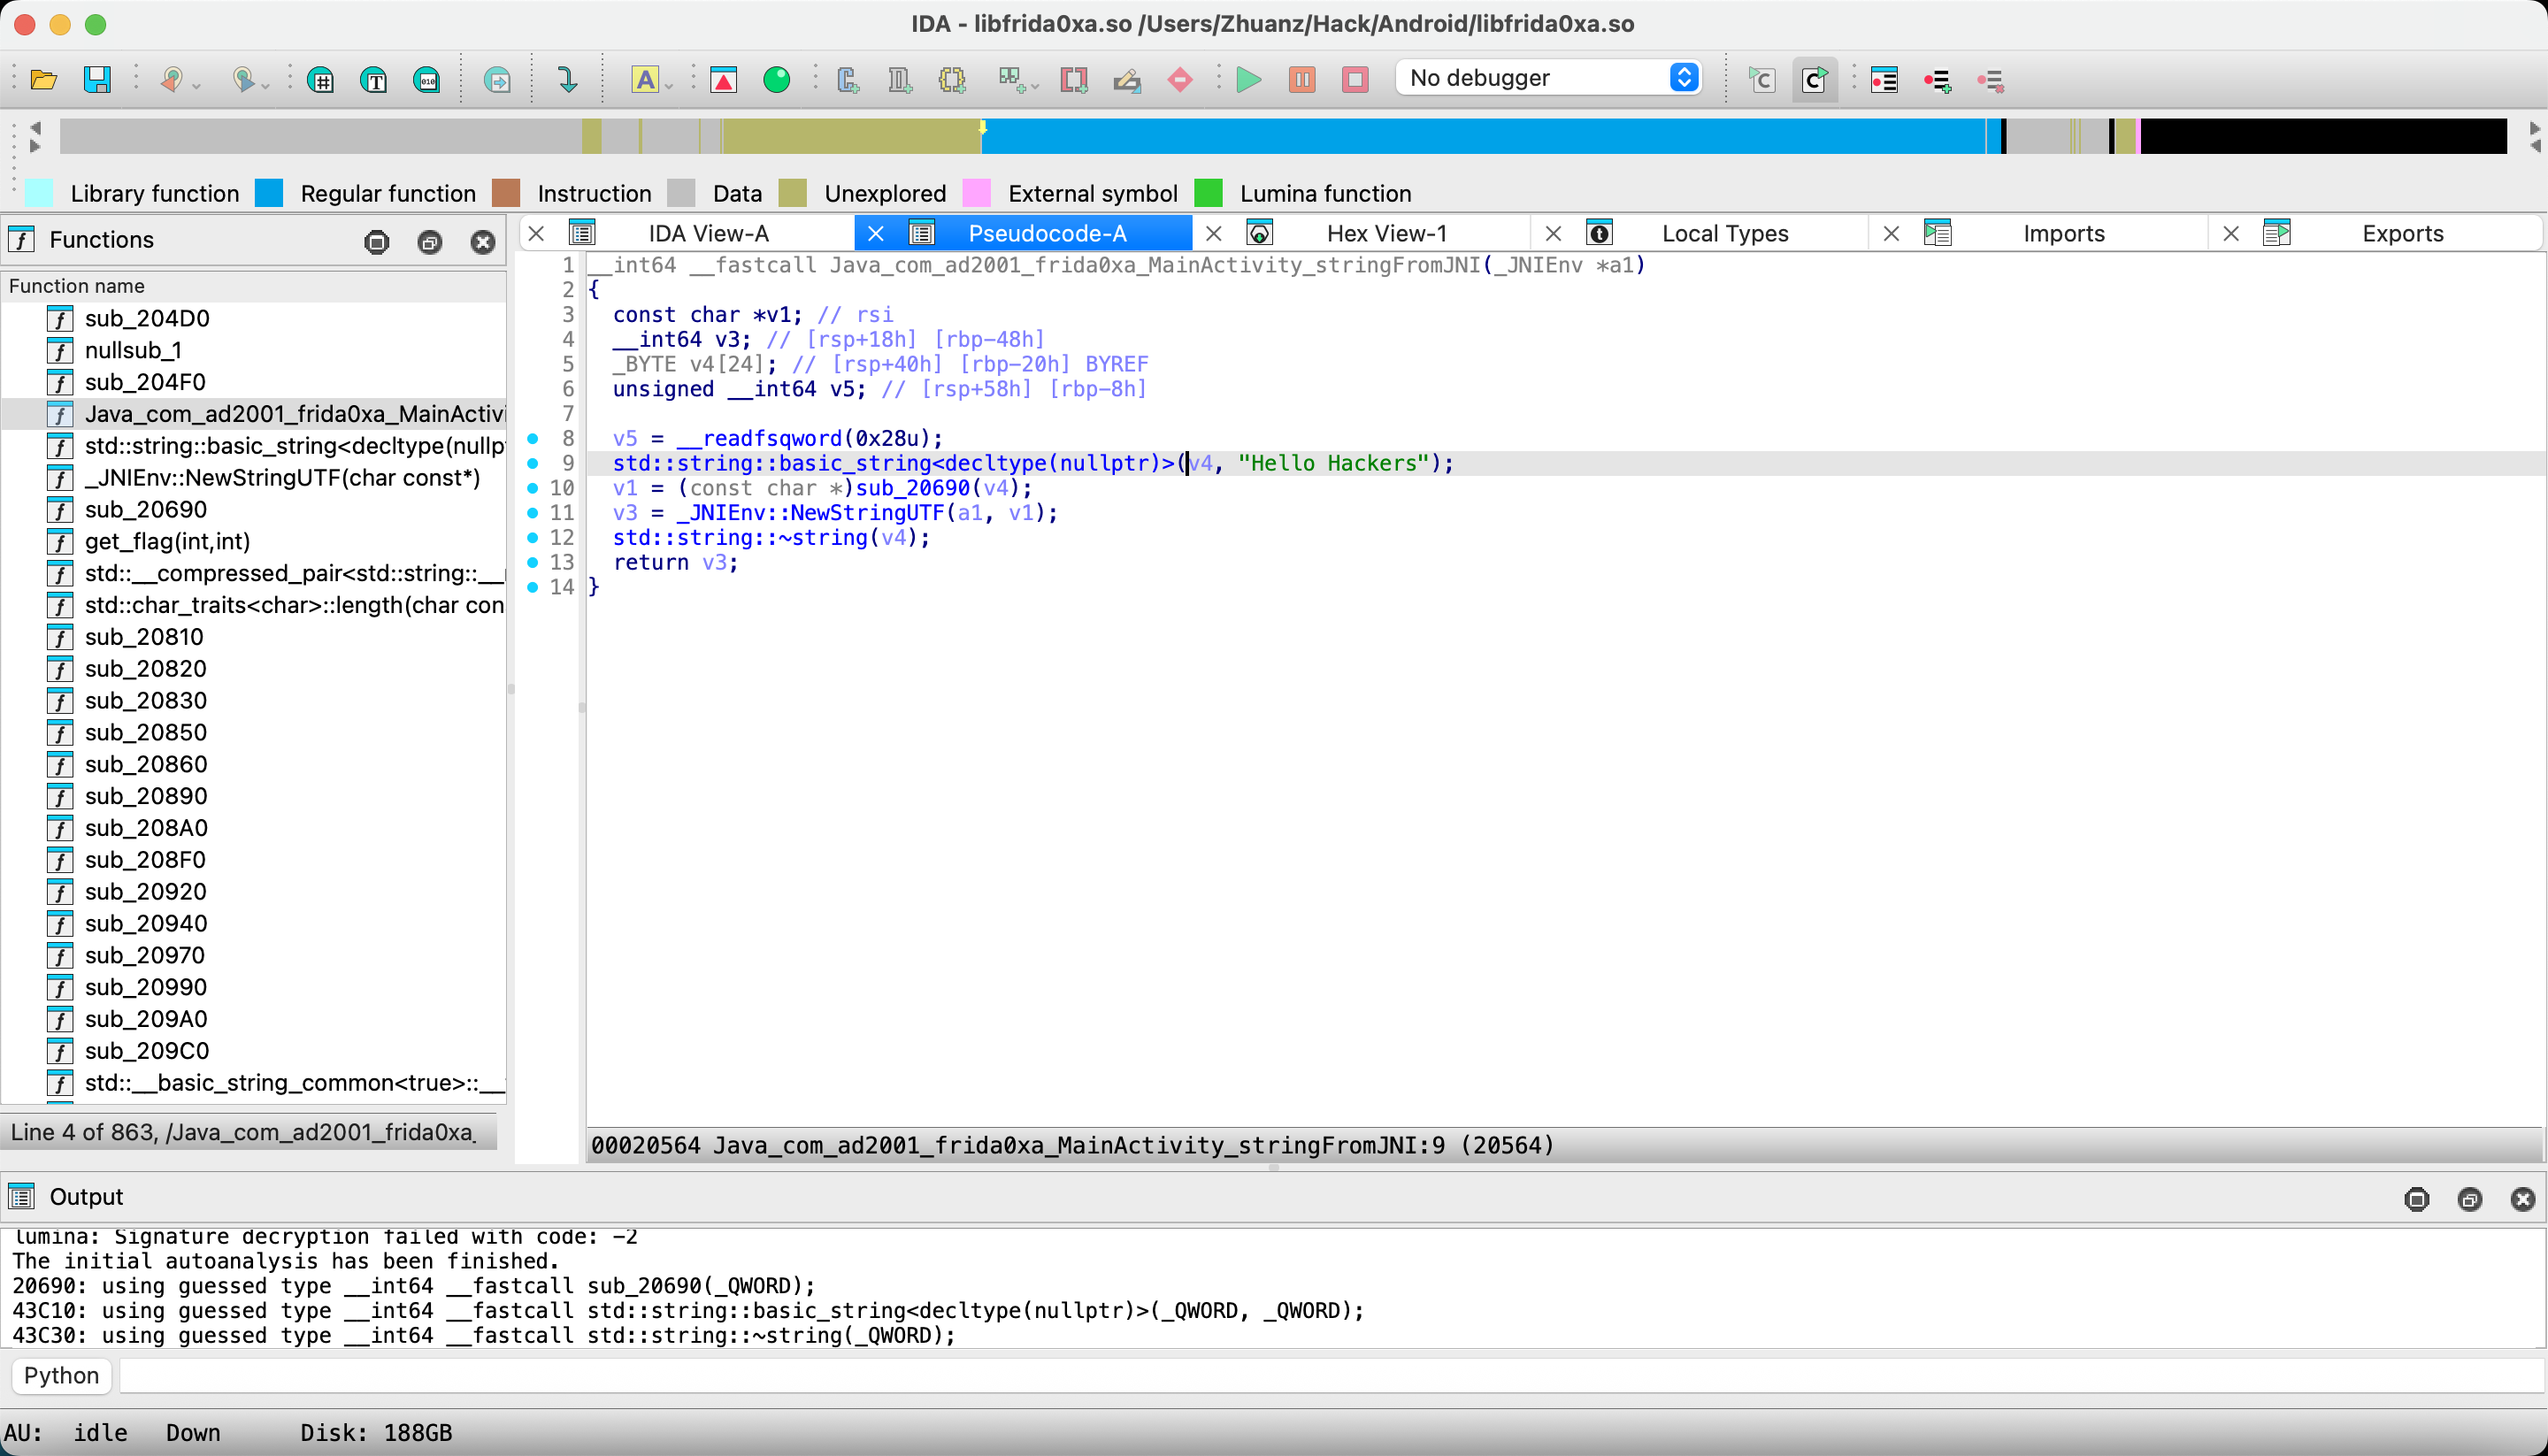
stringFromJNI 函数作用就是把 Hello Hackers 字符串打印出来(建议反编译 x86 架构的 so 文件,arm 架构反编译不出 Hello Hackers 这个字符串)
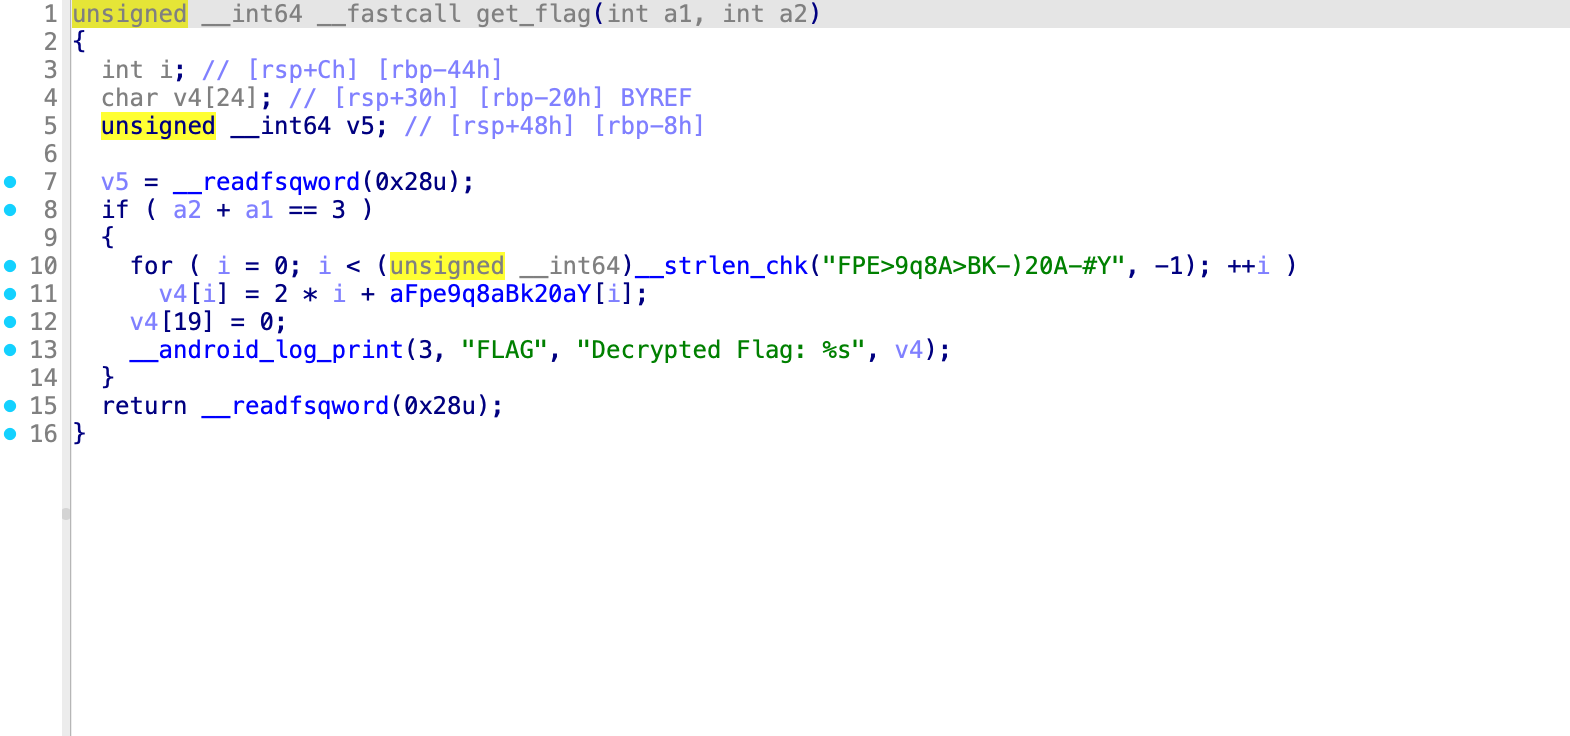
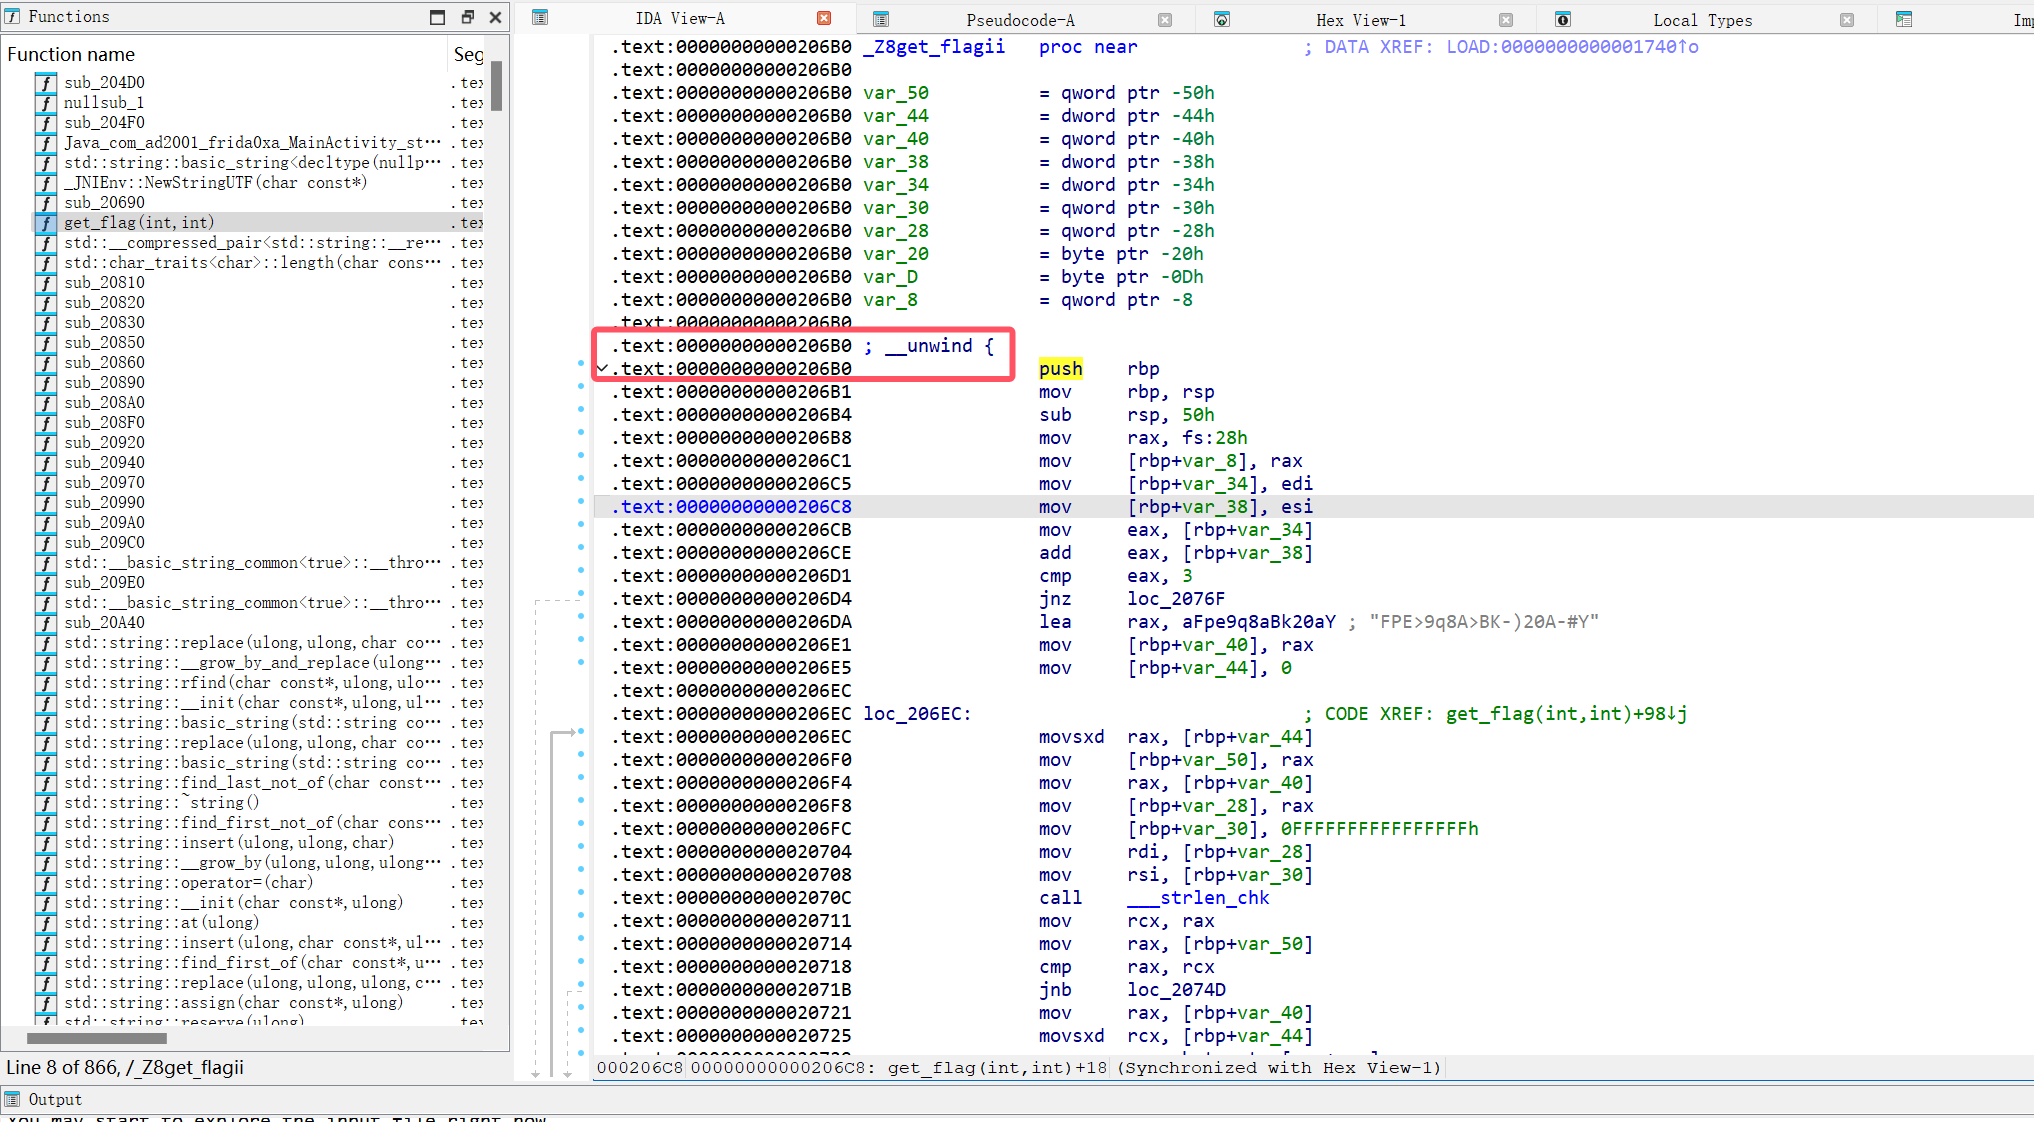
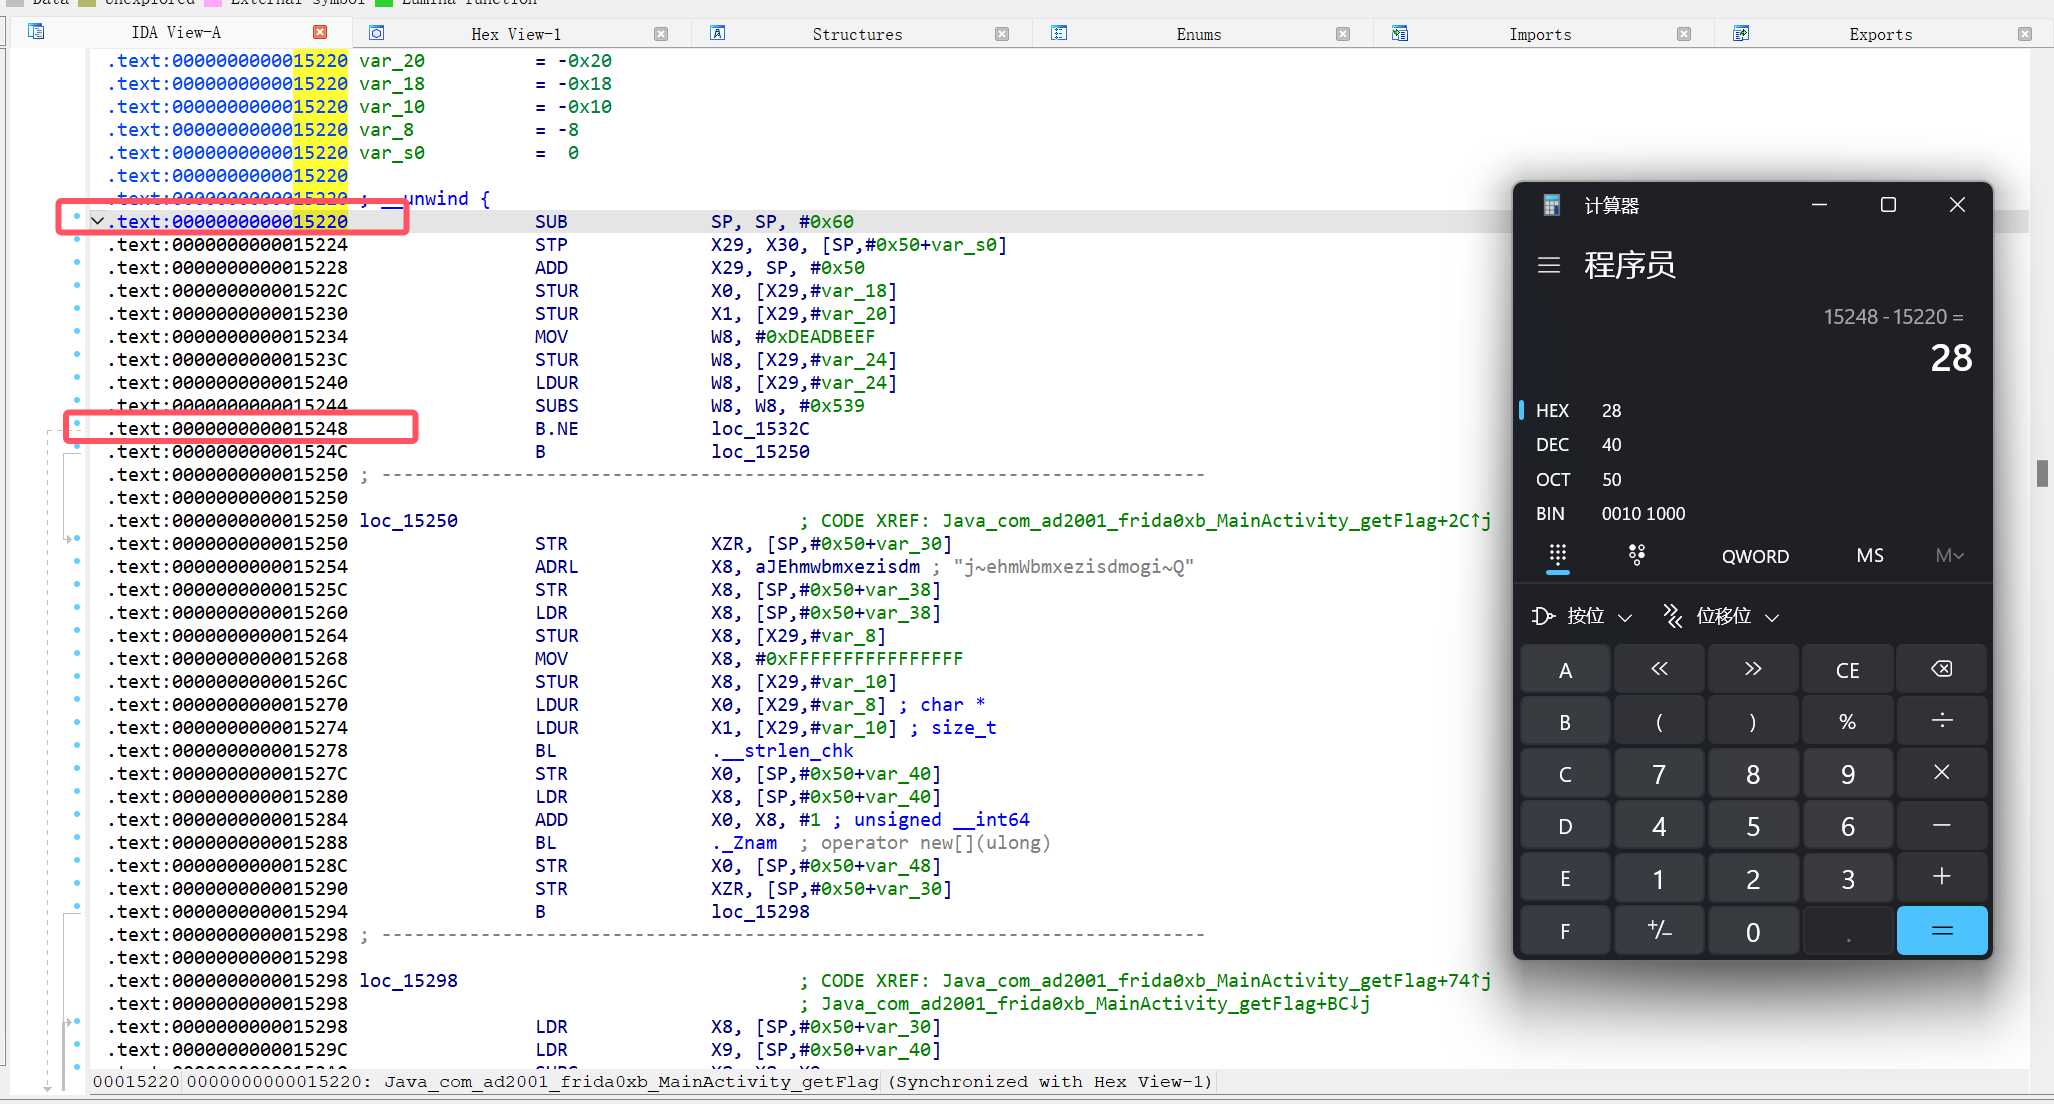
但是在符号表里面还没有被调用过的 get_flag 方法才是真正的 flag 生成逻辑
这个算法很简单就是每个字符的 ASCII 值加上 2 * i
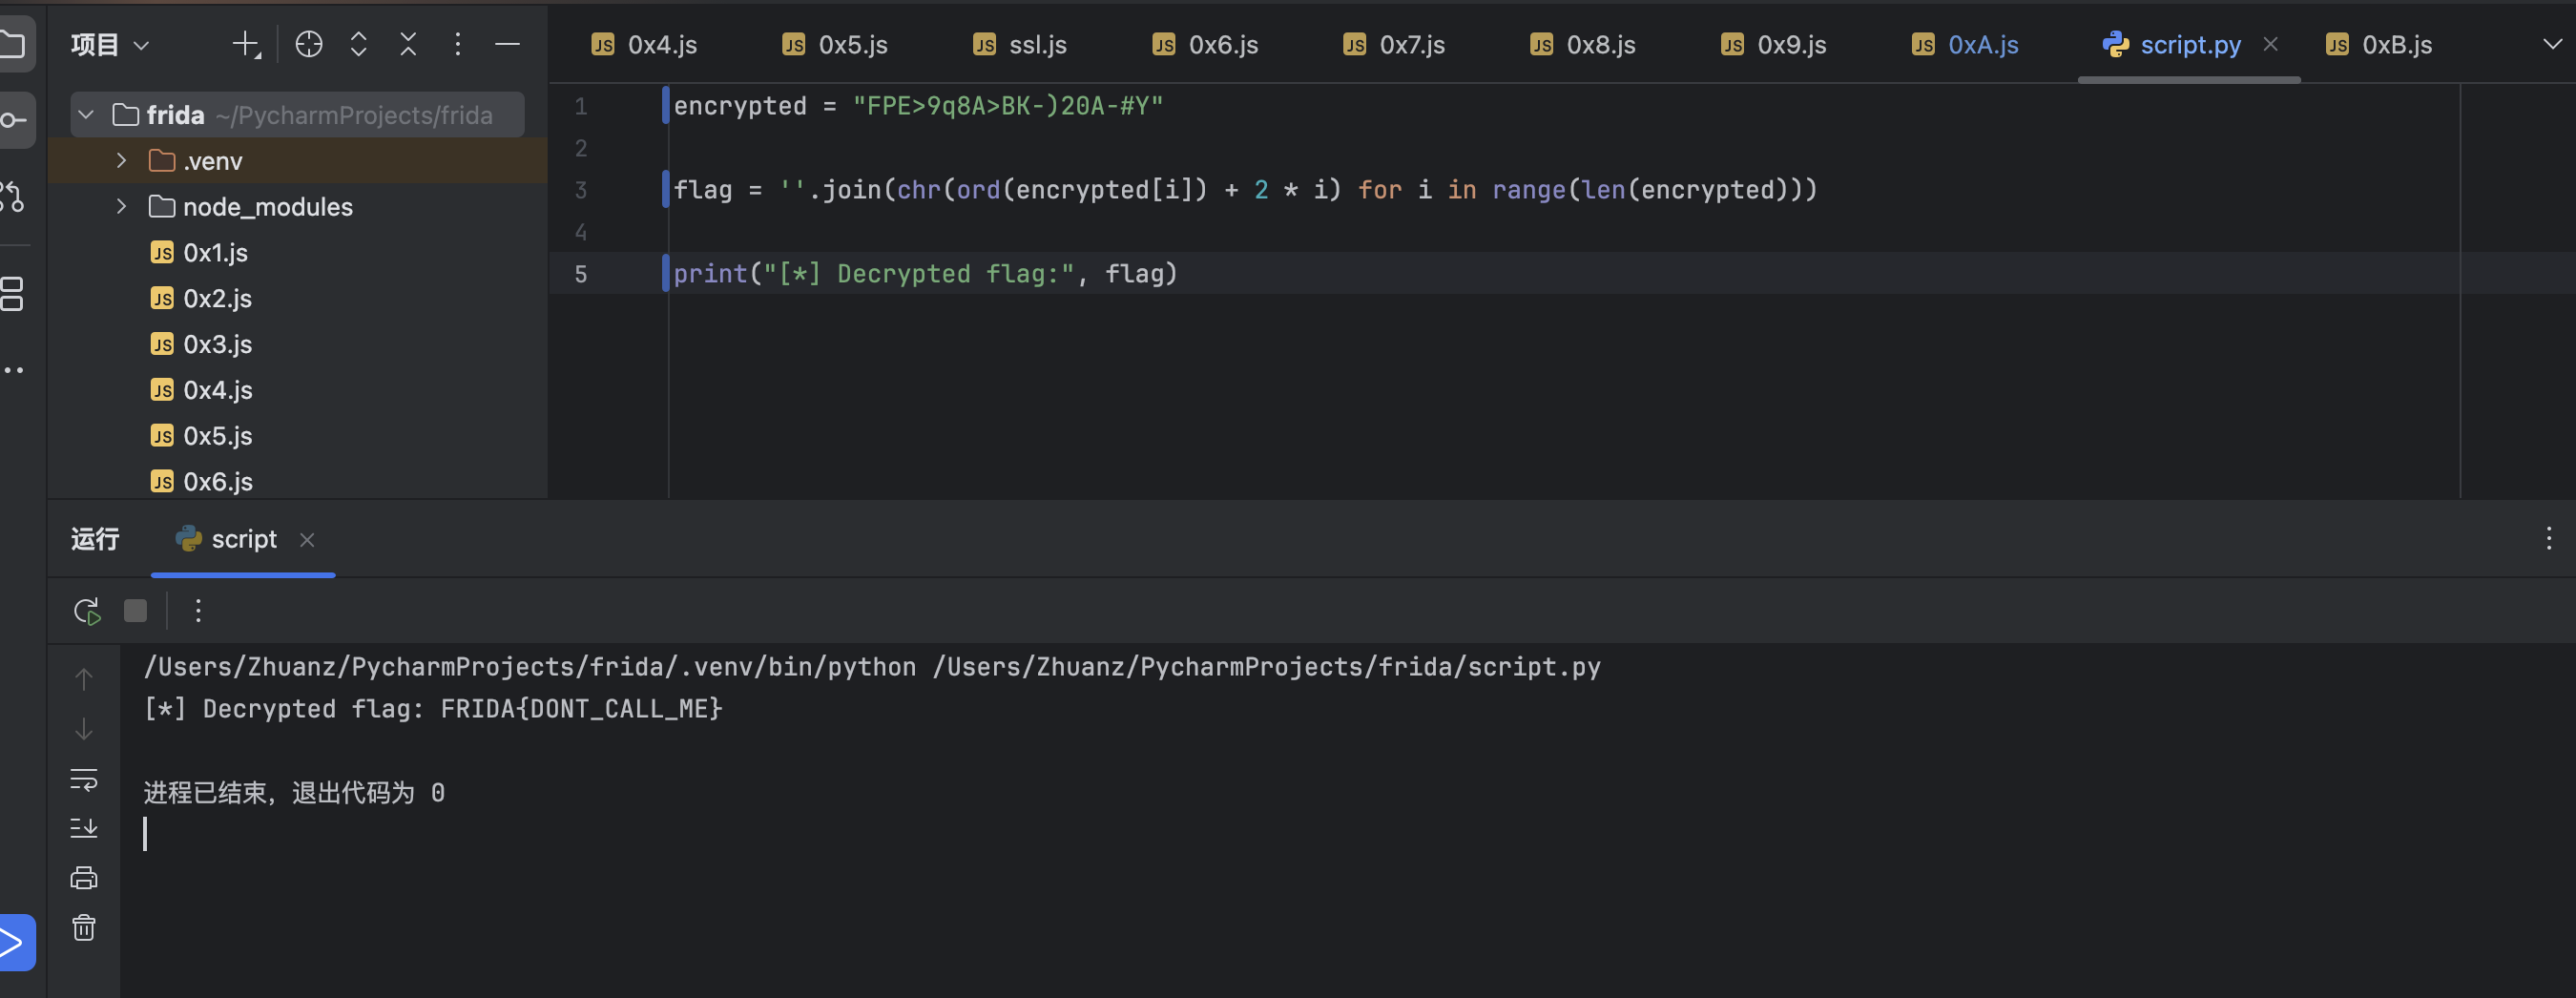
1 2 3 4 5
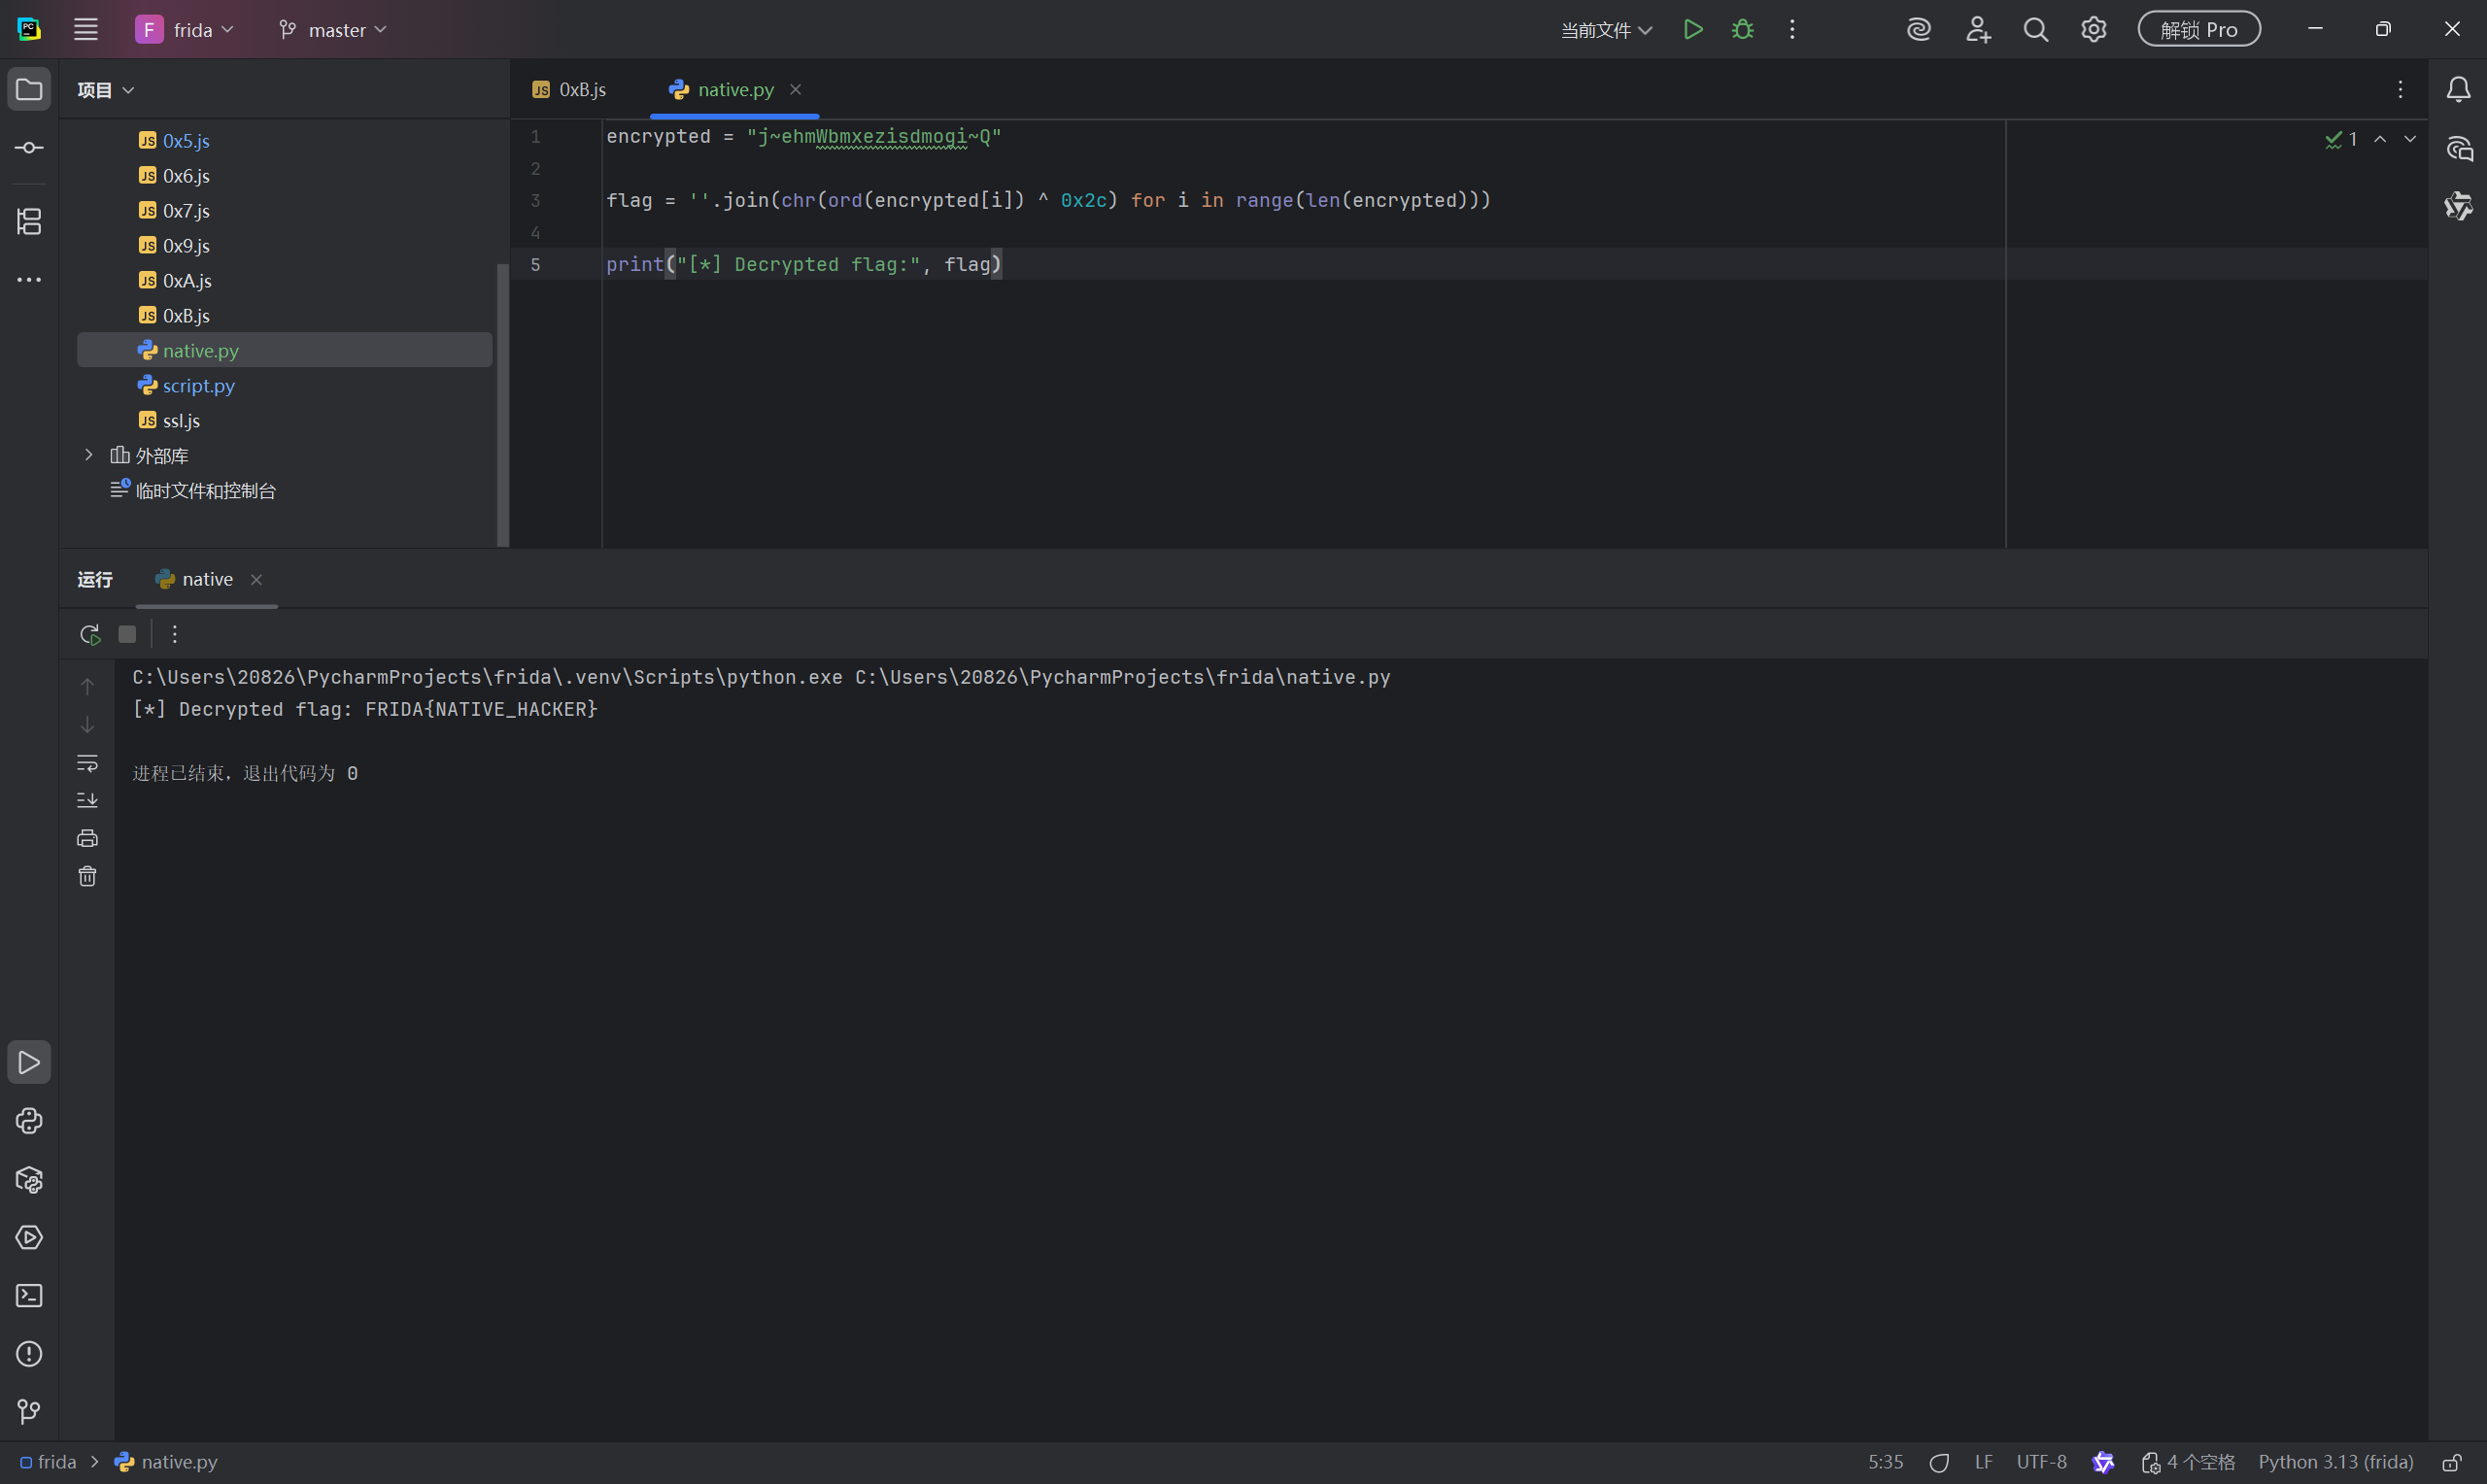
encrypted = "FPE>9q8A>BK-)20A-#Y"
flag = ''.join(chr(ord(encrypted[i]) + 2 * i) for i inrange(len(encrypted)))
print("[*] Decrypted flag:", flag)
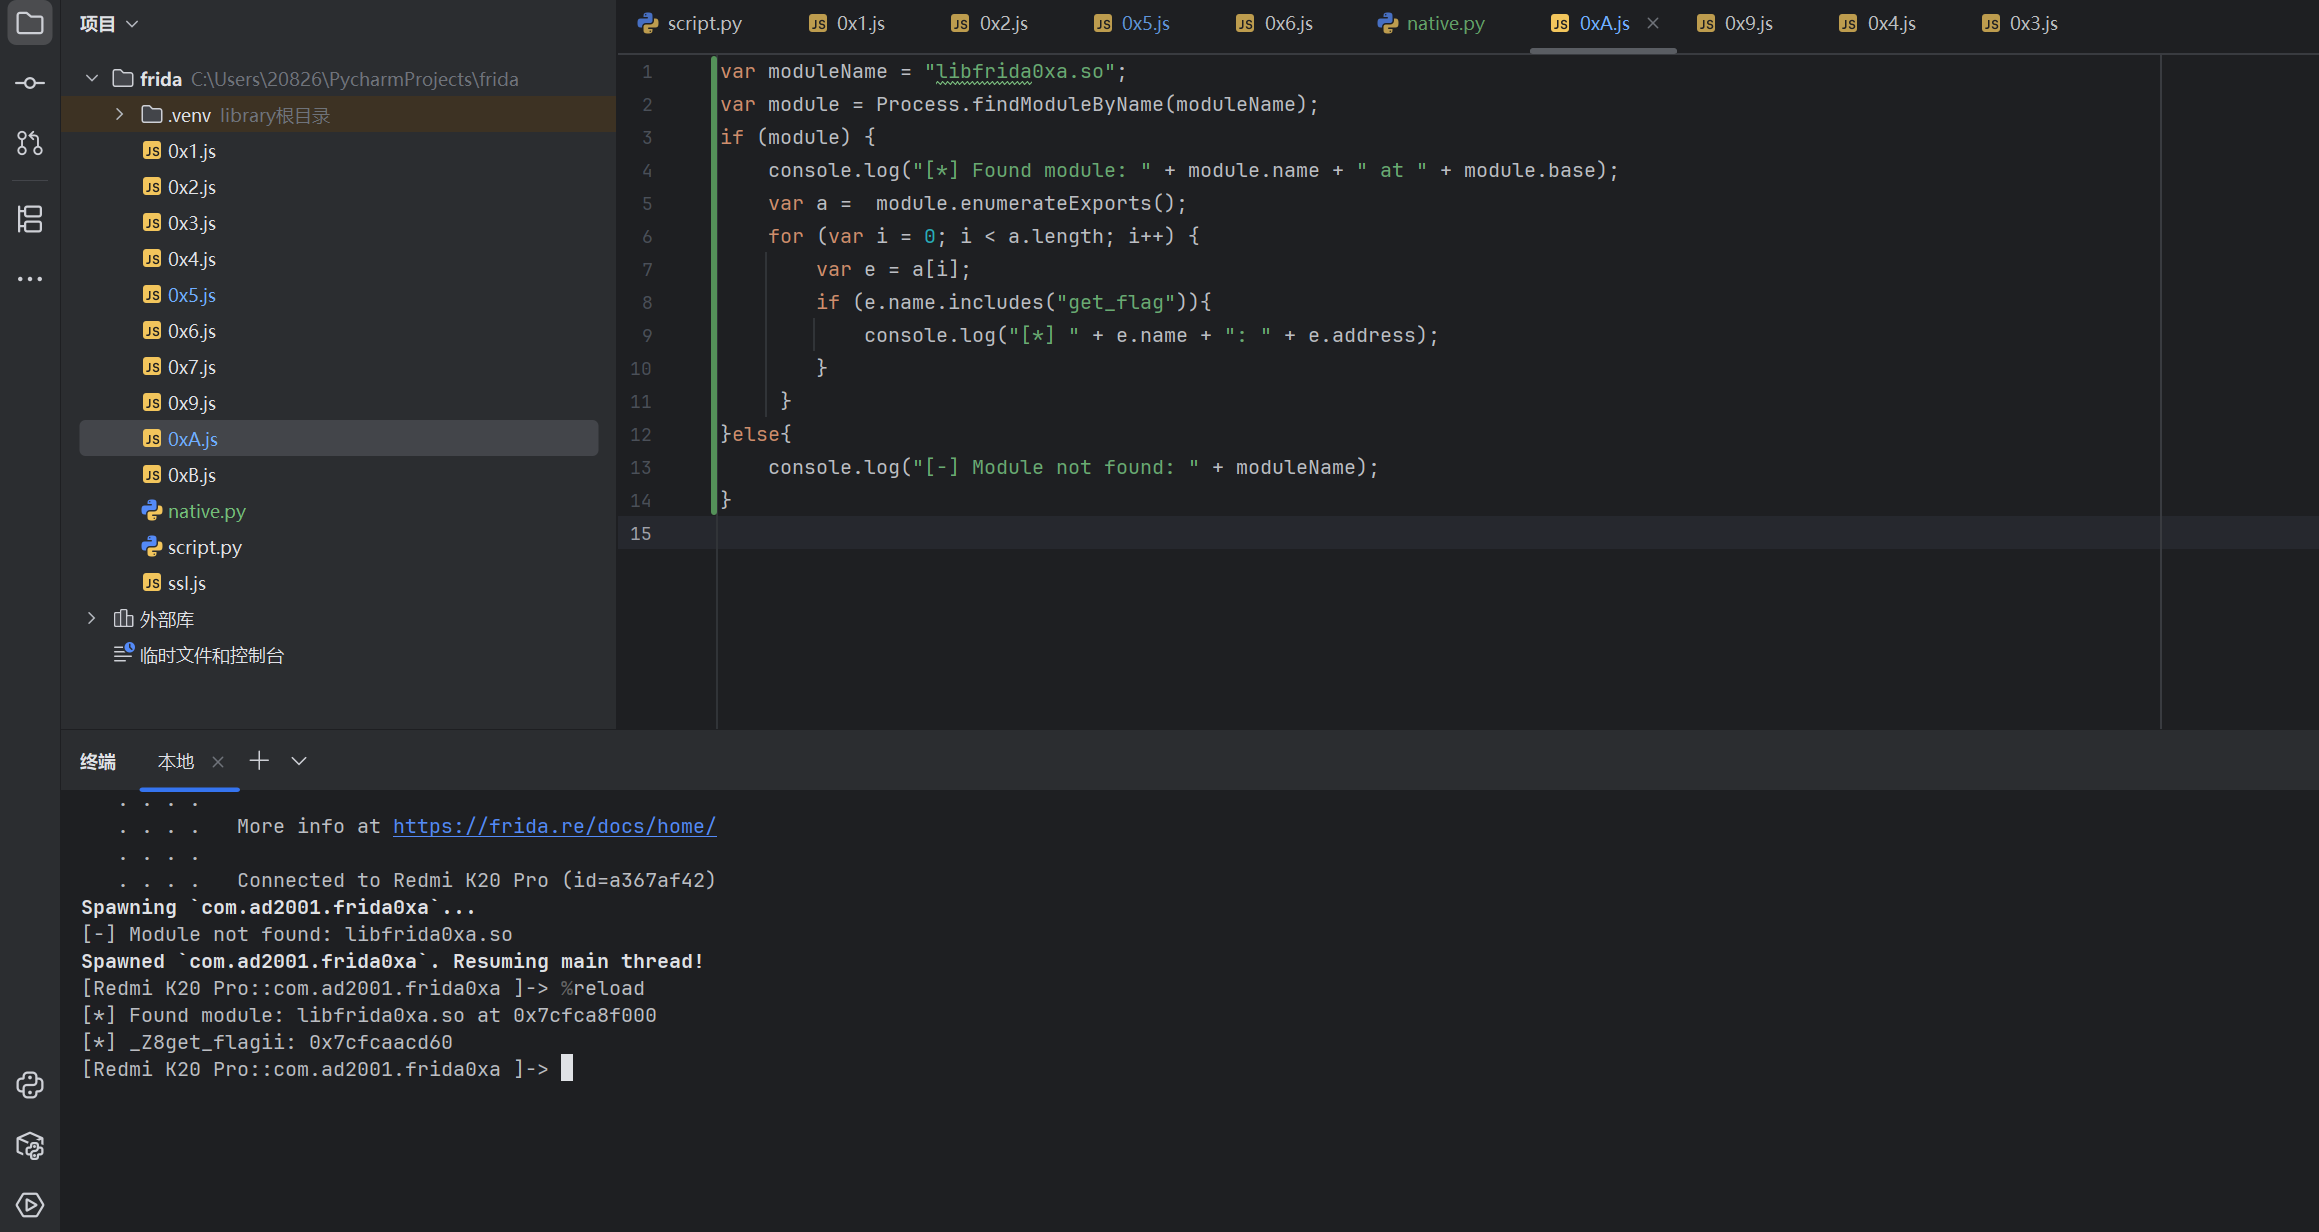
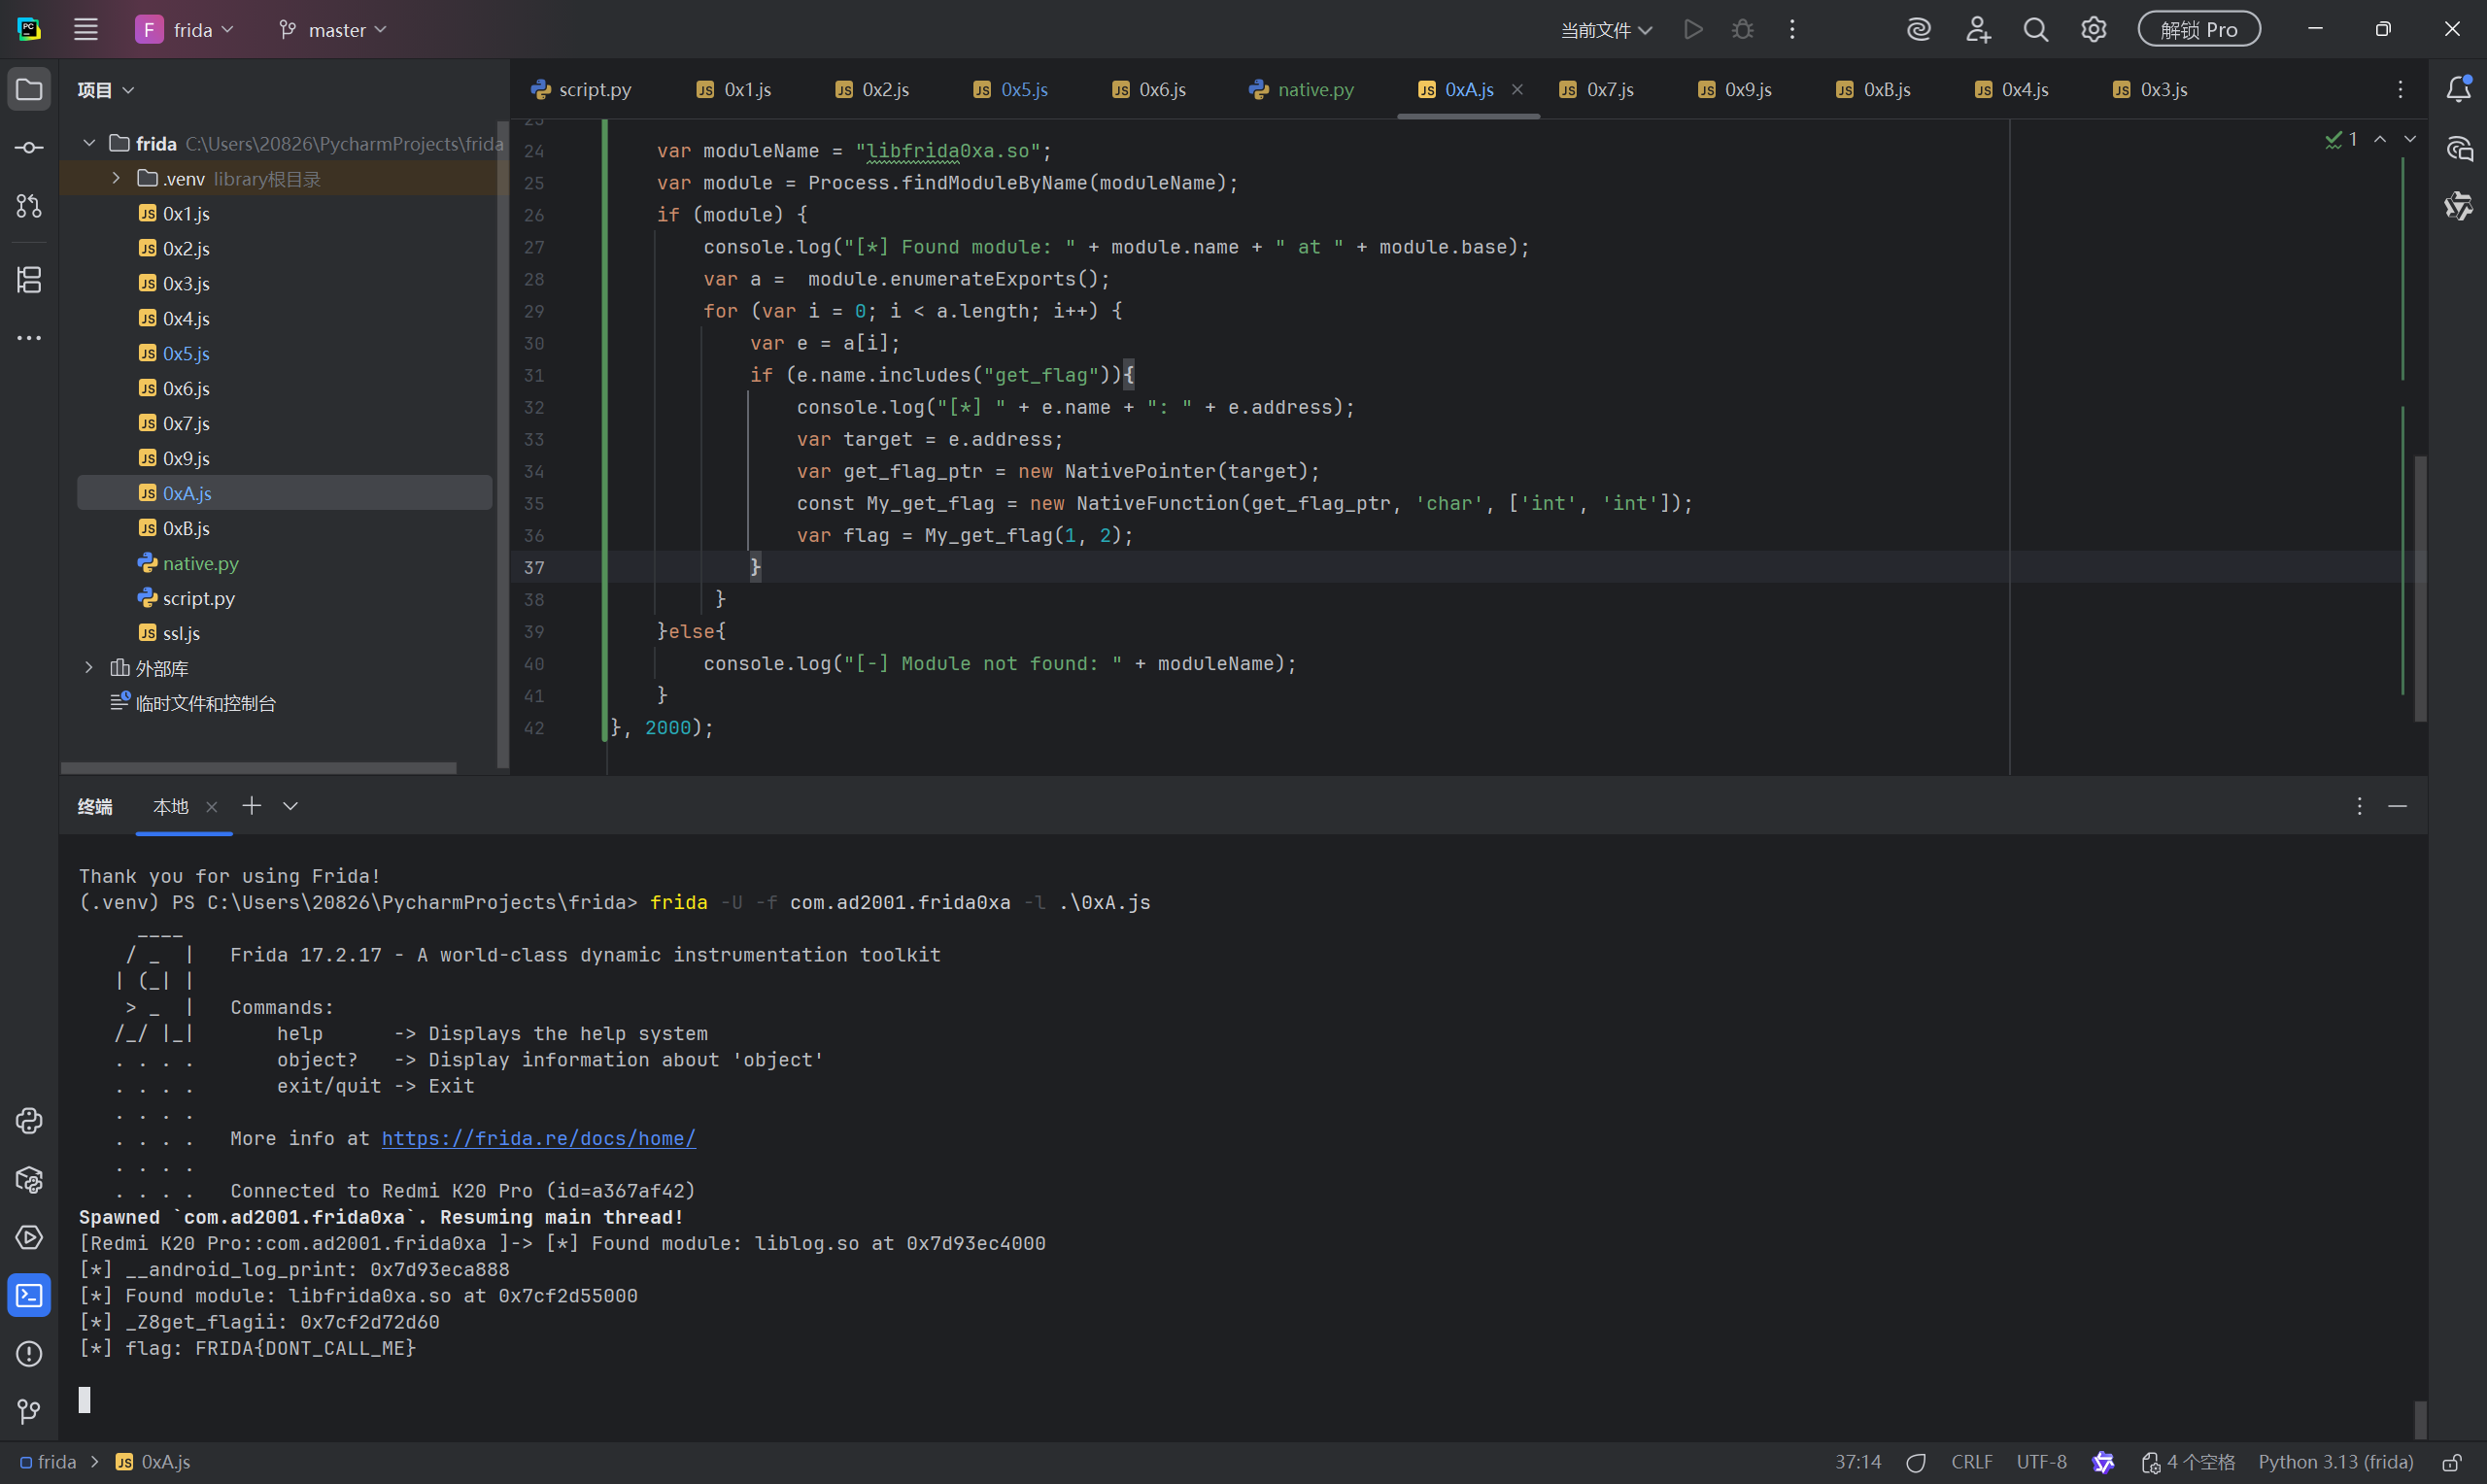
frida 也提供了可以主动调用 native 方法的 api
遍历导出表
1 2 3 4 5 6 7 8 9 10 11 12 13 14
var moduleName = "libfrida0xa.so"; varmodule = Process.findModuleByName(moduleName); if (module) { console.log("[*] Found module: " + module.name + " at " + module.base); var a = module.enumerateExports(); for (var i = 0; i < a.length; i++) { var e = a[i]; if (e.name.includes("get_flag")){ console.log("[*] " + e.name + ": " + e.address); } } }else{ console.log("[-] Module not found: " + moduleName); }
发现 get_flag 变成了 _Z8get_flagii,这是因为编译器需要为 C++ 中的所有函数,在符号表中生成唯一的标识符,来区分不同的函数,所以会重命名函数
var moduleName = "libfrida0xa.so"; varmodule = Process.findModuleByName(moduleName); if (module) { console.log("[*] Found module: " + module.name + " at " + module.base); var a = module.enumerateExports(); for (var i = 0; i < a.length; i++) { var e = a[i]; if (e.name.includes("get_flag")){ console.log("[*] " + e.name + ": " + e.address); var target = e.address; var get_flag_ptr = newNativePointer(target); constMy_get_flag = newNativeFunction(get_flag_ptr, 'char', ['int', 'int']); var flag = My_get_flag(1, 2); console.log(flag);
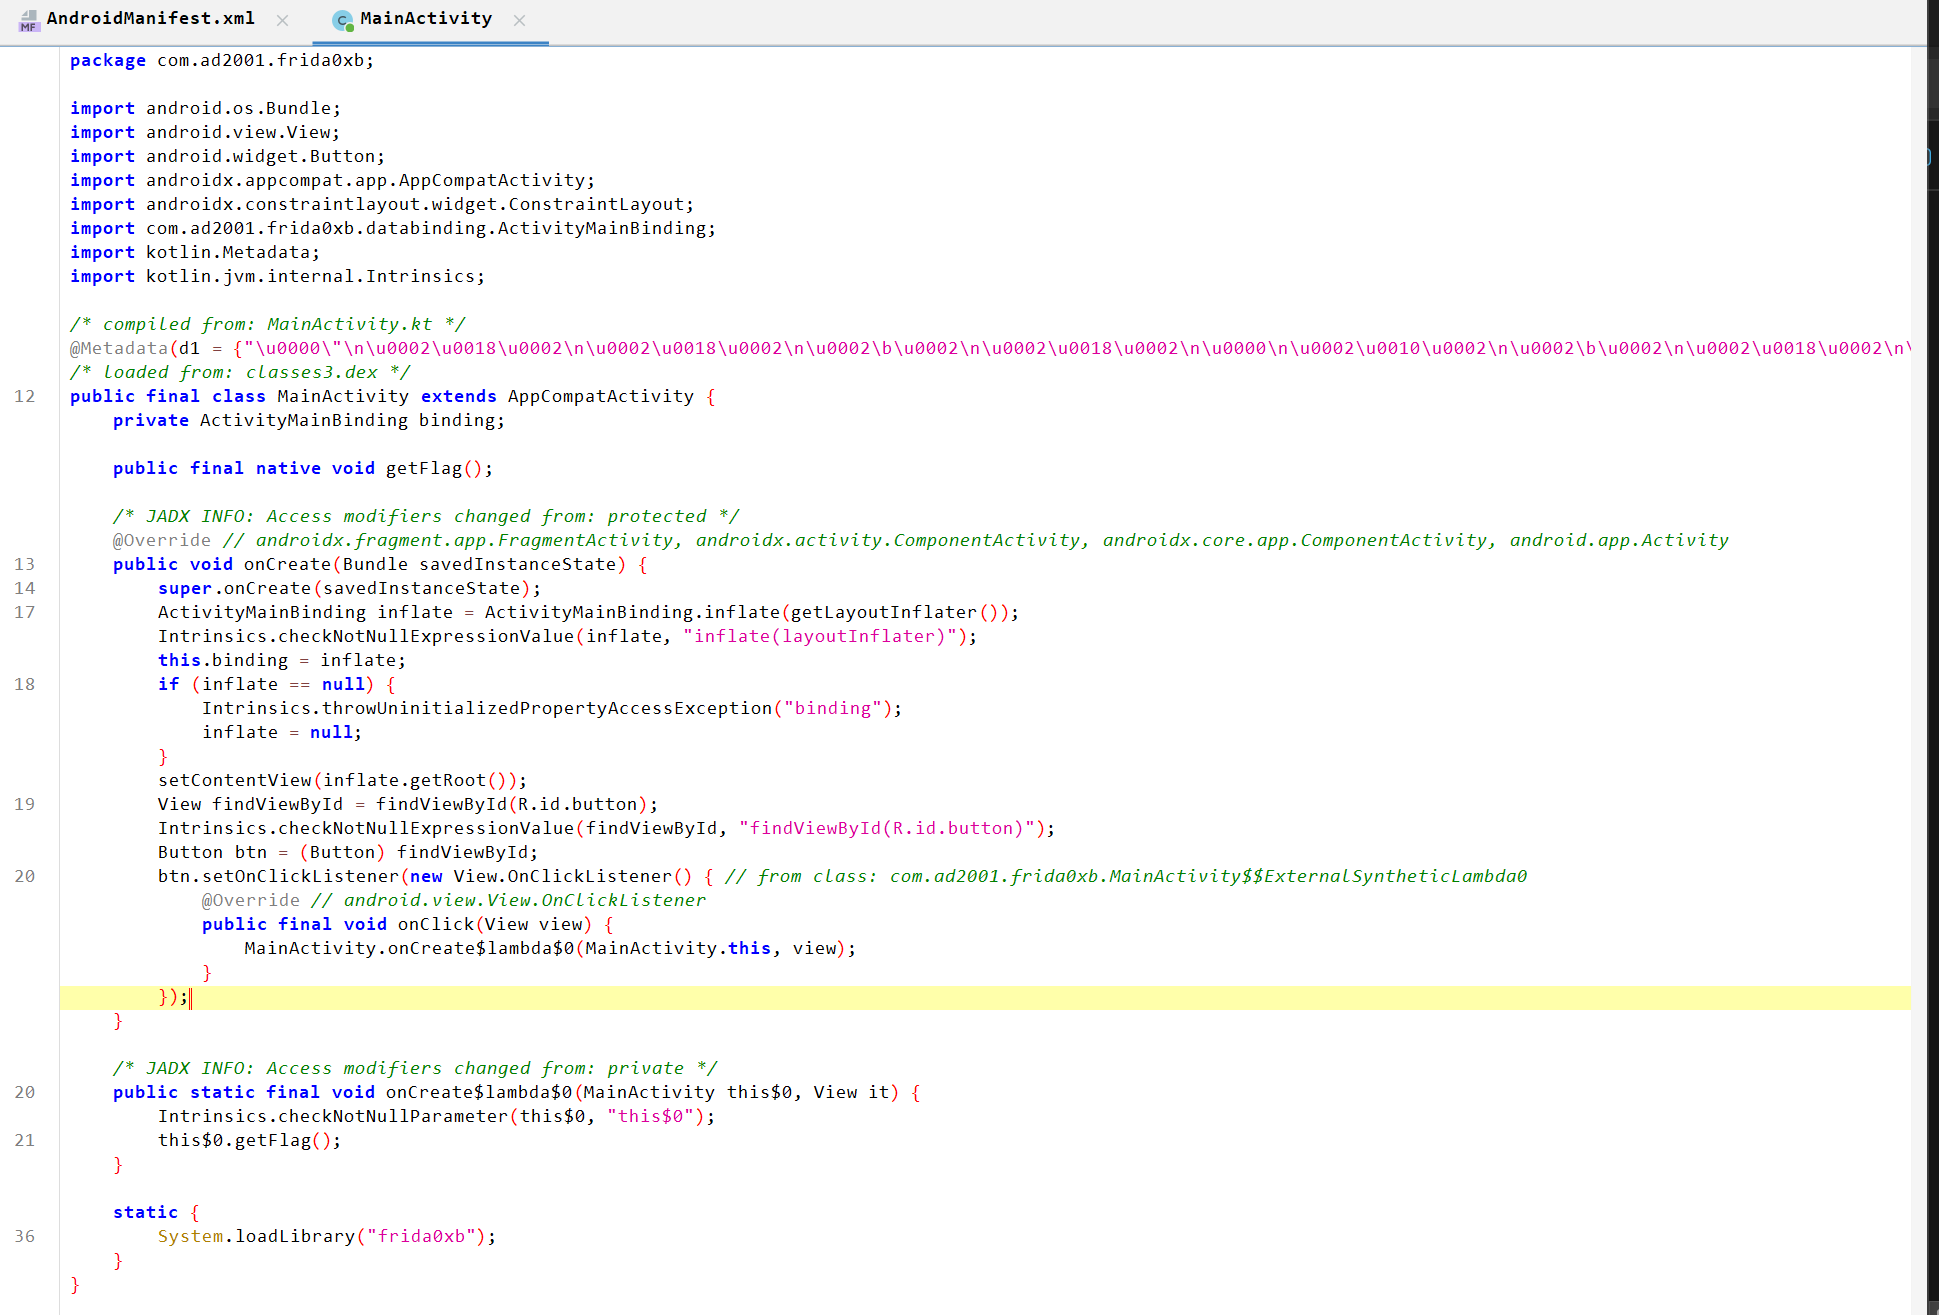
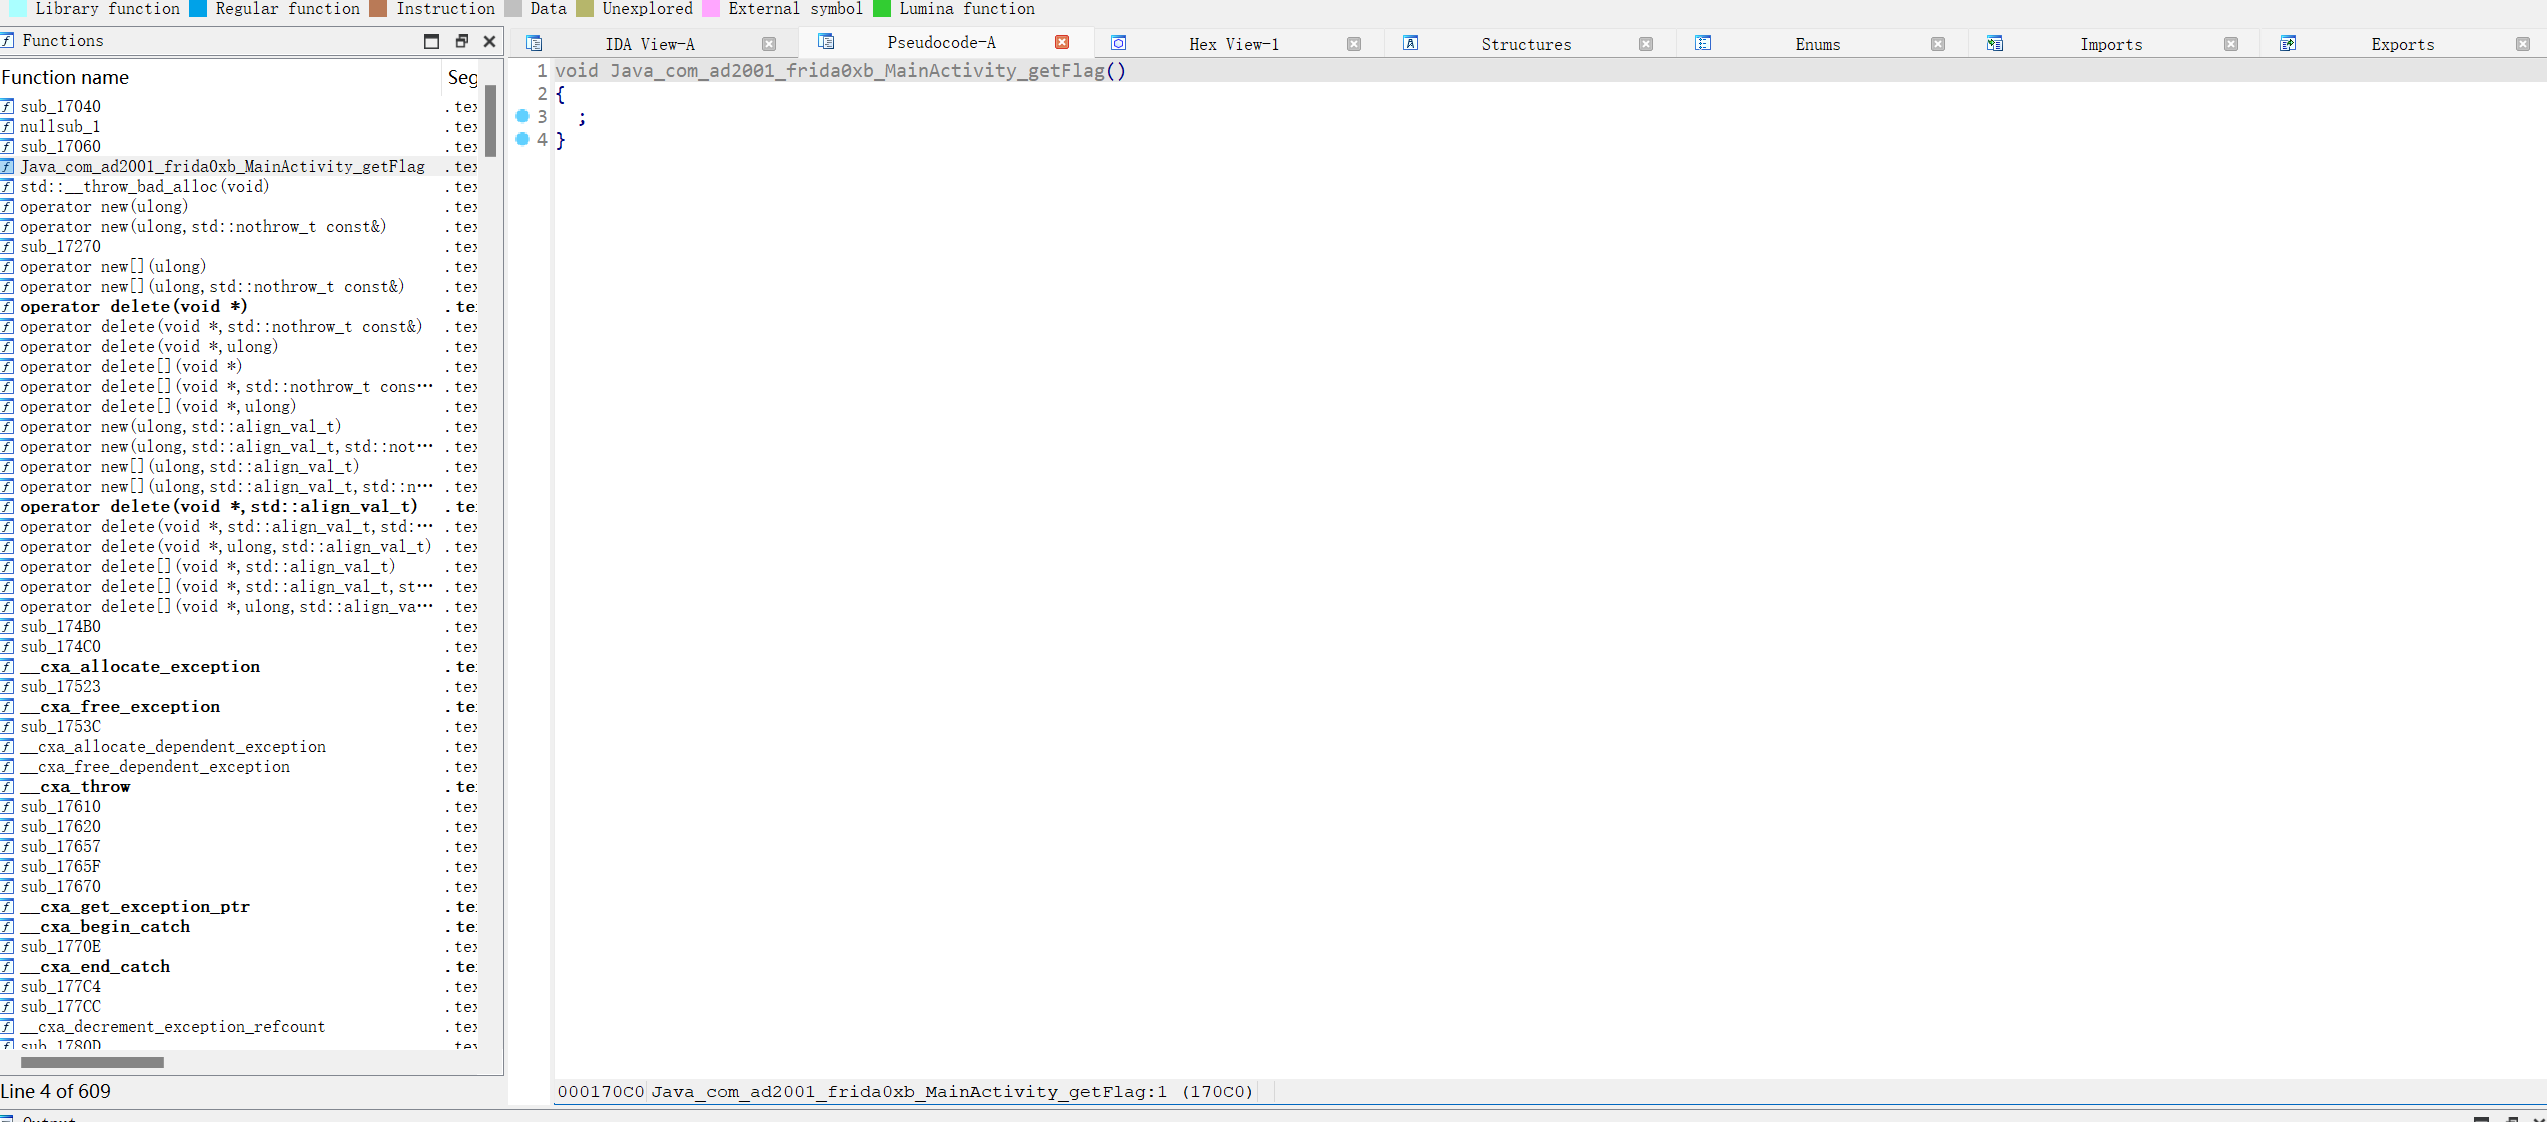
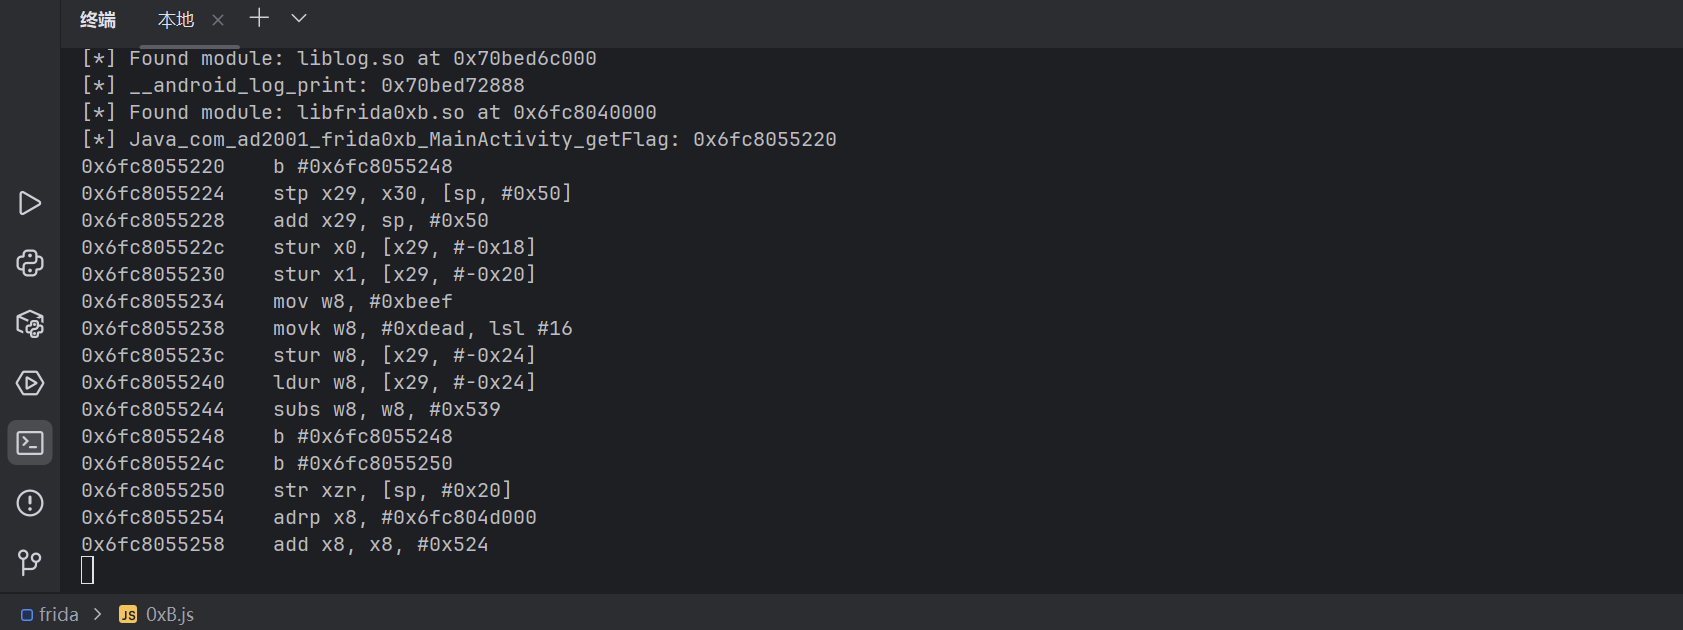
var moduleName = "libfrida0xb.so"; varmodule = Process.findModuleByName(moduleName); if (module) { console.log("[*] Found module: " + module.name + " at " + module.base); var a = module.enumerateExports(); for (var i = 0; i < a.length; i++) { var e = a[i]; if (e.name.includes("getFlag")){ console.log("[*] " + e.name + ": " + e.address);
var be = e.address.add(0x28); var currentAddr = e.address;
for (let i = 0; i < 15; i++) { const instr = Instruction.parse(currentAddr); if (!instr) { console.log(`[!] 无法解析地址: ${currentAddr}`); break; } console.log(`${instr.address}${instr.toString()}`); currentAddr = instr.next; } } } }
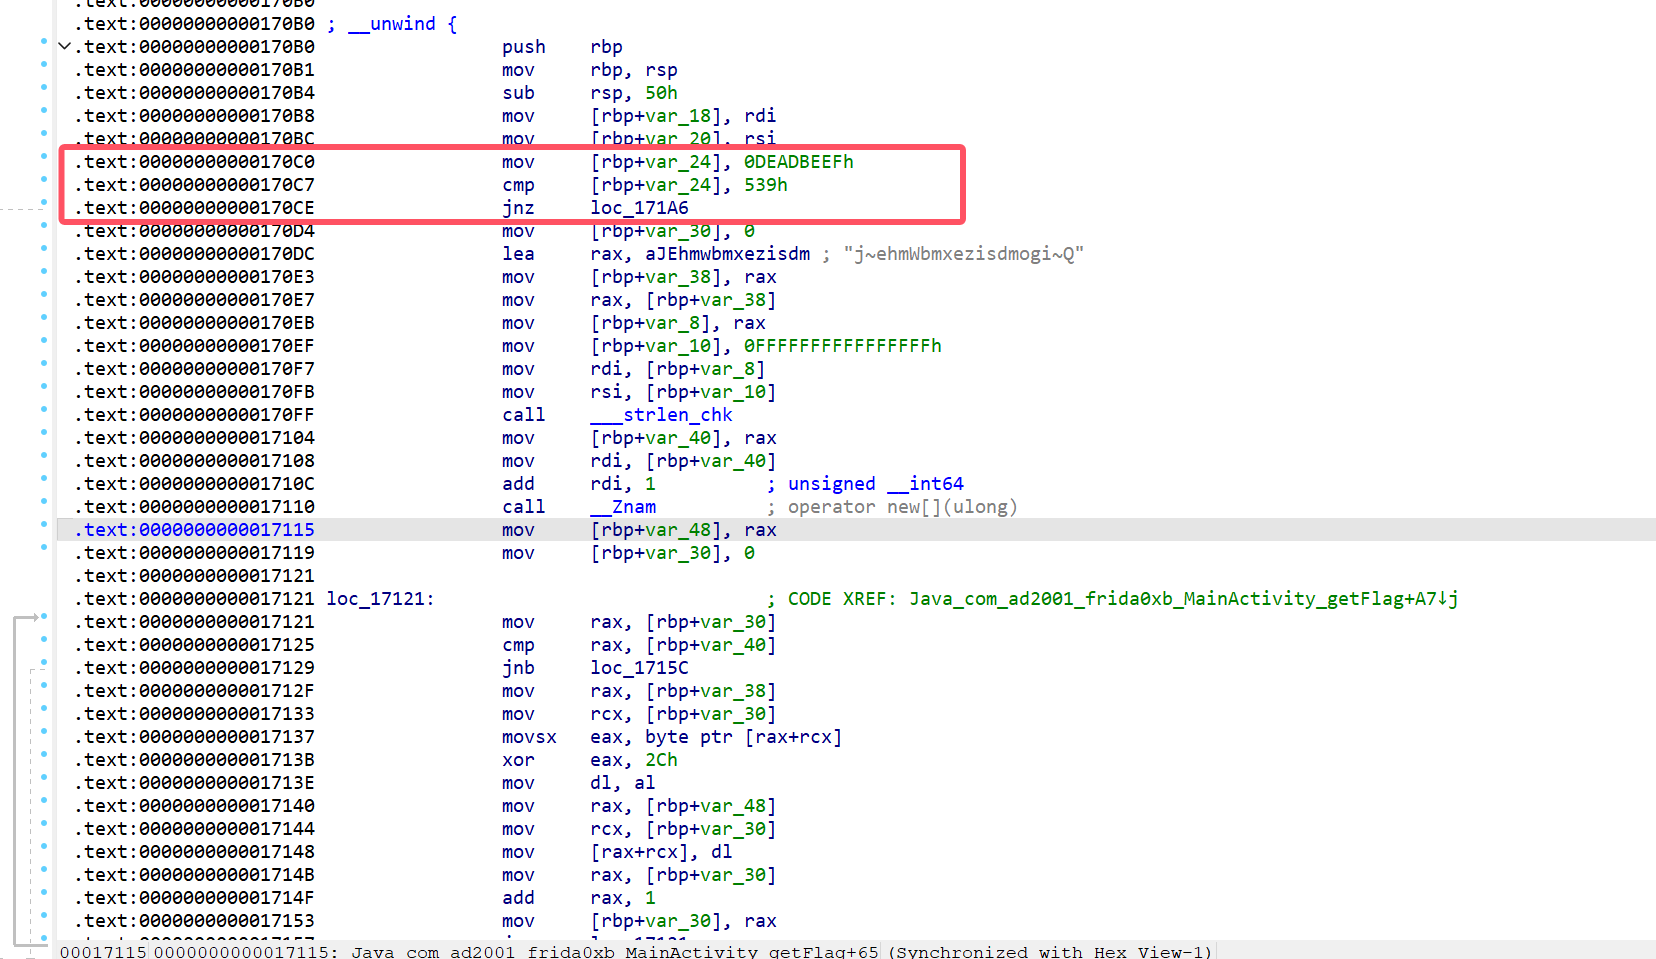
可以看到偏移 0x28 后的指令是 b #0x6fc8055248,但根据 ida 反编译的汇编以及上下文来看,BE 跳转指令确实在这个地址上
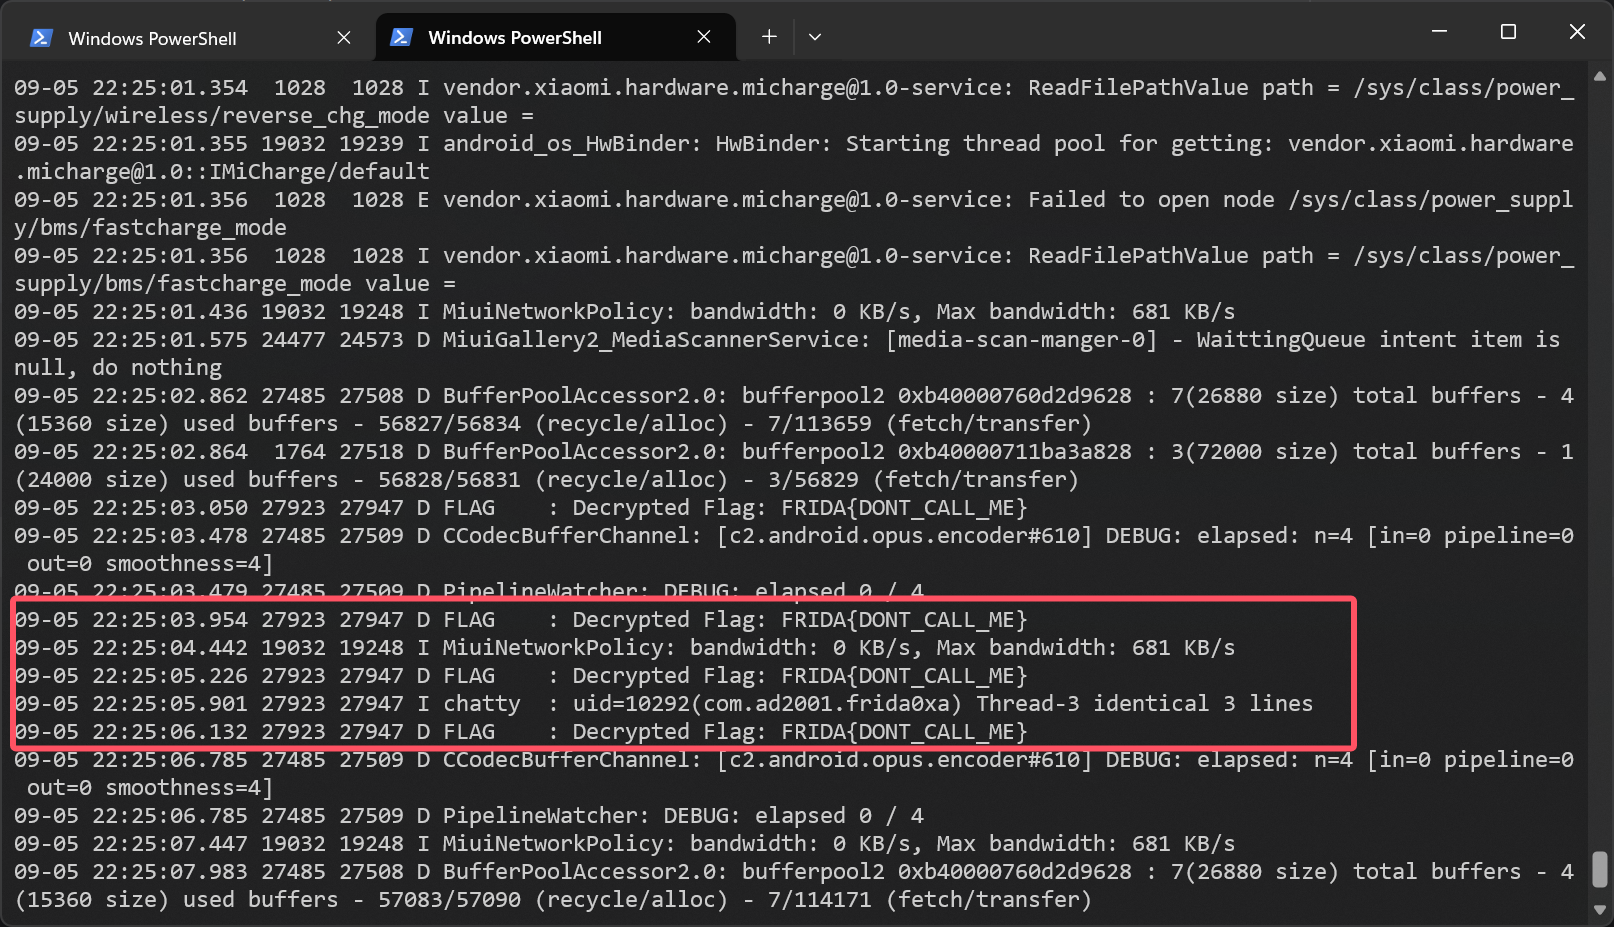
setTimeout(function() { var loglib = "liblog.so"; var log = Process.findModuleByName(loglib); if (log) { console.log("[*] Found module: " + log.name + " at " + log.base); var a = log.enumerateExports(); for (var i = 0; i < a.length; i++) { var e = a[i]; if (e.name.includes("__android_log_print")){ console.log("[*] " + e.name + ": " + e.address); var logPrint = e.address; Interceptor.attach(logPrint, { onEnter: function(args) { var flagPtr = args[3]; var flagValue = flagPtr.readCString(); console.log("[*] flag: " + flagValue + "\n"); } });
} } }
var moduleName = "libfrida0xb.so"; varmodule = Process.findModuleByName(moduleName); if (module) { console.log("[*] Found module: " + module.name + " at " + module.base); var a = module.enumerateExports(); for (var i = 0; i < a.length; i++) { var e = a[i]; if (e.name.includes("getFlag")){ console.log("[*] " + e.name + ": " + e.address);
var be = e.address.add(0x28); var target = be.add(0x4); var currentAddr = e.address;
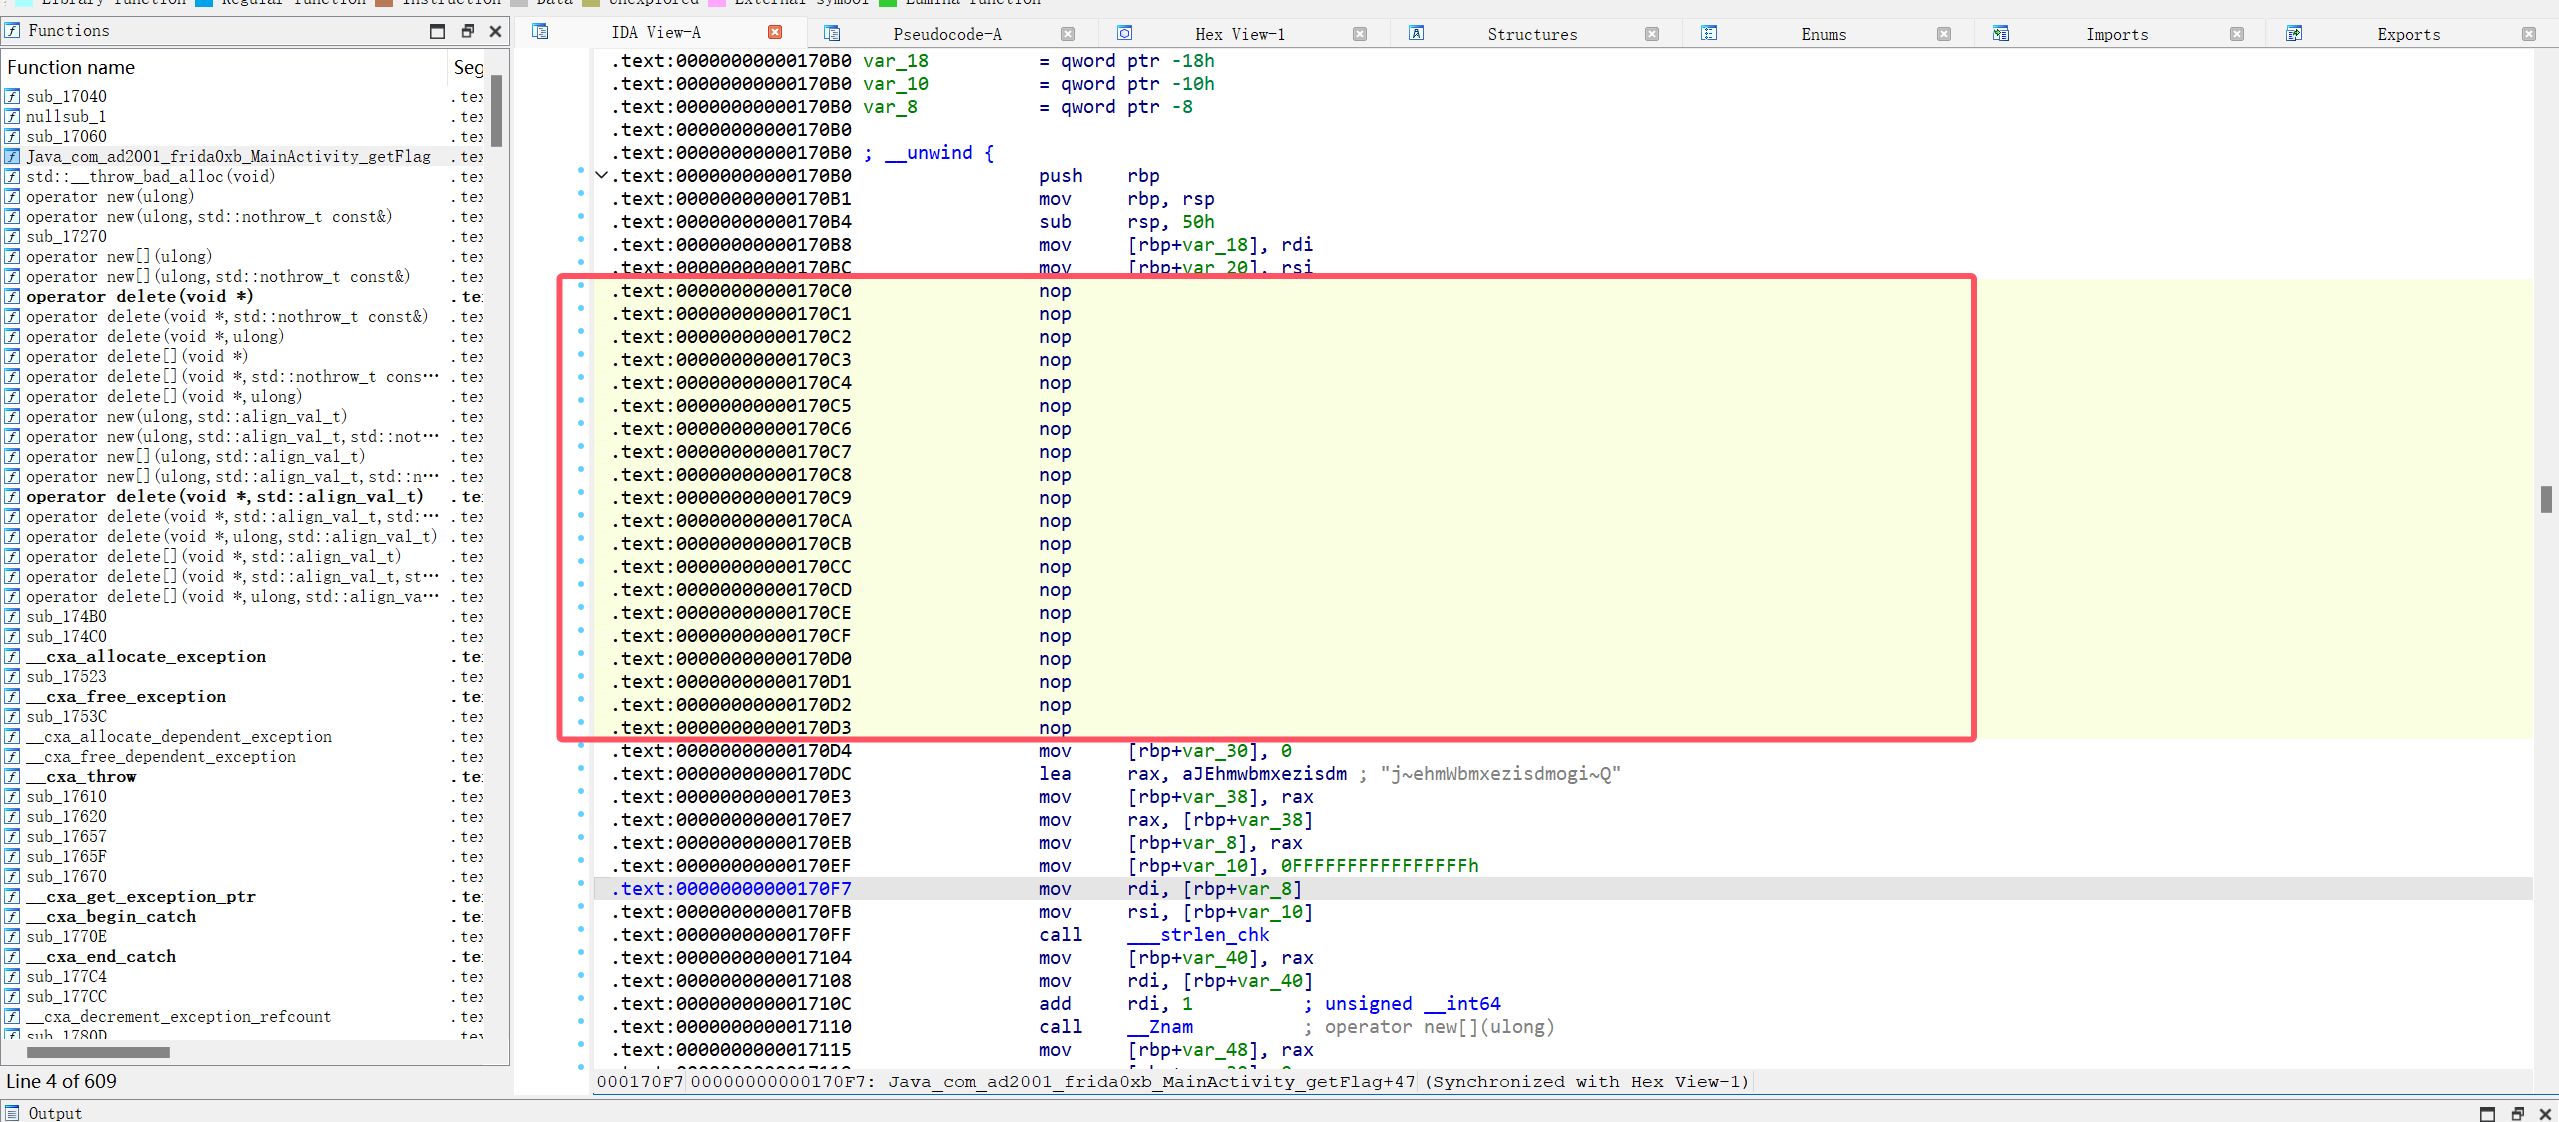
for (let i = 0; i < 15; i++) { const instr = Instruction.parse(currentAddr); if (!instr) { console.log(`[!] 无法解析地址: ${currentAddr}`); break; } console.log(`${instr.address}${instr.toString()}`); currentAddr = instr.next; } Memory.protect(be, 0x1000, "rwx"); var writer = newArm64Writer(be); try{
setTimeout(function() { var loglib = "liblog.so"; var log = Process.findModuleByName(loglib); if (log) { console.log("[*] Found module: " + log.name + " at " + log.base); var a = log.enumerateExports(); for (var i = 0; i < a.length; i++) { var e = a[i]; if (e.name.includes("__android_log_print")){ console.log("[*] " + e.name + ": " + e.address); var logPrint = e.address; Interceptor.attach(logPrint, { onEnter: function(args) { var flagPtr = args[3]; var flagValue = flagPtr.readCString(); console.log("[*] flag: " + flagValue + "\n"); } });
} } }
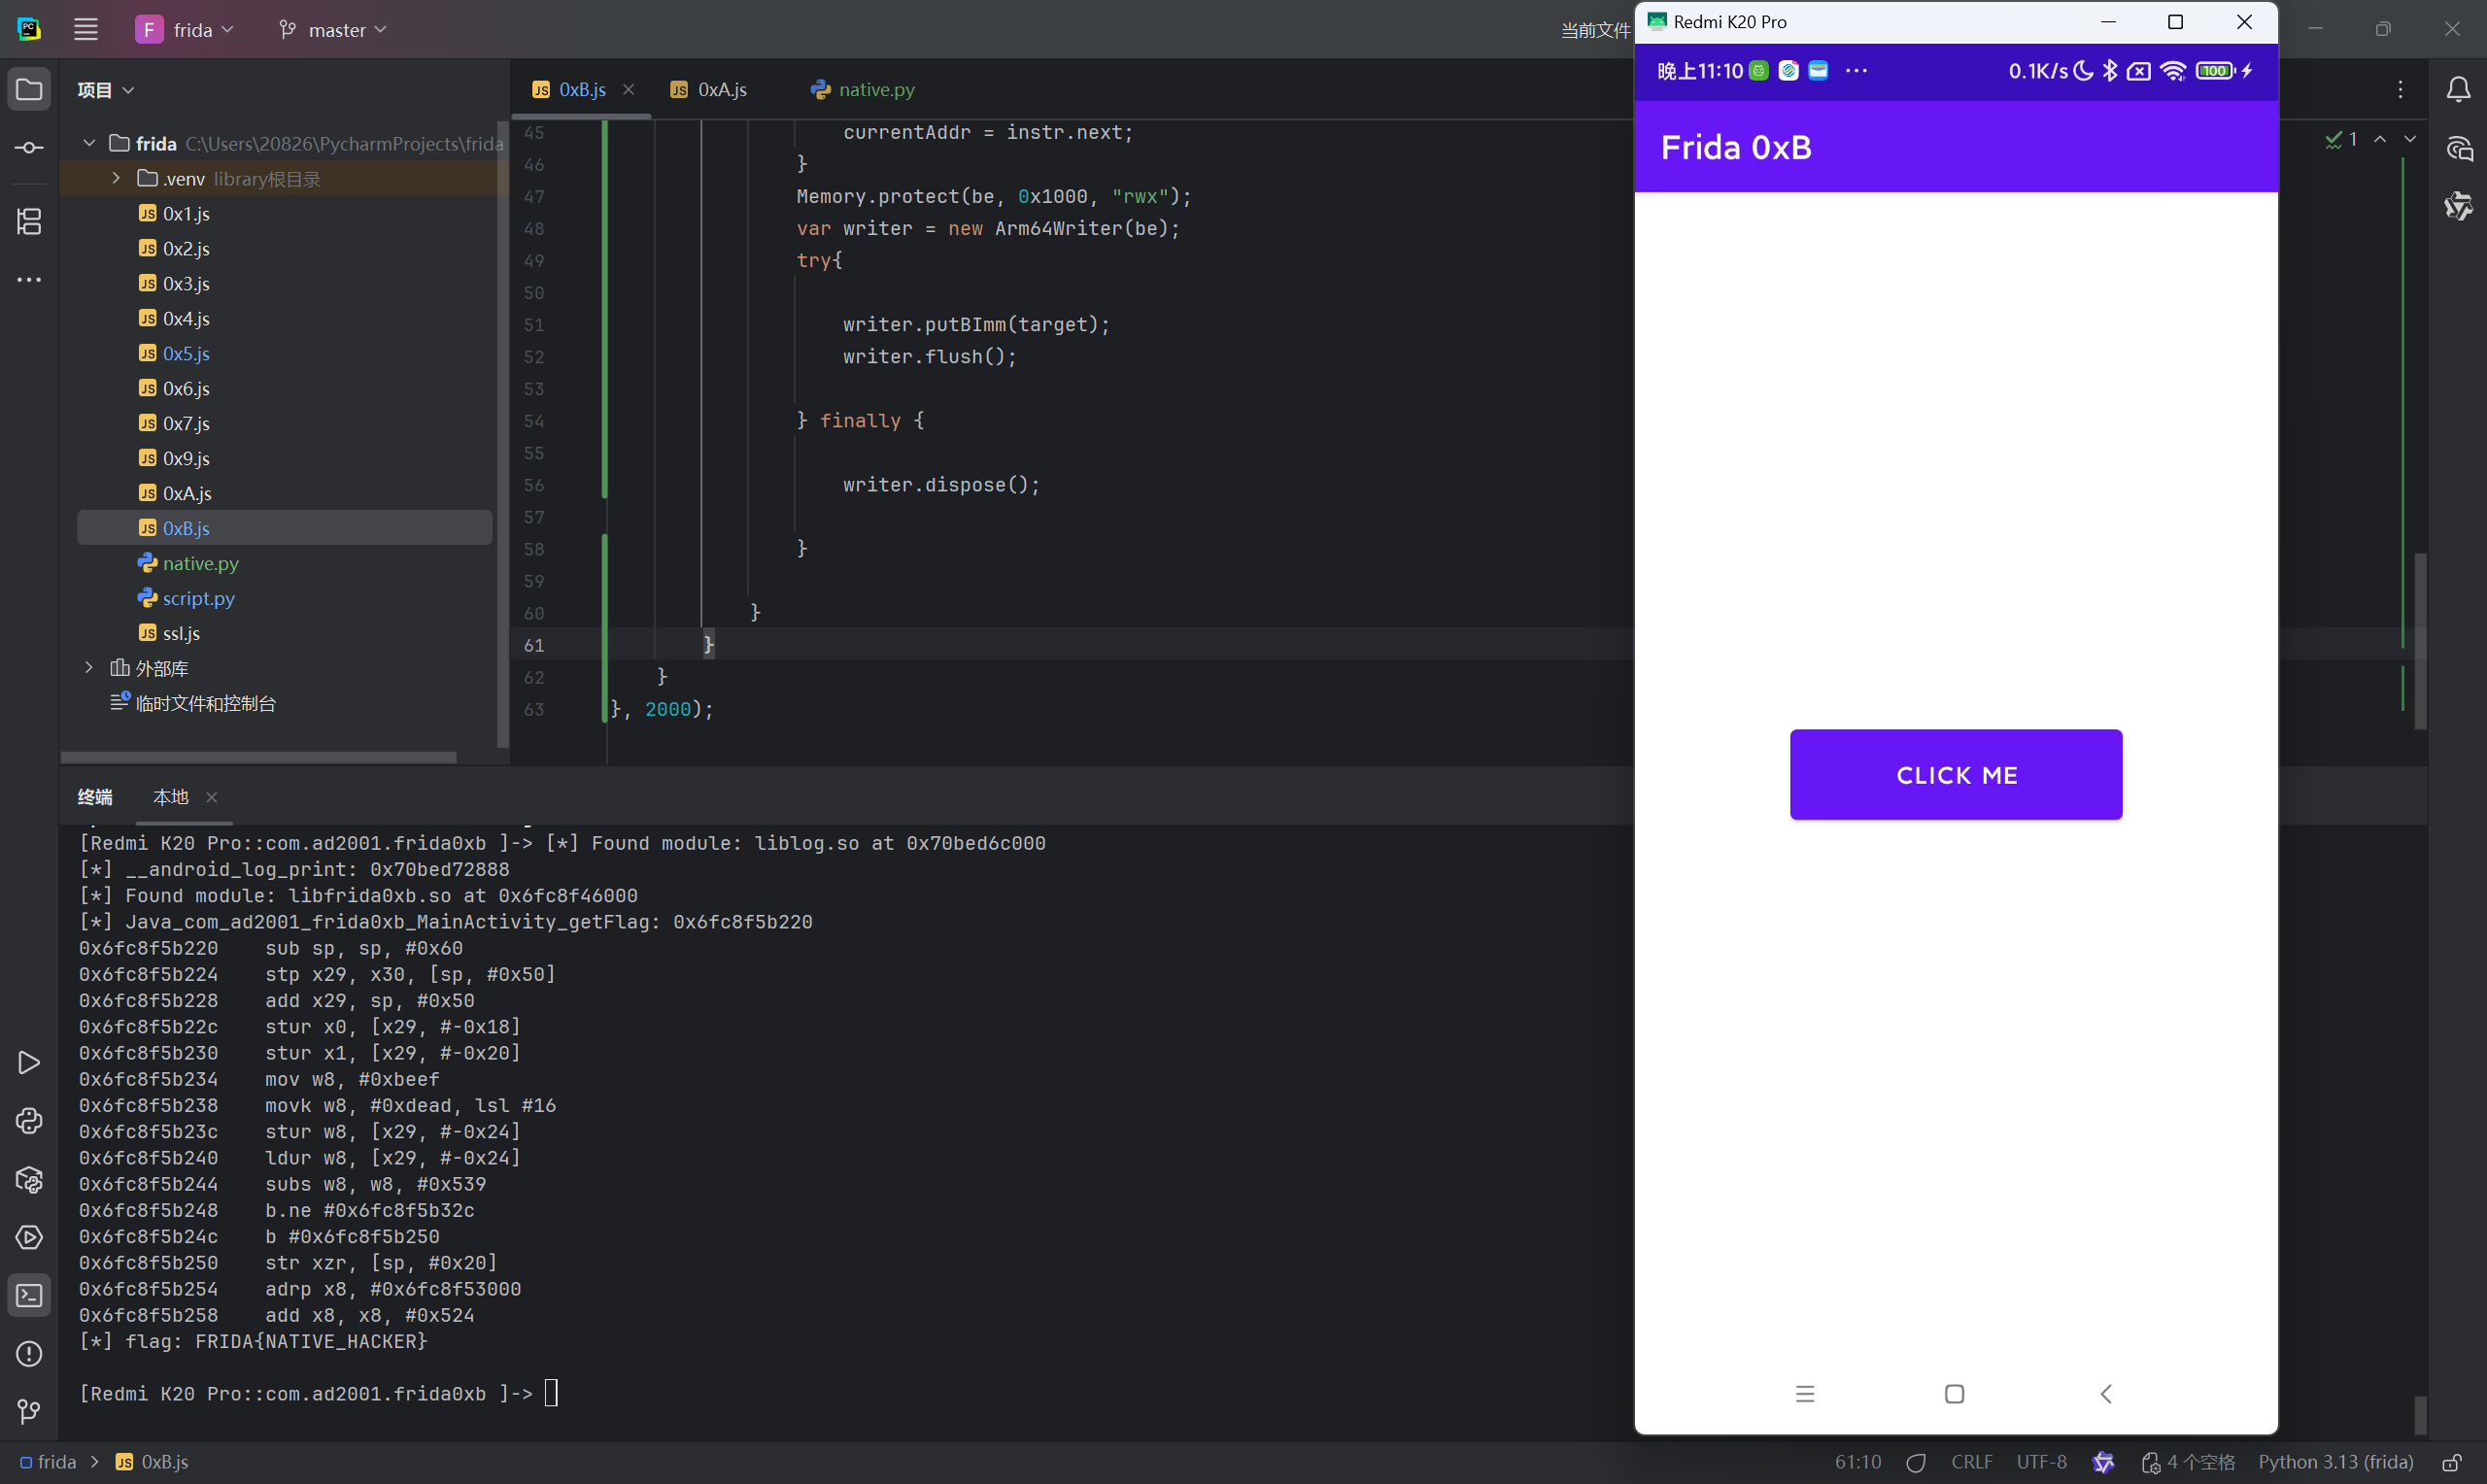
var moduleName = "libfrida0xb.so"; varmodule = Process.findModuleByName(moduleName); if (module) { console.log("[*] Found module: " + module.name + " at " + module.base); var a = module.enumerateExports(); for (var i = 0; i < a.length; i++) { var e = a[i]; if (e.name.includes("getFlag")){ console.log("[*] " + e.name + ": " + e.address);
var be = e.address.add(0x28); var target = be.add(0x4); var currentAddr = e.address;
for (let i = 0; i < 15; i++) { const instr = Instruction.parse(currentAddr); if (!instr) { console.log(`[!] 无法解析地址: ${currentAddr}`); break; } console.log(`${instr.address}${instr.toString()}`); currentAddr = instr.next; } Memory.protect(be, 0x1000, "rwx"); var writer = newArm64Writer(be); try{
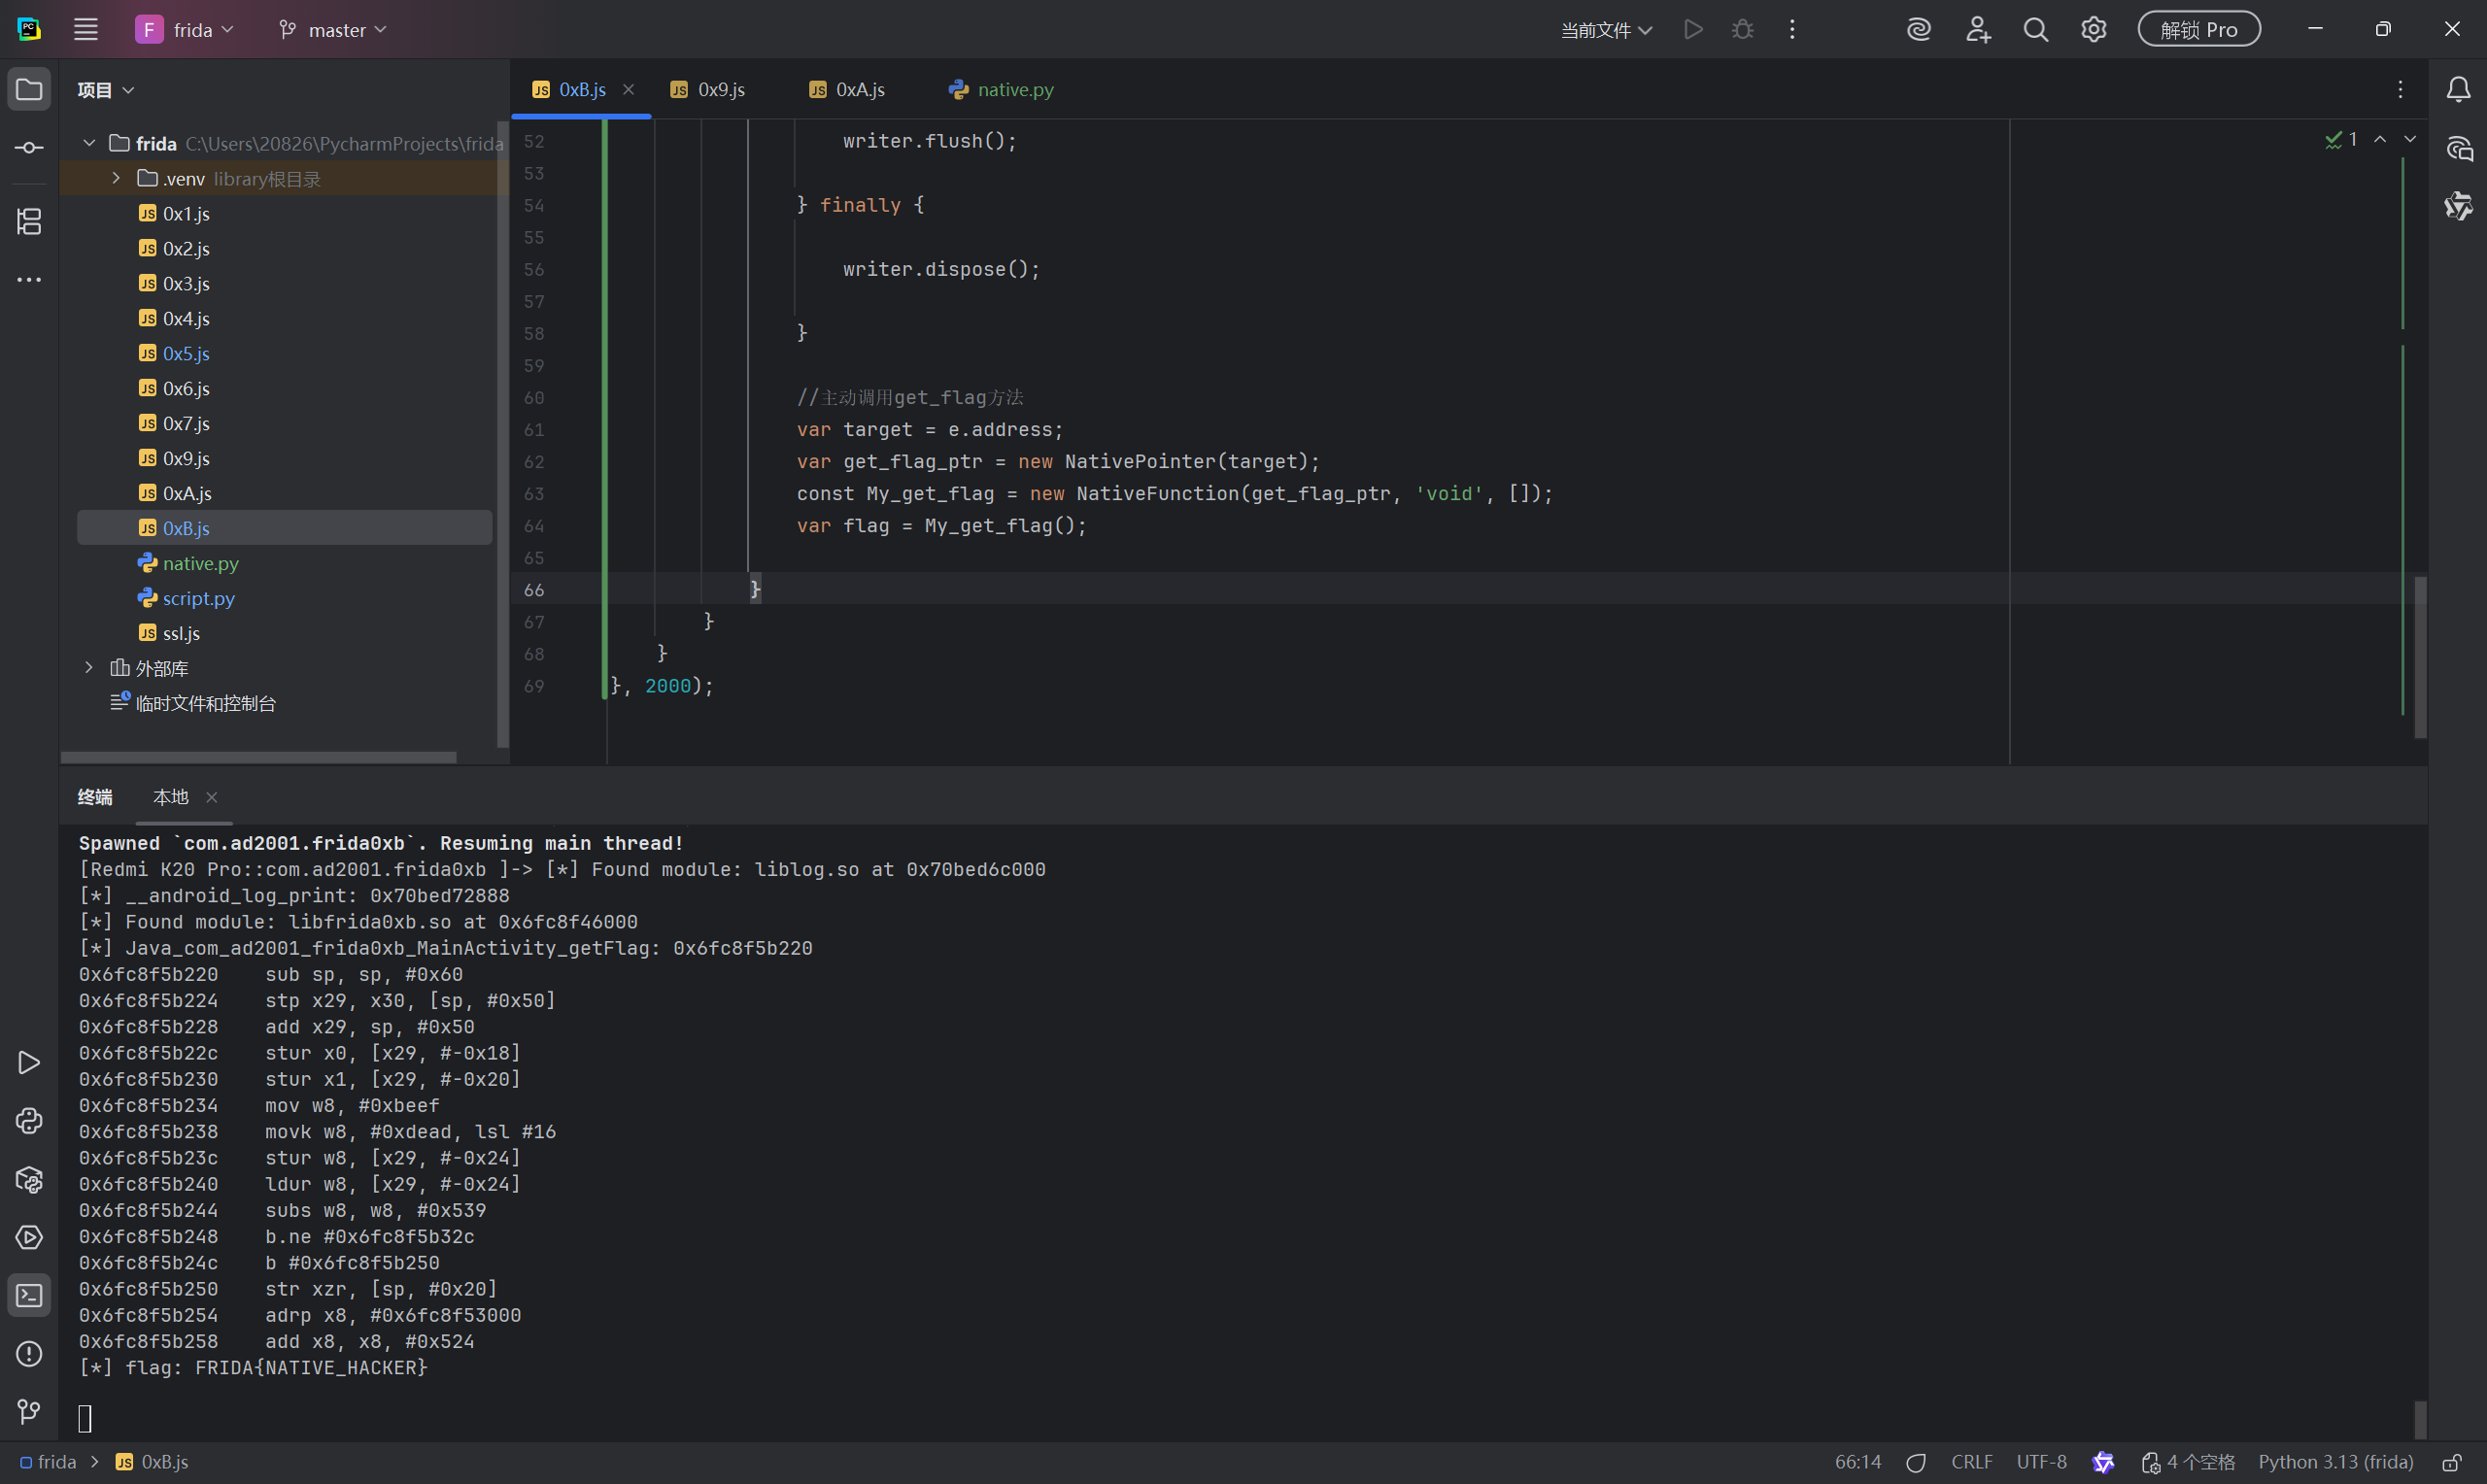
writer.putBImm(target); writer.flush();
} finally {
writer.dispose();
}
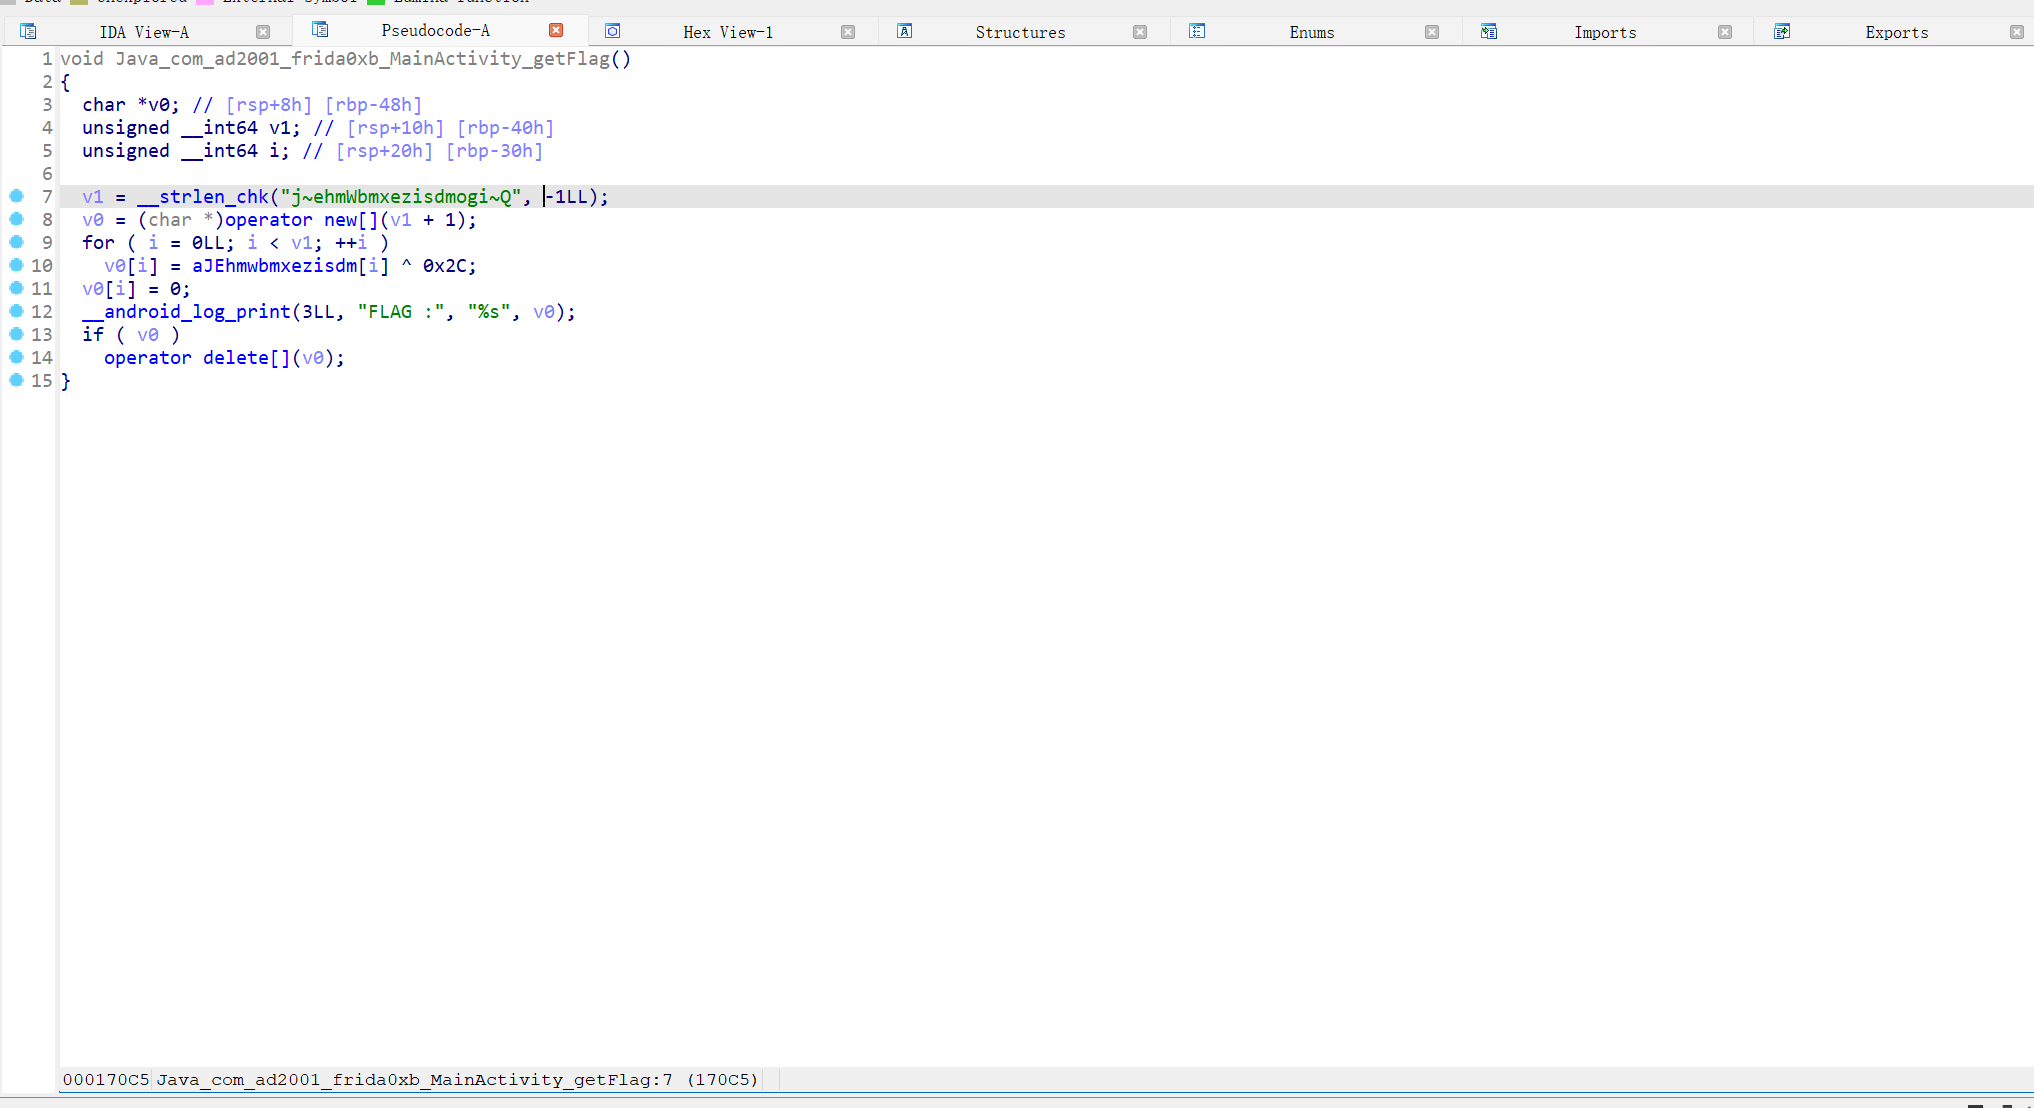
//主动调用get_flag方法 var target = e.address; var get_flag_ptr = newNativePointer(target); constMy_get_flag = newNativeFunction(get_flag_ptr, 'void', []); var flag = My_get_flag();